


The resources used in applications sometimes fall short during times of peak demand. The HorizontalPodAutoscaler (HPA) in Kubernetes responds to such demands by deploying more pods.
In an orchestration scenario, and especially in Kubernetes, we often come across a situation where the resources assigned to a pod get utilised fully due to the peak demand for an application. Online shopping during Christmas or Diwali, or many people accessing music applications while going on a holiday over weekends, are examples of such situations.
| A ‘pod’ is the smallest and simplest unit in the cluster that can be created, deployed, and managed. It represents a single instance of a running process within a cluster, and is used as the basic building block for deploying containerised applications.
A pod is a logical host for one or more containers. It is used to encapsulate one or more containers that are deployed together on the same host and share the same network name space. This means they can communicate with each other using local host. Containers within a pod can also share the same storage volumes, which allows them to access and modify the same files. |
In such situations, it’s highly important to manage autoscaling of our application. There are two types of scaling in Kubernetes.
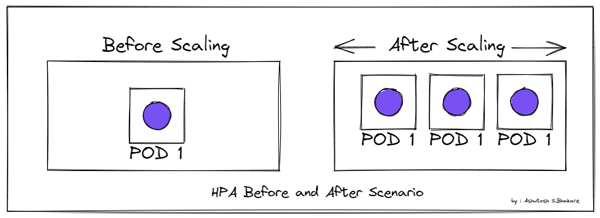
1 Horizontal scaling: HPA (HorizontalPodAutoscaler) basically works by adding more pods (Figure 1).
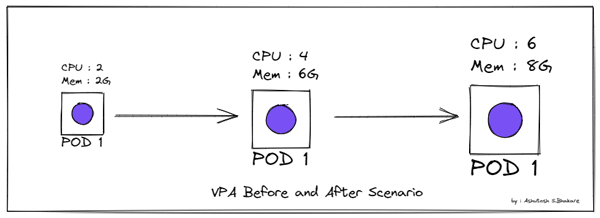
2 Vertical scaling: VPA (Vertical Pod Autoscaler) works by changing the pod size, as shown in Figure 2.
In this article we will discuss how to achieve horizontal scaling (using HPA) in an application. The prerequisites are:
1 Working k8s cluster
2 An already deployed and running metrics server
3 Running application. In this case the application is running using deployment.
HPA is a Kubernetes autoscaler, which scales up the replicas of a pod whenever a pod exceeds its threshold value. It will keep adding the replicas till the maximum pods limit is reached, as defined in the HPA configuration.
The entire walkthrough for HPA is as follows
We have a service called php-apache and deployment called php-apache, which has a resource limit of 200m CPU. We will be setting up a 50 per cent threshold limit in our HPA configuration, as follows:
apiVersion: v1
kind: Service
metadata:
creationTimestamp: null
name: php-apache
spec:
ports:
- port: 80
protocol: TCP
targetPort: 80
selector:
run: php-apache
status:
loadBalancer: {}
---
---
apiVersion: apps/v1
kind: Deployment
metadata:
creationTimestamp: null
labels:
run: php-apache
name: php-apache
spec:
replicas: 1
selector:
matchLabels:
run: php-apache
strategy: {}
template:
metadata:
creationTimestamp: null
labels:
run: php-apache
spec:
containers:
- image: k8s.gcr.io/hpa-example
name: php-apache
ports:
- containerPort: 80
resources:
requests:
cpu: 200m
status: {}
To create the service and deployment together, we can use:
kubectl create -f hpaapp.yml
Given below is the HPA example, which is targeting php-apache deployment with 50 per cent threshold value. The moment this deployment reaches 50 per cent of the assigned resource (200m in our case), it will trigger an additional pod.
apiVersion: autoscaling/v1
kind: HorizontalPodAutoscaler
metadata:
creationTimestamp: null
name: php-apache
spec:
maxReplicas: 10
minReplicas: 1
scaleTargetRef:
apiVersion: apps/v1
kind: Deployment
name: php-apache
targetCPUUtilizationPercentage: 50
status:
currentReplicas: 0
desiredReplicas: 0

kubectl create -f hpa.yml
kubectl get hpa
To test this, we can use a temporary pod called load-generator and run a while loop for a few minutes. Then we can exit the pod and check whether it got autoscaled.
| Note: If the load decreases, and the number of pods is above the configured minimum, the HPA will scale down. This value can be configured using the —horizontal-pod-autoscaler-downscale-stabilization flag, which defaults to 5 minutes. |
Run the command given below to see if autoscaling is working as desired:
kubectl run -i --tty load-generator --image=busybox /bin/sh
while true; do wget -q -O- http://php-apache.default.svc.cluster.local; done
You can try out different threshold limits and configurations as per your requirement.


