This series’ eighth and final article outlines the creation of a DevOps pipeline to deploy a network functions virtualization module. This pipeline takes care of all the challenges faced from development to deployment of software, making the process simpler for developers and operations teams.
This series’ eighth and final article outlines the creation of a DevOps pipeline to deploy a network functions virtualization module. This pipeline takes care of all the challenges faced from development to deployment of software, making the process simpler for developers and operations teams.
DevOps has been known to reduce deployment time, and its automation chain can help push the latest application features and fixes in no time. So how about pushing virtualised network functions through this DevOps pipeline on a platform that could help scale the application both horizontally and vertically across a cloud computing platform?
In this article, we have successfully created a pipeline that achieves all the benefits of network functions virtualization (NFV) while easing the burden on developers and operations teams when implementing the DevOps pipeline. This DevOps pipeline takes care of every single hurdle, from development to deployment. The current setup utilises cutting-edge technologies such as distributed systems, containerisation, software-defined networking, and cloud computing, all under the umbrella of DevOps. This article demonstrates how to deploy an NFV module such as a video-on-demand (VOD) containerised application over an NFV-enabled infrastructure using a DevOps pipeline.
Experimental setup
We have configured a pipeline that invokes various DevOps tools in different phases, where the end goal is to achieve full-fledged deployment of our NFV application. The integration is carefully done to fulfil each stage of DevOps, invoke specific automation tools to accomplish the task, and then call the subsequent phases. The source code is developed by the developer and is pushed to a source control management (SCM) system. With every push to the SCM, the integration tool is invoked to run the predefined tasks while containerising the microservices of the developed application. This container image is then deployed over the software-defined networking (SDN)-enabled cloud platform, which also orchestrates all the running containers. Let’s explore how all these tools work in sync for faster deployment of the application.
Managing code with GitHub
GitHub is an excellent SCM tool built by the open source community for developers. It is utilised to manage the various code versions and branches. The NFV application has been created to demonstrate the development and deployment of the NFV module using DevOps tools and methodologies. While the application is purely for experimentation purposes, it can be extended to meet specific customer needs. A VOD service is created and its relevant configuration files and source code can be found at https://github.com/shubhamaggarwal890/nginx-vod.
Integrating with Jenkins
Merely creating the code is not enough; developers must build it first to publish it on the production infrastructure. Jenkins, a well-known platform for continuous integration, enables us to achieve precisely that. We use Jenkins with a GitHub webhook, which triggers a notification to Jenkins communicating the latest changes pushed to the GitSCM. Jenkins then pulls the latest changes from GitHub and triggers the created pipeline, where the application is containerised in a Docker container.
This functionality is enabled via the pipeline plugin of Jenkins. All the credentials and environment variables can be stored within Jenkins. Similarly, for this research, a pipeline script has been written to invoke the various stages. The pipeline source code is given in Figure 1, where we can see that in the NFV module – SCM Checkout stage, the git plugin within Jenkins clones the source code repository. Then in the Containerize NFV module stage, a Docker image is built on the given source code. The built instructions are forwarded through a Docker file by the installed Docker plugin in Jenkins. Once this stage is completed, the Push Docker Image over Docker registry stage is invoked, where the Docker image is pushed to the Docker hub. Finally, the Deploying modules through the Ansible Playbook stage calls the Ansible to perform allocated tasks on the designated nodes.
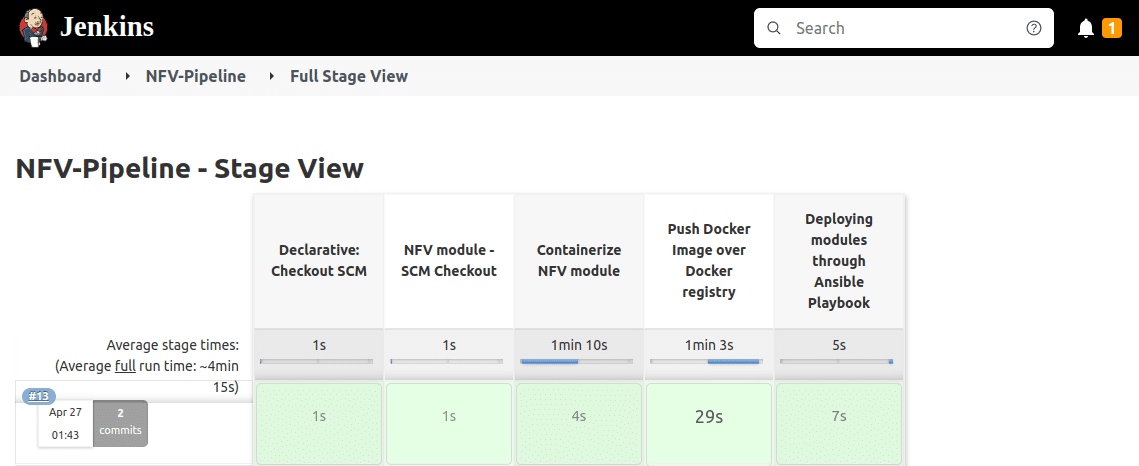
Figure 1 shows the various stages of the pipeline script written to be executed by Jenkins. This script can be found at https://github.com/shubhamaggarwal890/nginx-vod/blob/master/Jenkinsfile.
The Git repository is pulled to the Jenkins workspaces, followed by containerisation of the NFV module. After the successful creation of the NFV image, the Docker image is pushed to the Docker registry, i.e., Docker hub. Alongside this information, other details such as the time taken by each stage and the average run time taken by multiple builds are also visible.
Containerisation with Docker
Containerisation of an application has become a norm as well as a healthy habit due to the scalability and resource efficiency provided by containerisation tools. Network functions virtualization (NFV) is also ruled by the microservices. Therefore, the idea here is to containerise different services of the NFV module and connect them via a container orchestrator.
The services are containerised in the Jenkins pipeline and pushed to the Docker registry for the Docker image to be available for the production environment. The containerisation is handled by the Docker plugin in Jenkins. The Docker plugin looks for the Dockerfile within the source code and builds the Docker image from it. The Dockerfile is at https://github.com/shubhamaggarwal890/nginx-vod/blob/master/Dockerfile. It invokes the Debian base image and installs the essential packages required to facilitate an environment for the VOD application.
After the successful build of the application, the Docker image is pushed to the Docker hub registry; the image link can be found at https://hub.docker.com/r/shubhamaggarwal890/nginx-vod.
Deploying with Ansible
Deployment is often a challenging task as it requires accommodating configurations throughout the environment while ensuring that similar packages and dependencies are installed. In this pipeline, we have to install the NFV containers over our infrastructure to make them readily available throughout the network. Ansible deploys the application and manages the related configuration via playbooks written in YAML. The playbooks communicate through SSH to all the hosts written in the inventory file.
A similar playbook is written for the deployment, where various Kubernetes configuration files are registered by the Ansible server to the deployment machines. Various Kubernetes objects are applied via the declarative methodology using the configuration files at https://github.com/shubhamaggarwal890/nginx-vod/blob/master/deploy-kubernetes-config.yml.
Deployment over Kubernetes and OpenStack
Infrastructure is the key aspect of any deployment, especially when we talk about NFV-enabled infrastructure. We have seen how Kubernetes helps in the enablement of NFV and provides resources for it to be scalable and self-healing. We wanted an environment that enables horizontal as well as vertical scalability. Horizontal scalability refers to the addition of new nodes or virtual machines to the current infrastructure setup, whereas vertical scalability refers to the addition of computation, networking, and storage resources to an existing node or virtual machine. With Kubernetes, this is successfully achieved where the number of replica deployments can be increased imperatively via Kubernetes internal tools, and further, the cluster size of Kubernetes can be increased too by adding new virtual machines through OpenStack.
After the installation of OpenStack, we tailored security groups and networking specifically to the needs of Kubernetes and deployed multiple VMs for it to entertain the Kubernetes cluster. These nodes connect and achieve orchestration, over which our NFV application is deployed. To enable the deployment of NFV containers and create services, the Kubernetes configurations files are written, which can be found in the NFV source code repository at https://github.com/shubhamaggarwal890/nginx-vod/tree/master/deploy-kubernetes.
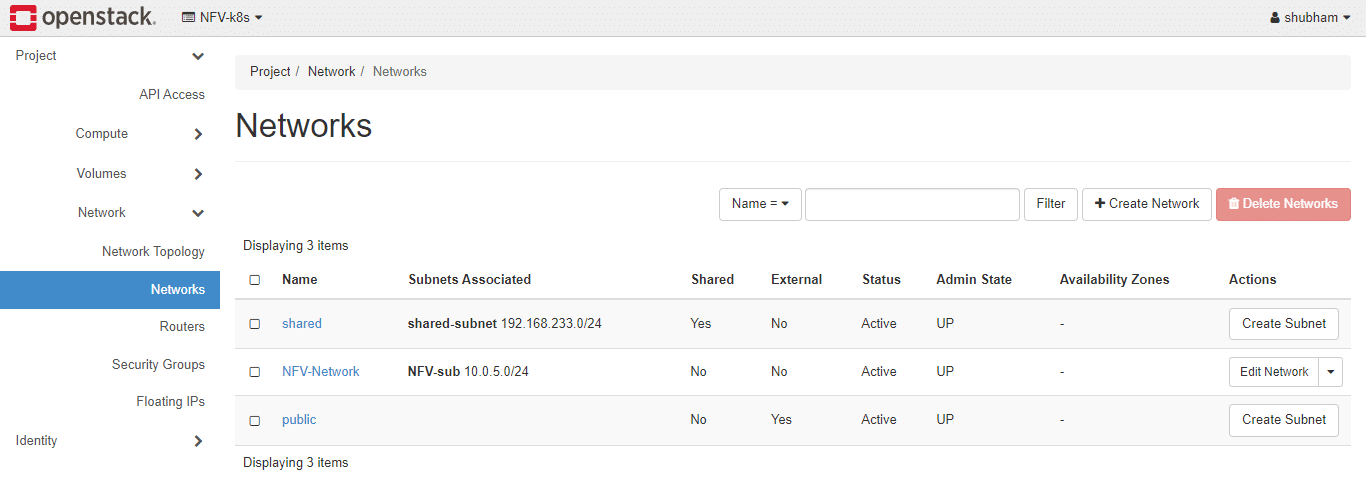
Figure 2 illustrates the creation of a custom network and its subnet specifically for our NFV module over the OpenStack platform, where all the network services are abstracted through the Neutron component. Various details such as DNS, Class address, and IP range are decided while creating the network. The Kubernetes cluster is then connected to this custom network allowing communication between its various nodes.
After the successful establishment of the network between the nodes of the Kubernetes cluster, we need to provide access to the internet to the cluster nodes. This connection is required so that the Kubernetes cluster can patch new updates, and download the Docker images from the Docker registries. Our custom network is connected with the public/external network via a router. This router is created by OpenStack and linked to the interface of our custom network, enabling the flow of traffic to the internet.
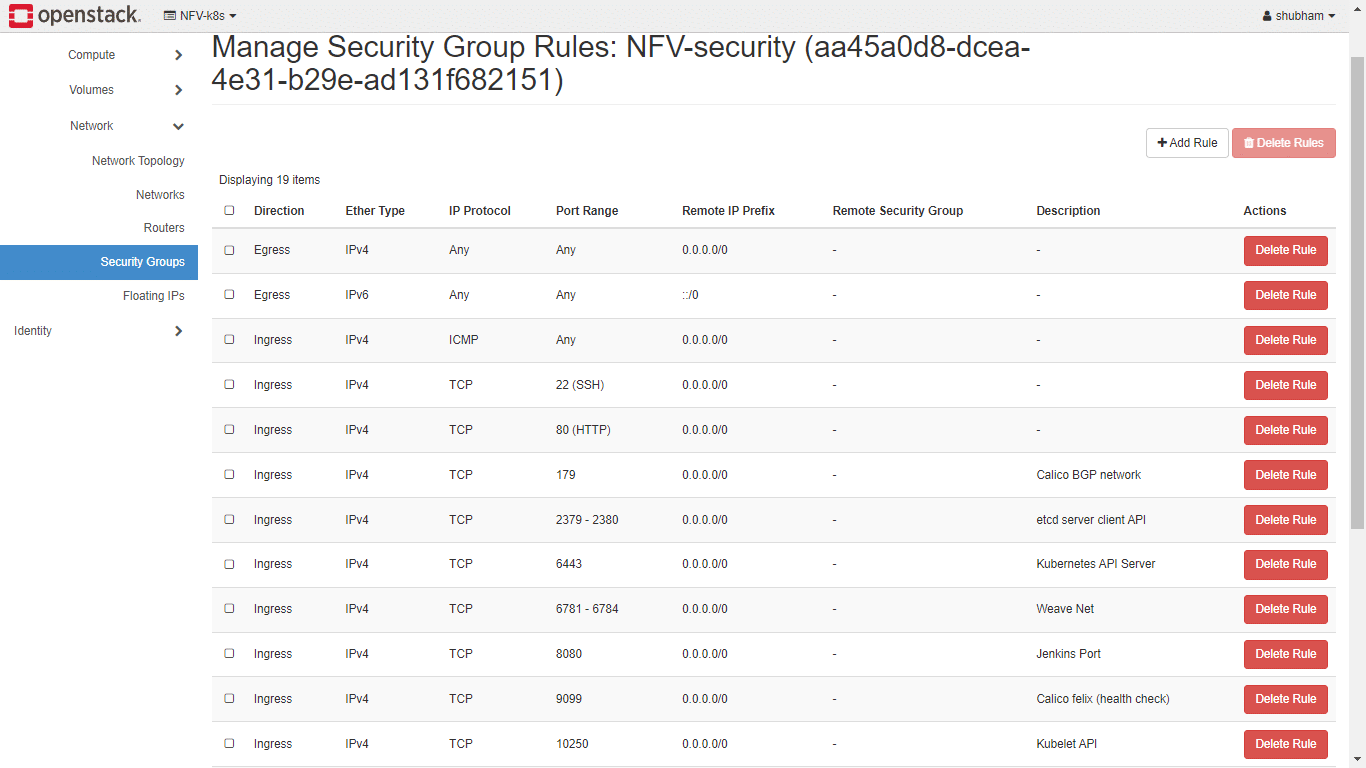

OpenStack enables security groups for every running instance. In the security group, administrators can manage the security rules and the flow of traffic. Figure 3 showcases the enabled security group for the project, where all the Kubernetes-related traffic is allowed to flow through different ports and protocols.
Various instances, as shown in Figure 4, are created to facilitate the Kubernetes cluster. These instances are attached to the respective networks, security key pairs, and security groups. A floating IP is attached to these instances, which provides a public IP address to them for it to enable connection to the internet. The flavour in the figure showcases the configurations and the computation resources provided to these instances.
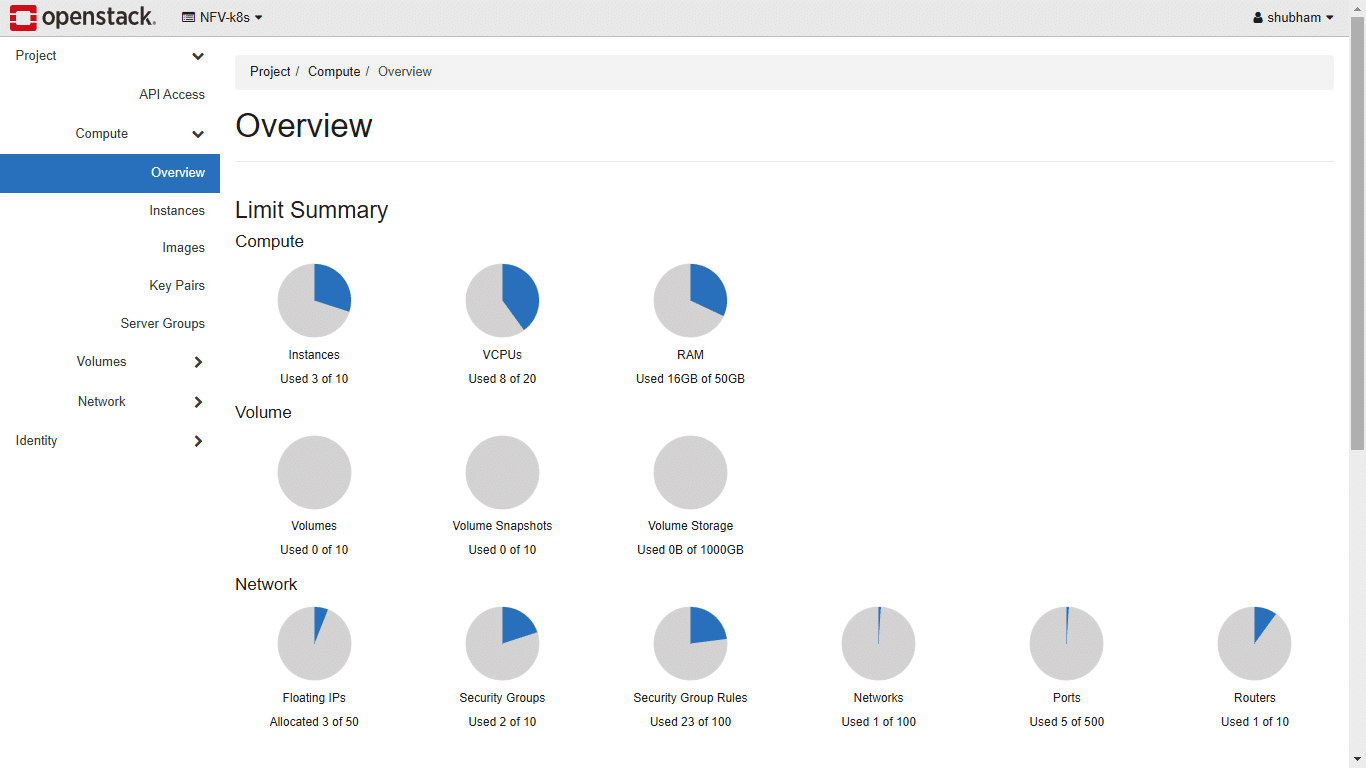
The OpenStack dashboard shows comprehensive information about the various resources being utilised within the working project. In Figure 5, we see all the instances running and the number of virtual CPUs and RAM allocated to them. Apart from this, other network details are visible too, where the number of floating IPs attached to the instances is visible along with the number of security groups and their rules created within the working project. This information is helpful for the administrator to have a look over the metadata related to all the services provided by OpenStack.

Ansible completed all its allocated tasks by deploying the Kubernetes objects over the cluster sitting on top of OpenStack. Figure 6 shows all the configured objects running on the Kubernetes cluster after the successful deployment. The Kubernetes configuration files also deployed certain services within the cluster so that the NFV application could be invoked from outside the network.
Here, in this cluster for the experimentation, the configuration files call for one active pod of the application, along with the port numbers on which the application would be running. Every running service is allocated an IP address by Kubernetes to allow communication between them, and this can be seen in the figure. The command, as shown in the figure, prints all the various objects deployed over the Kubernetes cluster while showcasing helpful details such as status, number of restarts of the pods, and the services. The administrator can upscale and downscale the number of deployments and replica sets based on the traffic requirements.
Figure 7 depicts all the running pods in the Kubernetes cluster. These pods are attached to different namespaces and the command asks Kubernetes to print all the pods associated with different namespaces. These pods could be running on different nodes of the cluster based on their roles. The application-based objects always run on the worker nodes and a similar one can be seen here; our server deployment can be seen running on the worker node under the NODE section.

After the successful deployment of all configuration files and microservices over the Kubernetes cluster, the end user can access the VOD application from the web browser. Figure 8 showcases this capability. All the DevOps tools and methodologies worked in harmony to demonstrate the deployment of the NFV application. This application is deployed as a microservice and is orchestrated by Kubernetes. All the computation, network, and storage services are served by OpenStack which is configured as an Infrastructure-as-a-Service (IaaS).

Results and discussion
With the advent of DevOps tools and methodologies, we have achieved a system for NFV applications that can be deployed and delivered in a jiffy. The various methodologies of DevOps fulfil the requirement of fast-paced delivery with easy-to-configure servers and no downtime of the application. The deployed module showcases the research, where an application is created catering to the demand of video and played over the web browser. The application can be further extended based on the requirements.
With the introduction of OpenStack to the mix of tools, the administration-based networking to the application requirements is eased out. All the networking services are facilitated via abstraction provided by OpenStack through its dashboard or APIs. OpenStack facilitates SDN, where it deploys routers, switches, load balancers, and security groups into the compute space of the virtualised application. In Figure 9, we see how each stage of the software development life cycle (SDLC) is connected via DevOps tools to produce an integrated pipeline where we successfully deploy our VOD network functions virtualization module.
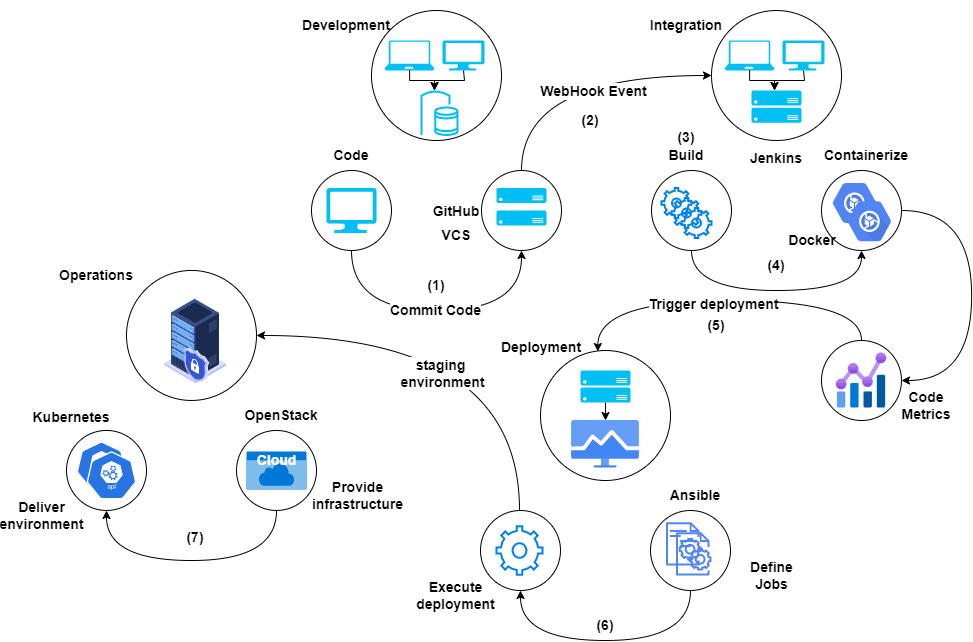
Every new change in the code is populated to the GitHub and as soon as any commit is pushed, the webhook of GitHub attached to Jenkins senses the latest changes, and the job inside Jenkins gets triggered. The latest changes are pulled from the GitHub repository, which begins the process of building the code. The built code is then containerised as a Docker image. The Docker image is pushed to the Docker registry, which is the Docker hub here. The idea behind this is that the image should be available to all the servers remotely for the active deployment of the services. In deployment, the Ansible server executes the predefined jobs of invoking the Kubernetes environment which would facilitate the NFV application. The Kubernetes infrastructure is set over the OpenStack cloud, which will encourage data confidentiality of the organisation and flourish an environment for software-defined networking.
Benefits and use cases
This is just the tip of the iceberg when it comes to the possibilities in the field of deployment of NFV applications. The experimentation successfully showcases the power and capability of DevOps tools and methodologies, where various such applications can be deployed and delivered while assuring self-healing of the deployment in case of any mishap. Kubernetes helps achieve high availability and no downtime. The rollout of new features is easily patchable to the current experimental setup and can be rolled back if and when needed. A deployment infrastructure can be structured within no time with the help of OpenStack which introduces abstract computation, networking, and storage services through its various components. With OpenStack, the administrator can feed new virtual machines to the Kubernetes cluster so that it can stay on par with the growing traffic. This project can further be extended to various NFV use cases such as content delivery networks (CDNs), load balancers, web application firewalls, and intrusion detection and prevention systems.
This DevOps integration in network functions virtualization will help scale and readily deploy the applications. Microservices-based architecture is already ruling NFV deployments. When combined with DevOps, the automated pipeline will enable independent and dynamic scaling of the functional elements of the NFV system. This will help reduce the capex and opex of the NFV market. All these tool-chains provide a collective development and delivery solution, which not only reduces the time of deployment but also the workload on developers, testers, and operators. The entire pipeline will give any NFV module deliverable an edge over traditional deployments.
In this comprehensive eight-article series, we have extensively covered essential topics in today’s technology landscape. We explored distributed systems, containerisation, Kubernetes, open source cloud computing, software-defined networking (SDN), network functions virtualization (NFV), DevOps methodologies, and the integration of network functions virtualization infrastructure (NFVI). By delving into these subjects, we provided a comprehensive understanding of how these technologies and concepts can be seamlessly integrated for optimal performance in modern IT environments. We demonstrated the practical implementation of NFV integration with the DevOps pipeline, showcasing its potential to enhance network operations and accelerate software delivery.
We believe that this series has equipped you with valuable insights and actionable knowledge to embark on your own successful journey in implementing these powerful solutions. May your endeavours in embracing NFV and DevOps be met with efficiency, innovation, and success in the ever-evolving world of technology.


