


This comprehensive DIY guide offers a quick way to build an offline, on-premises ChatGPT-like tool using Ollama and Ollama-WebUI.
ChatGPT has been widely adopted across various sectors because it can understand and generate human-like text. Its applications range from customer service automation, where it can handle enquiries and provide support 24/7, to content creation, aiding in drafting articles, emails, and reports. Its integration into educational tools facilitates personalised learning experiences, and it assists developers by debugging code and generating programming-related content.
Open source AI models
Open source models such as META’s LLaMA2 and Microsoft’s Phi2 offer a foundation for building customised AI solutions, democratising access to cutting-edge technology. The development of offline AI solutions, particularly those based on open source projects like Ollama and Ollama-WebUI, marks a significant step forward in AI. These tools not only provide the benefits of AI models like ChatGPT but also ensure that organisations can innovate and maintain control over their data, comply with privacy regulations, and operate without the need for constant internet connectivity.
This guide will walk you through the fastest DIY method to set up an offline, on-prem ChatGPT-like tool using Ollama and Ollama-WebUI.
Setting up your OS environment
Before diving into the installation of your offline, on-prem ChatGPT tool, it’s crucial to ensure that your environment meets the necessary system requirements and that Debian Linux 12 is correctly installed on your machine, whether it’s a physical server or a virtual machine (VM).
To ensure smooth operation of your offline AI solution, your system should meet the following minimum specifications.
- CPU: Latest model (Intel i5, Xeon, or AMD EPYC) with at least 8 cores
- RAM: 16GB to start with or more
- HDD storage: 100GB or more
- NVIDIA GPU: Optional (but recommended for enhanced performance)
Here’s a step-by-step guide to installing Debian.
Download the Debian installation image: Visit the official Debian website at https://cdimage.debian.org/debian-cd/current/amd64/iso-cd/debian-12.4.0-amd64-netinst.iso to download the latest Debian installation image suitable for your system architecture.
Create a bootable USB drive or CD/DVD: Use software like Rufus or any other preferred tool to create a bootable USB drive or burn the Debian image onto a CD/DVD.
Boot from the USB drive or CD/DVD: Insert the bootable media into your system and restart. Enter the BIOS or UEFI settings to select the boot device as your USB drive or CD/DVD.
Follow the Debian installer prompts:
Select the installation language as English, location as ‘India’, and keyboard layout as ‘American English’.
Configure the network to gain internet access and set the host name, for example, gpt.deepen.in.
Set up users and passwords. Create a root password and a new user (sysadmin) with a new password.
For disk partitioning, select ‘Guided – use the entire disk’ and choose ‘All files in one partition’ as the partitioning scheme for simplicity.
Confirm to ‘Finish partitioning and write changes to disk’ and select ‘Yes’ to write changes.
Choose ‘No’ when asked to scan another installation media.
Configure the package manager, select ‘India’ for Debian repositories, and proceed with the default archive mirror.
Opt out of the package usage survey by selecting ‘No’.
In the software selection screen, ensure only ‘SSH server’ and ‘Standard System Utilities’ are selected for installation.
Install the GRUB bootloader on the primary drive (e.g., /dev/sda) when prompted.
Complete the installation and reboot: Allow the installer to finish the setup. Once completed, remove the installation media and reboot into your new Debian system.
Post the installation, follow these steps.
After rebooting, log in as root to your system and install the necessary packages to proceed with the setup of your offline AI tool. Begin with installing Git, which is essential for downloading the GitHub repository in the next steps:
apt -y install git
This completes the environment setup required for installing your offline, on-prem ChatGPT tool. With your Debian system ready, you are now set to proceed with the installation process of Ollama and Ollama-WebUI.
Installation process
The core of setting up your offline, on-prem ChatGPT tool involves downloading the necessary software, setting up the main engine, integrating AI models, and finalising the web interface.
Downloading the GitHub repository: First, you will need to clone the repository containing all the scripts and configurations required for the setup. Open a terminal on your Debian system as user root and run the following command:
git clone https://github.com/deependhulla/gpt-debian12 /opt/gpt-debian12
This command clones the repository into /opt/gpt-debian12, a directory that will serve as the working directory for the installation process.
Changing to the installation directory: After cloning the repository, change your current directory to /opt/gpt-debian12 to access the setup scripts:
cd /opt/gpt-debian12
Running setup scripts: The installation process is divided into four main scripts, each responsible for a different part of the setup. Execute these scripts in the order listed below to ensure a successful setup. These scripts will install the necessary packages, set up the Ollama main engine, download AI models, and configure the Ollama-WebUI.
1. Basic package setup: This script installs the basic packages and modules required for the Ollama engine and web interface.
./01-basic-package-setup.sh
2. Ollama main engine setup: This sets up the Ollama main engine, ensuring that the core functionalities are properly installed and configured.
./02-Ollama-main-engine.sh
3. Downloads of Ollama models: This script downloads the necessary AI models for Ollama. These models are crucial for enabling AI’s generative capabilities.
./03-Ollama-models-downloads.sh
4. Ollama WebUI setup: The final script sets up the web interface, making it easier to interact with the Ollama engine through a browser.
./04-Ollama-WebUI-setup.sh
After running all the scripts, it is important to verify that each component of the Ollama setup has been installed and configured correctly. Check the output of each script for any errors and ensure that all processes are running as expected.
This completes the installation process of your offline, on-prem ChatGPT tool. With Ollama and Ollama-WebUI now set up, you are ready to access the web tool and start exploring its capabilities.

Accessing the web tool via browser
To access the Ollama WebUI, open a web browser and navigate to http://<IP_ADDRESS>:8080/, replacing <IP_ADDRESS> with the actual IP address of the server where you installed Ollama. Upon accessing the WebUI for the first time, the initial account to sign up is automatically granted administrator privileges. This account has comprehensive control over the platform, including user management and system settings. Subsequent users signing up will have their accounts set to pending status and will require approval from the administrator to access the platform functionalities.
Navigating the Ollama WebUI interface features
The Ollama WebUI is designed with an intuitive interface, drawing inspiration from ChatGPT for a user-friendly experience. It features a responsive design, making it seamlessly usable on both desktop and mobile devices. The interface has several key features as listed below.
- Code syntax highlighting: Enhances code readability, making it easier for developers to work with code snippets
- Full markdown and LaTeX support: Offers comprehensive formatting capabilities for a wide range of content creation needs
- Multiple model support: Allows users to switch between different chat models based on their specific requirements
- Many model conversations: Engages with various models simultaneously for a multifaceted conversational experience
- Regeneration history access: Users can revisit and explore their entire regeneration history
- Chat history: Provides access to and management of the conversation history
- Import/export chat history: Facilitates moving chat data in and out of the platform for backup or analysis

Example queries for content creation and developer assistance
The Ollama WebUI supports a variety of language models, each tailored for different use cases.
- TinyLlama: This model is ideal for applications with limited computational and memory resources.
- Prompt for content creation: ‘Write a concise blog intro about the impact of AI on small businesses.’
- Prompt for developer assistance: ‘Explain the difference between GET and POST request methods in web development.’
- Llama 2: Best suited for chat applications, this model is fine-tuned on human annotations for natural conversational responses.
- Prompt for content creation: ‘Generate an engaging conversation between a customer and a support bot regarding a refund process.’
- Prompt for developer assistance: ‘Provide tips for optimising SQL queries in a database-heavy application.’
- Phi-2: Demonstrates excellent reasoning and language understanding, and is perfect for tasks requiring common-sense reasoning.
- Prompt for content creation: ‘Create a short story involving a time-travelling scientist and a historical figure.’
- Prompt for developer assistance: ‘Explain the concept of machine learning bias and how to mitigate it in AI models.’
- LLaVA: This is a multimodal model for tasks involving visual and language understanding, offering improved visual reasoning and OCR capabilities.
- Prompt for content creation (visual task): ‘Describe the emotions conveyed in a photo of a sunset over the ocean (assuming the photo is provided).’
- Prompt for developer assistance (visual task): ‘Analyse this chart of user engagement over the last quarter and summarise the key trends (assuming the chart is provided).’
- Mistral: Outperforms other models in instruction following and text completion, and is suitable for a wide range of English tasks and code generation.
- Prompt for content creation: ‘Draft an email to stakeholders summarising the key achievements of the quarter.’
- Prompt for developer assistance: ‘Generate a Python script to automate the extraction of data from JSON files and summarise the information.’
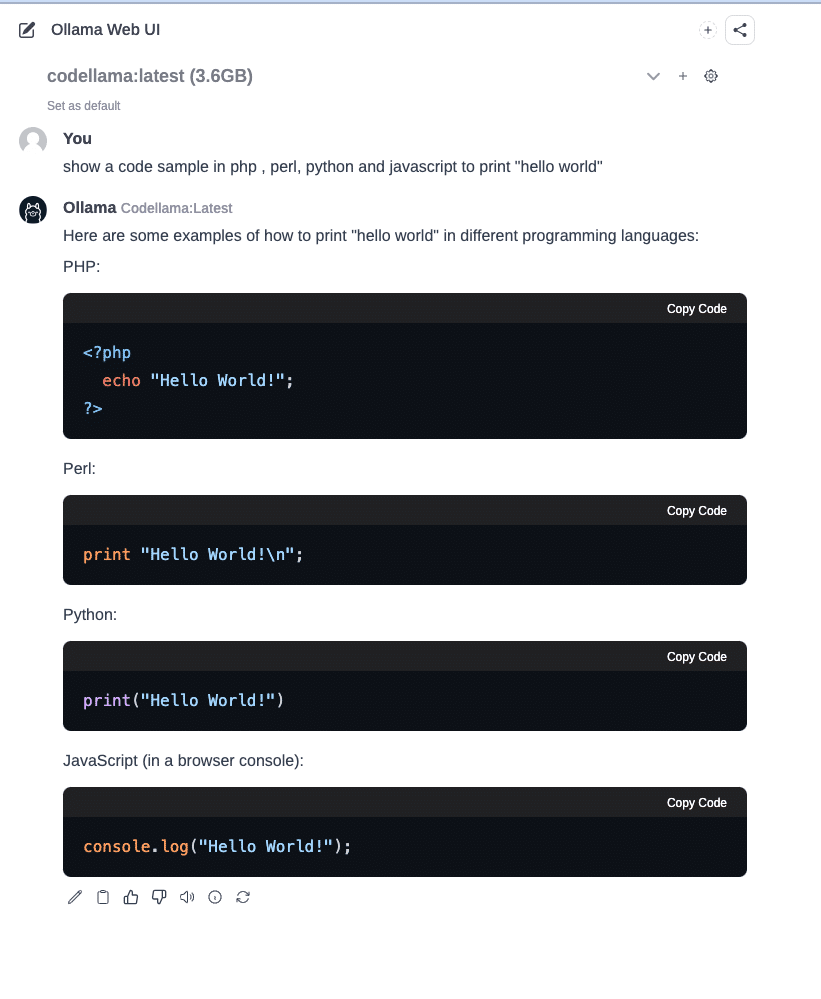
- CodeLlama: Designed for generating and discussing code, it supports multiple programming languages, making it invaluable for developers.
- Prompt for content creation: ‘Create a tutorial on the basics of Python programming for beginners.’
- Prompt for developer assistance: ‘Generate a function in JavaScript that dynamically filters an array of objects based on a given property value.’
These sample prompts are designed to illustrate the versatility and capability of each model within the Ollama WebUI platform. By utilising these prompts, users can explore a wide range of applications, from generating engaging content to solving complex programming challenges. The platform’s intuitive interface and diverse model support make it an invaluable tool for organisations looking to enhance their operations with AI-driven solutions.
By following the steps outlined in this guide, you have successfully set up an offline, on-prem ChatGPT-like tool, empowering your organisation with a powerful AI solution that operates securely on your premises. Do explore the capabilities of Ollama and Ollama-WebUI, experiment with different models, and utilise the platform to its full potential.


