


This article describes how to automate the bare metal provisioning of physical and virtual machines through Razor, an open source tool that works perfectly with Puppet
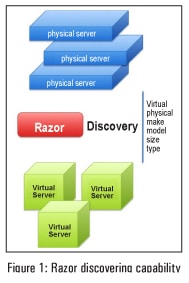
Razor was created to automatically discover bare metal hardware and dynamically configure operating systems and hypervisors. Razor makes it easy to provision a node with no previously installed operating system and bring it under the management of Puppet. It was originally developed by EMC and is based on Tiny Core Linux. The Razor micro-kernel is 64-bit only. Razor can only provision 64-bit machines. It has the ability to discover hardware via in-memory instances of the Razor micro-kernel (a.k.a. Razor MK). The source code of the micro kernel is available at: https://github.com/puppetlabs/razor-el-mk under GPL v2 license.
Razor is completely open source, which means that it offers you the freedom to build your own custom Razor MK images, with the option to specify user accounts, the ability to enable remote SSH access for debugging, and to build and include custom Tiny Core Linux extensions to support unique hardware for your environment. Razors policy-based bare-metal provisioning lets you make an inventory and manage the lifecycle of your physical machines.
How does Razor work?
Whenever a new node gets added, Razor discovers its characteristics by booting it with the Razor micro-kernel and inventorying its facts. The node is tagged based on its characteristics. Tags contain a match conditiona Boolean expression that has access to the nodes facts, and determines whether the tag should be applied to the node or not. Node tags are compared to tags in the policy table. The first policy with tags that match the nodes tags is applied to the node.
Provisioning elements of Razor
Repositories: These take care of What to install? They basically indicate the contents to be installed on a system. To create a repository, either import or install an ISO or point at an existing package repository.
Tasks: A task takes care of How to install using installation scripts such as kickstart files, preseed files and additional shell scripts. Predefined tasks are shipped with Razor, and custom tasks can easily be added without additional coding.
Broker: This takes care of How to manage with post-installation scripts that install a configuration management agent on the node and enrol the node with the configuration management system (e.g., Puppet).
Tag: This takes care of Where to install with the Boolean expression that uses node facts and metadata. Tags are used to match nodes and policies.
Policy: This takes care of Combining it all with the use of ordered tables which combine all the above elements in the form of YAML.
Setting up the Razor server
It is recommended that the Razor server shouldnt be installed on the same machine on which the Puppet master is running. The reason is that the default port for Razor is 8080, which conflicts with the default Puppet DB port. To set up a test environment, we will need at least 2 VMs one for the Puppet master and the other for the Razor server:
- Puppet server (hostname – puppetmaster)
- Razor server (hostname – puppetagent1)
Razor has been specifically validated on RHEL/CentOS 6.5 but it should work on all 6.x versions. I assume that the Puppet server is installed and configured properly on CentOS 6.5 VM with the hostname puppetmaster. If you are new to Puppet, I recommend reading https://docs.puppetlabs.com/guides/install_puppet/install_el.html
Here are the steps that need to be followed to set up a Razor server on the puppetagent1 machine.
Installing a Razor module: A Razor module is available under the Puppet Labs GitHub repository. I assume that the Git package is already installed on puppetagent1. We will use Rubygems software (rightly called a gem) which allows you to easily download, install and use Ruby packages on the system.
# gem install bundler
# cd /opt; git clone https://github.com/puppetlabs/razor-server.git
# cd razor-server;
# bundle install
# rake db:migrate
# torquebox deploy
#yum install jruby
#curl -L -O http://torquebox.org/release/org/torquebox/torquebox-dist/3.0. 1/torquebox-dist-3.0.1-bin.zip
#unzip torquebox-dist-3.0.1-bin.zip -d $HOME
# jruby bin/razor-admin -e production migrate-database
Set the following environmental variable:
#cat /root/.bashrc
export TORQUEBOX_HOME=$HOME/torquebox-3.0.1
export JBOSS_HOME=$TORQUEBOX_HOME/jboss
export JRUBY_HOME=$TORQUEBOX_HOME/jruby
export PATH=$JRUBY_HOME/bin:$PATH
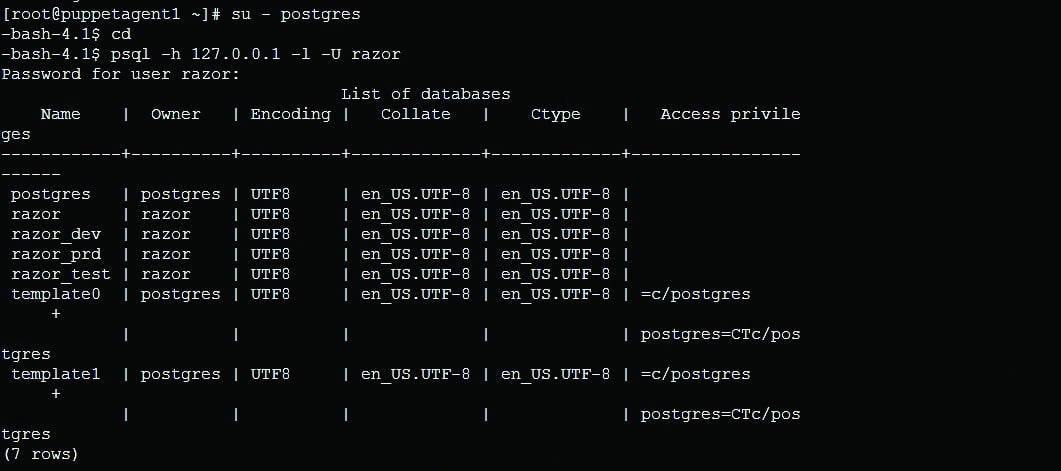
Installing the database: Razor uses PostgreSQL as its database server. To configure the database, follow the steps:
# yum remove postgresql postgresql-server
# curl -O http://yum.postgresql.org/9.4/redhat/rhel-6-x86_64/pgdg-centos94-9.4-1.noarch.rpm
# rpm -ivh pgdg-centos94-9.4-1.noarch.rpm
# service postgresql-9.4 initdb
# chkconfig postgresql-9.4 on
Log in as psql user and verify the table entry (see Figure 2).
Installing the micro-kernel: Download a pre-built micro-kernel from http://links.puppetlabs.com/razor-microkernel-latest.tar. The micro-kernel is based on Fedora 19 and needs to be manually put into your repo_store_root directory; it cannot be added using the API. If you downloaded the prebuilt micro-kernel above, simply extract it into your repo_store_root directory. Doing so will create a sub-directory called microkernel with its contents.
#cd /var/lib/razor/repo-store
# wget http://links.puppetlabs.com/razor-microkernel-latest.tar
# tar xvf razor-microkernel-latest.tar
#cd microkernel
# ls
initrd0.img README SHA256SUM SHA256SUM.sig vmlinuz0

Configuring the database: Edit /opt/razor/config.yaml and change the database URL setting. Once that is done, you can load the Razor database schema into your PostgreSQL database, and finally start the service (see Figure 3).
Ensure that you have the following line: repo_store_root: /var/lib/razor/repo-store placed under /opt/razor/config.yaml. Verify that razor-server service is in a running state:
#service razor-server status
razor-server is running (pid 1380)

After youve followed one of the above installation methods, you should be able to go to http://localhost:8080/api and get the API entry point that will give you a JSON document that talks about collections and commands.
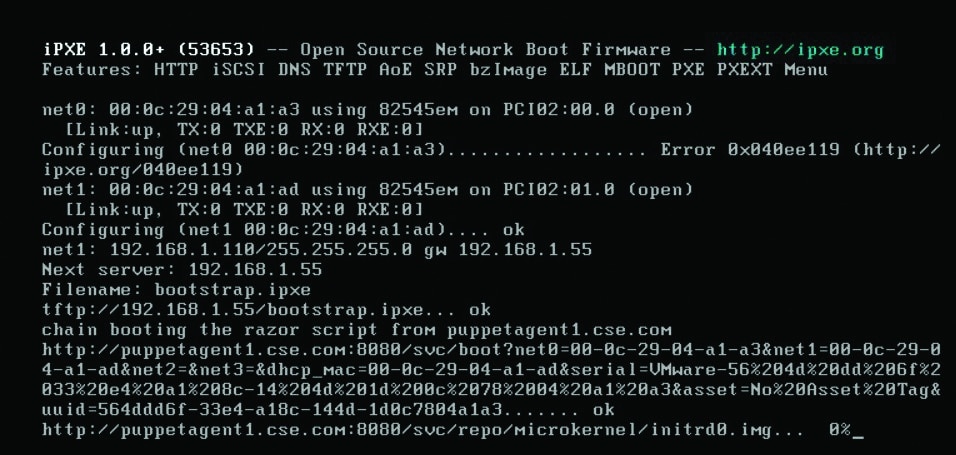
Setting up PXE: Type the following commands (see Figure 4).
# wget http://links.puppetlabs.com/pe-razor-ipxe-firmare-3.3.
# cp undionly-20140116.kpxe /var/lib/tftpboot
# cp bootstrap.ipxe /var/lib/tftpboot
Configuring DNSMASQ: Set the following configuration under /etc/dnsmasq.conf.
# This works for dnsmasq 2.45
# iPXE sets option 175, mark it for network IPXEBOOT
dhcp-match=IPXEBOOT,175
dhcp-boot=net:IPXEBOOT,bootstrap.ipxe
dhcp-boot=undionly.kpxe
# TFTP setup
enable-tftp
tftp-root=/var/lib/tftpboot
dhcp-range=192.168.1.50,192.168.1.150,12h
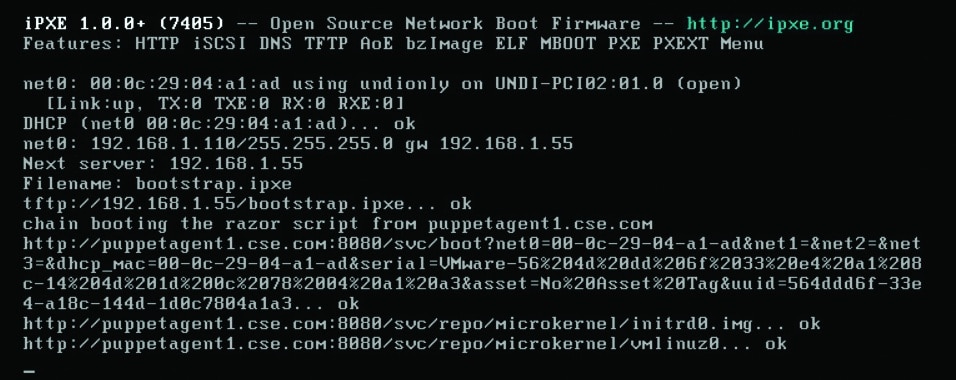
This completes the Razor server configuration. Now lets create a new VM and try to PXE boot.
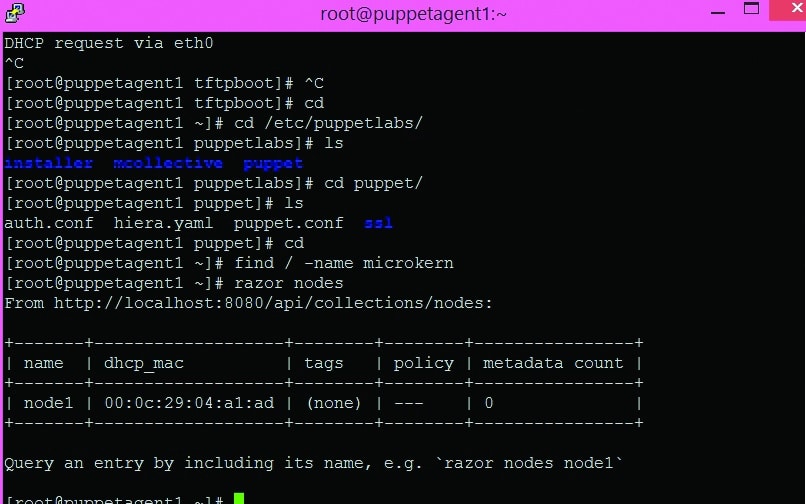
As youve seen above, the new VM listened to the net1 interface and acquired the IP address from the DHCP server. Next, Razor discovers its characteristics by booting it with the Razor micro-kernel and inventorying its facts. Meanwhile, you can check the status of nodes as shown in Figure 7.
As seen in this figure, as of now, there are no provisioning elements created for the new PXE booted VM. Its time to create the provisioning elements of Razor. I have created a provisioning element for CentOS 6.5 x64.
Creating the repository
To create a repository, type:
[root@puppetagent1 ~]# razor create-repo --name=CentOS6.5-Repo --iso-url http:// 192.168.1.100/OS/Linux/CentOS/CentOS-6.5-x86_64-bin-DVD1.iso --task centos6
From http://localhost:8080/api:
name: CentOS6.5-Repo
iso_url: http://192.168.1.100/OS/Linux/CentOS/CentOS-6.5-x86_64-bin-DVD1.iso
url: ---
task: ---
command: http://localhost:8080/api/collections/commands/1
Creating a broker
To create a broker, type:
[root@puppetagent1 ~]# razor create-broker --name foo --broker-type puppet-pe -- configuration { server: puppetmaster.cse.com }
From http://localhost:8080/api:
name: foo
broker-type: puppet-pe
configuration:
server: puppetmaster.cse.com
policies: 0
command: http://localhost:8080/api/collections/commands/2
Creating policy
To create a policy, type:
[root@puppetagent1 ~]# cat policy.json
{
name: test_node1,
repo: Centos-6.4,
task: centos,
broker: pe,
enabled: true,
hostname: node${id}.cse.com,
root_password: razor123,
max_count: 20,
tags: [small]
}
We are good to create a policy through the following command:
[root@puppetagent1 centos.task]# razor create-policy --name demo --repo CentOS6.5-Repo --hostname host$(id).cse.com --root-password dell01 --broker foo --tag test --task centos From http://localhost:8080/api: name: demo repo: CentOS6.5-Repo task: centos broker: foo enabled: true max_count: nil tags: test nodes: 0 command: http://localhost:8080/api/collections/commands/6
Creating tasks
By default, Razor is shipped with CentOS tasks under /opt/razor/tasks/centos.task .
Once you successfully create the policy, you can see the following output:
# razor nodes
From http://localhost:8080/api/collections/nodes:

+-------+------------------+------+--------+----------------+
| name | dhcp_mac | tags | policy | metadata count |
+-------+------------------+------+--------+----------------+
| node1 | 00:0c:29:04:a1:ad | test | --- | 0 |
+-------+-------------------+------+--------+---------------+
Query an entry by including its name, e.g., `razor nodes node1`
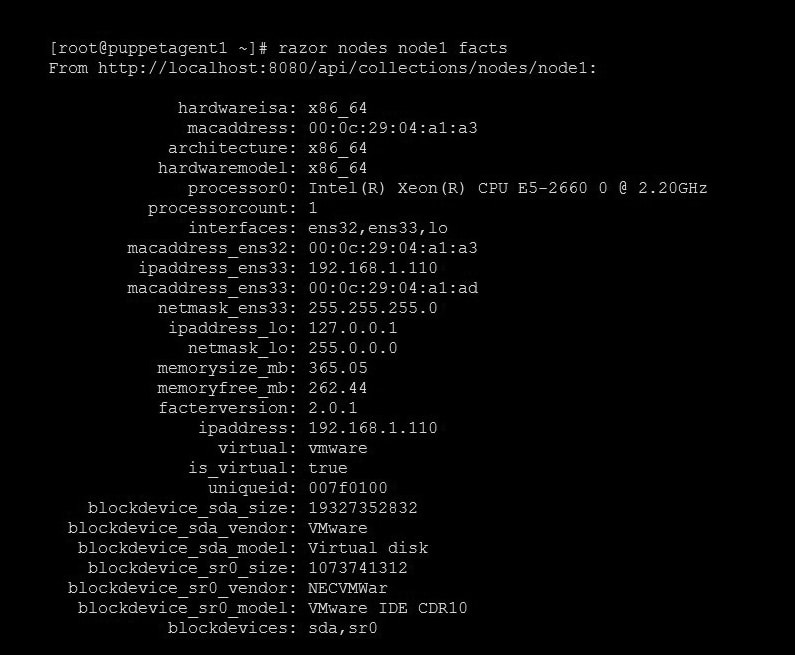
To get the detailed information about the node1, run the following command:
#razor nodes <node name> facts
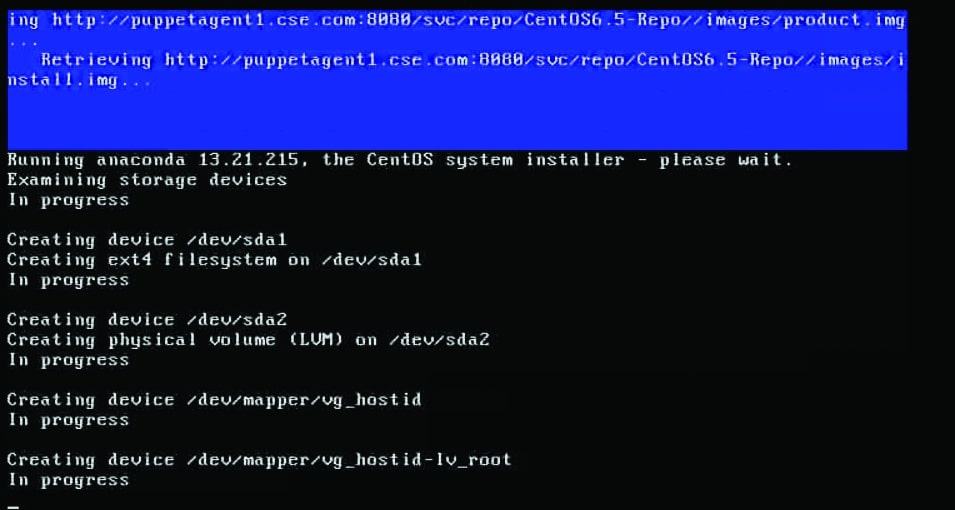
Finally, after a few minutes, a new CentOS 6.5 VM comes up.
Wrapping up
Razor provides real-time inventory data for every hardware node. Its auto-discovered ability eliminates the inefficient, error-prone manual process. Razor effectively uses IT defined policy to specify the desired state of each hardware node and its operating system. It automatically tracks provisioning progress toward this state, and can even decide when to re-provision. This gives you full control over a nodes boot sequence and a complete log of its lifecycle. With RESTful open APIs, Razor gives you full programmatic control of the rules and models that govern operating system image selection and hardware provisioning
References
[1] Razor: https://github.com/puppetlabs/razor-server
[2] Razor microkernel: https://github.com/puppetlabs/razor-el-mk
[3] Next Gen Provisioning: http://puppetlabs.com/solutions/next-generation-provisioning


