Here’s a basic Android application — a Simple Interest Calculator, which illustrates the application development method. To follow this tutorial, you should have written ‘core’ Java code, and should have some experience using the Eclipse IDE.
The following steps are a shortened version of what’s on the Android developer website; you can check the website for more details.
- Prepare your development computer: You may need to install JDK version 5 or 6, and Eclipse (version 3.4 or 3.5, but not 3.6) if you don’t already have these installed.
- Download and install the SDK starter package and extract its contents to a folder, then add the folder location to your
PATHvariable (especially if using Windows). - Install the ADT (Android Development Tools) plugin in Eclipse: Via Help –> Install New Software –> Add, set up the remote update site https://dl-ssl.google.com/android/eclipse/. If you have problems with this URL, replace
httpswithhttp. Install the ADT plugin (see Figure 1), restart Eclipse, and set the ‘Android’ preferences in Eclipse to point to the location where you’ve extracted the SDK. -

Figure 2: AVD Manager button Add Android platforms and other components to your SDK: Use the Android SDK and AVD (Android Virtual Device) Manager included in the SDK starter package, which is represented by the Eclipse toolbar button shown in Figure 2. With it, you can add one or more Android platforms that you intend to develop (e.g., Android 2.0 or Android 2.2) and other components to your SDK. You can also install the documentation for the version of Android you are downloading. To launch the Android SDK and AVD Manager, you can also execute the Android tool in the SDK’s /tools folder.
Creating a new Android project
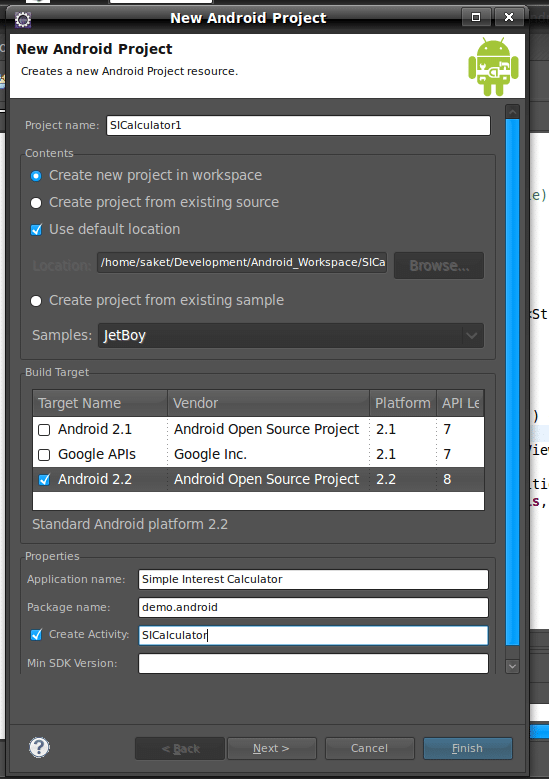
Once you’ve set up the environment, you can create a sample Android Project in Eclipse; the new Android project dialogue is shown in Figure 3.

Some important fields in this dialogue:
- Build Target lets you choose one of the Android SDK versions you have installed with the SDK and AVD Manager.
- Application name is the title that is shown when you run your application.
- Package name must be at least two levels deep (for example, “home.saket”).
- The Activity name specifies the name of your class (that is going to be created), which will extend the Activity class from the Android library. We will cover the Activity class in some other tutorial.
Android project folder structure
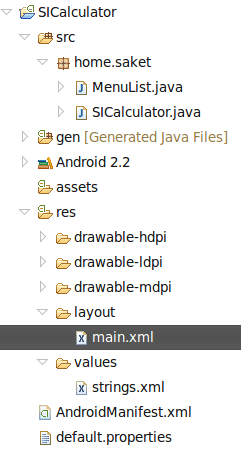
When the new Android project is created on disk, it has a folder structure as shown in Figure 4. This helps you organise your application resources in a logical manner:

src— Holds all the Java classes that you createres— Short for Resource, it holds all your images, layout files, andstringclass="Apple-converted-space"value XMLdrawable— Contains three folders for storing images with different sizes based on the resolution of mobile phone screenslayout— Consists of a single XML file initially defining the layout configurationsvalues— Holds an XML file namedstrings.xmlwhich maps values of IDs to string values. Discussed later in the tutorialAndroidManifest.xml— This is the main configuration file for the whole of Android application. It defines the way your application will be launched, the number of activities present in your application, the permissions that your application has, etc.default.properties— This file is generally used for localisation purposes
User interface
Let’s begin with res/layout/main.xml, which configures the layout of the application. The layout terms/tags that we use are very similar to Java Swing components:
LinearLayout: A layout that arranges its children in a single row or column. The orientation attribute specifies whether the layout is horizontal or vertical (a row or a column).Button: Specifies a push-button.EditText: Corresponds to an editable text box where the user can enter data.TextView: Corresponds to a Label field.
You can either use the UI layout tool provided by ADT, or hand-edit the XML. I prefer the latter because I have more control over the UI, and the ADT tool is a bit jerky as of now, needing a lot of improvement.
Using the tags listed above, I created the layout of the demo application in main.xml. You can obtain the full code from my GitHub repository.
Now, let’s examine how we build the layout. As the first step, I used LinearLayout to set the layout on the screen:
<LinearLayout android:id="@+id/LinearLayout01"
        android:layout_width="fill_parent"
        android:layout_height="fill_parent"
        android:orientation="vertical"
        android:background="@drawable/simpleinterest1"
        xmlns:android="http://schemas.android.com/apk/res/android">
android:id— A unique ID for the component, which can be used to refer to it in application codeandroid:layout_widthandandroid:layout_height— Gives the instruction on how the layout should occupy the screen. The fill_parent value fills the screen completely, while wrap_content varies size as per the size of contained content.android:orientation— Orientation of the layout. When horizontal, components are added side by side; when vertical, components are added one below the other.android:background— Indicates a background image — a resource in the drawable folder. In this case, it is the fileres/drawable-hdpi/simpleinterest1.jpg, which you can obtain from the GitHub repository.
The next step is to add a TextView specifying the title, the result of which is shown in Figure 5.

We then add another LinearLayout nested inside the parent LinearLayout, with horizontal orientation, so that we can have a label and a text-box beside each other, as shown in Figure 6:
<LinearLayout android:id="@+id/LinearLayout02"
    android:layout_width="fill_parent"
    android:layout_height="wrap_content"
    android:orientation="horizontal"
    android:layout_marginTop="20dp"
    android:layout_marginLeft="25dp"
    >
        <TextView android:text="@string/principal"
        android:layout_width="wrap_content"
        android:layout_height="wrap_content"
        android:id="@+id/TextPrincipal"
        android:textSize="20dp"
        >
    </TextView>

    <EditText android:id="@+id/pAmount"
        android:layout_width="wrap_content"
        android:layout_height="wrap_content"
        android:width="100dp"
        android:height="15dp"
        android:layout_marginLeft="95dp"
        android:inputType="numberDecimal"
        >
    </EditText>
</LinearLayout>

Note: 100dp is 100 density points. These units abstract away screen-size issues; they translate to differing numbers of pixels based on differing screen resolutions on different devices. That is, 100dp is different for a 7.6 cm (3 inch) screen and for a 10.2 cm (4 inch) screen, making your UI specification independent of physical screen sizes.
Our fourth step is to repeat the previous step, modifying IDs and labels for the other two components, the result of which is shown in Figure 7.

Now that we’re done with the UI, let’s move on to the functionality of our application — to calculate simple interest based on the given input, and display it to the user.
The Java code
I have created just one Java class here; as an application grows more complex, you can have multiple Java classes performing operations.
As promised earlier, let’s look at the Activity class. An Activity, in Android terms, is nothing but a screen window. We extend our class with Activity because we need to display a screen window with the application UI. When you want to perform different actions, or have multiple screens in your application, you need to have separate Java classes extending the Activity class, one for each of the screen windows.
When you create a new Android project, these three lines of code will be automatically generated for you:
public void onCreate(Bundle savedInstanceState) {
super.onCreate(savedInstanceState);
setContentView(R.layout.main);
The onCreate() method is invoked when your application starts. It calls the super-class’ onCreate() method to set the initial parameters of the screen window. setContentView(R.layout.main) initialises the screen layout with the UI described in main.xml.
Next, your Java code has to obtain references to the UI elements, to retrieve user inputs. For this, use a method named findViewById(), passing the unique ID that we assigned to each UI component in main.xml.
principal = (EditText)findViewById(R.id.pAmount);
rate = (EditText)findViewById(R.id.rate);
period = (EditText)findViewById(R.id.period);
messageBox = (Button)findViewById(R.id.box);
You can refer to the full code listing from the GitHub repository. The basic steps taken are:
- Obtain a reference to the Calculate button so you can assign an
OnClickListener()to the button. This catches the click event of the button, and makes the user override theonClick()method of the listener.messageBox.setOnClickListener(new OnClickListener() { public void onClick(View v) { } - Perform basic validations for NULL values, on the contents of the
EditTextelements. - Use the Double wrapper class to convert the string values to their actual Double values.
- If any error occurs, display
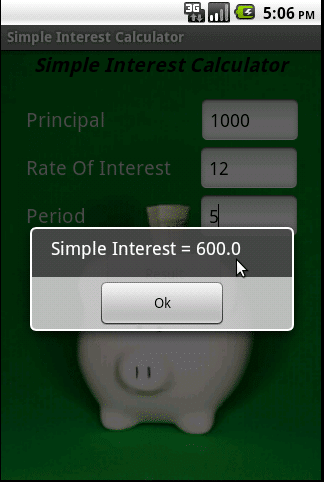
aToastmessage — a pop-up message telling the user about the error. - If all the validations are passed, then calculate the simple interest and display it in an alert dialogue box. The syntax used to show the
AlertDialogis as follows:// prepare the alert box AlertDialog.Builder alertbox = new AlertDialog.Builder(v.getContext()); System.out.println("Alert builder"); // set the message to display alertbox.setMessage("Simple Interest = "+si.toString()); // add a neutral button to the alert box and assign a click listener alertbox.setNeutralButton("Ok", new DialogInterface.OnClickListener() { // click listener on the alert box public void onClick(DialogInterface arg0, int arg1) { // the button was clicked Toast.makeText(getApplicationContext(), "Thank You !!!!", Toast.LENGTH_LONG).show(); } }); // show it alertbox.show();

I have created a screencast of this application, which provides a visual overview of it and enables you to understand it better.
[youtube=http://www.youtube.com/watch?v=4m83Iw_7gf4&w=560&h=349&rel=0]
This was a simple example of Android application development. So there is a lot more to Android than meets the eye!
References
For more information on Android and demo applications, refer to the following links:
- Android developer website
- Android Application Fundamentals
- anddev.org
- Android Beginners Google Group


[…] at the launch of the application for 5 seconds. The only new Android property you see from the previous article is android:scaleType; which is used while scaling the image. If the screen size changes, then the […]
Thank you a lot for your valuable tutorial , this helped me to put first steps to Android
best example…thank you…
hi Saket,
I have downloaded the sample project but unable to run it
console shows some error! i.e.
[2013-01-23 18:45:40 – SplashScreen] New emulator found: emulator-5554
[2013-01-23 18:45:40 – SplashScreen] Waiting for HOME (‘android.process.acore’) to be launched…
[2013-01-23 18:47:52 – SplashScreen] HOME is up on device ’emulator-5554′
[2013-01-23 18:47:52 – SplashScreen] Uploading SplashScreen.apk onto device ’emulator-5554′
[2013-01-23 18:47:52 – SplashScreen] Installing SplashScreen.apk…
[2013-01-23 18:50:05 – SplashScreen] Failed to install SplashScreen.apk on device ’emulator-5554!
[2013-01-23 18:50:05 – SplashScreen] (null)
[2013-01-23 18:50:05 – SplashScreen] Launch canceled!
as m new to android please help me out asap..
Thanks
Which project have you downloaded?
i have downloaded the splashscreen and Simple interest project, both and both shows the same error
m using android developer tool of java eclipse which i downloaded from a link given by u..
simple interest is now working by increasing avd’s sd card size to 1000mb,but still splash screen isn’t working
You are my man………….i have searched everywhere like a hungry animal and finally i found all the basic functions and their explanations in your article………there are a tons of android tutorial on web, but none explained very basics of android app as much as you did in here………….keep this up dude………..thanks a lot.
good
Java and XML are the two main programming languages used in Android App development. Knowledge and mastery over these programming languages are, therefore, prerequisites to developing an Android app.