Here’s introducing Google’s new App Inventor service (the beta version) to design graphic applications for the Android platform. The Android in question is 1.5 Cupcake, running on an Openmoko FreeRunner GTA02, though you could use other Android phones, or even an emulator on your PC instead. While it’s possible to use other OS platforms on the PC side, this article focuses on a FOSS platform — Ubuntu.
App Inventor for Android (often abbreviated to AIA) lets you create mobile applications for the Android platform in a visual manner, even if you don’t have a programming background. Instead of writing oodles of code, you visually design the way the application should look, and behave.
App Inventor is a Google Labs service, which is in beta testing. To get access to App Inventor, you need to visit this Web page and fill out the form. App Inventor users need to have Google accounts; the login authentication, and storage for your projects, is linked to your Google account. Google is rolling out access to the App Inventor system gradually, and you will receive a welcome email when you have been granted access. This email contains a link to the App Inventor site, and links to the documentation you need to get your PC and phone set up. It took around a month, if I remember right, for my request to be approved. However, in the past, with other products, Google has reduced the waiting period, and increased the number of accounts with access — so you may have to wait only for a short time.
[Editor’s note (2012-05-10): App Inventor is currently maintained by MIT. Although you still need to use a Google account to start using the application, you can get started right away without waiting for any invites. Also of note is many of the hyperlinks the author had used in the article originally pointed to the Google-hosted project site. We’ve tried to search and relink the references from the MIT website. However, there are always chances of errors — please notify us in comments if you find any. Finally, your mileage on using this application can greatly differ from that of the author’s as this article is from our November 2010 archives.]
Usage overview
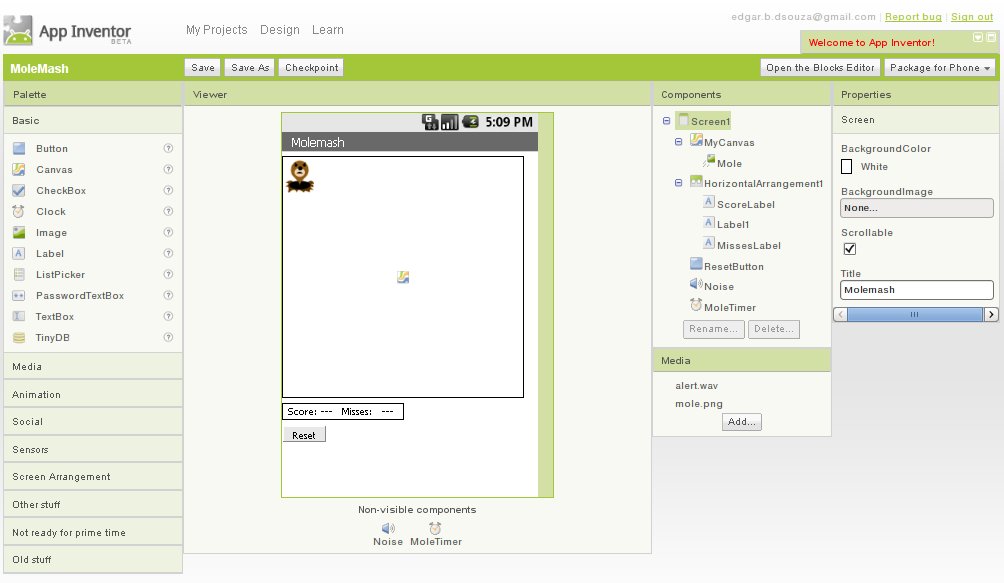
The AIA Web application interface provides a palette of available components, a viewer/design canvas to which you drag components you want to use, a tree-view of added components, and a properties pane where you can configure the properties of the selected component.
While you design the user interface of your Android app in the AIA Web application, open a separate Java Web Start application called the Blocks Editor, in which you use automatically-defined blocks (and more) to set up the application’s behaviour. The AIA Web application in the browser communicates with the Java application over the localhost interface (the Java application listening on a particular port, and the browser-based design application connecting to it).
If you use Firefox, as I do, you can see the constant status-bar flickers as the browser communicates with ‘127.0.0.1’. The reason for the Blocks Editor being a separate Java application is so that it is outside the browser sandbox, and can communicate with the attached Android phone without being blocked (it uses the Android debugger, adb, which is among the tools that will be installed on the PC).
The Blocks Editor, connected to an Android phone, displays a running version of the application you are designing and building. As you complete each block in the Blocks Editor, and it is parsed and found to be valid, the newly-created behaviour is exhibited by the application running on the phone (or in an emulator) within a few seconds. This is an exhilarating way to learn, try, test, and debug. It’s impressive how quickly you can get significant functionality working in half an hour, which with conventional coding would have taken an average programmer an afternoon for a single “code, package, install-on-the-phone and test” cycle.
Let’s now look at the respective roles of the AIA Web application and the Blocks Editor, before going on to the phone or emulator, which is (merely) used to provide a live run of the app you are developing.
The AIA Web application
It’s time we looked at some images to illustrate what we’re talking about. I took some screen captures with the fourth official Google tutorial project (a game called MoleMash) opened, to point out some elements which didn’t occur in previous tutorial projects.

Figure 1 is an “overview” of the whole AIA Web application. As you will notice, the application has the My Projects, Design and Learn links in the grey area at the top. The first two switch between a list of your existing projects and the currently-opened project in the design area. The third, Learn, leads to a page with links to Getting Started, Tutorials, Reference Documentation, FAQ, Troubleshooting and more.
The green bar below that contains (from left to right) the project name, Save, Save As and the Checkpoint button. This last appears to create a copy of the project with the name you specify; so it’s not initially obvious how different it is from the Save As button, other than that it appends “checkpoint_n” to the project name. To the right of the page, in this same green bar, are buttons to open the Blocks Editor, and to package the currently open project as an installable .apk file, which you can download to your PC, or install directly to the connected phone.
Components
Note: The term “component” refers to an item available in the AIA Web application’s palette, which you drag onto the design viewer/canvas to use in your application. If you have done GUI programming before, these components are conceptually equivalent to widgets or controls in other GUI toolkits.
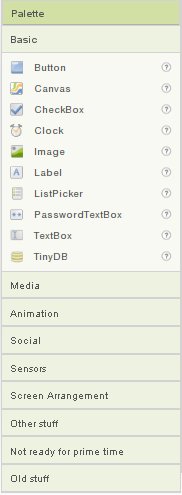
Figure 2 shows a closeup of the palette of components, with the Basic group expanded. The App Inventor team has created plenty of components for use with an Android phone, including:
- The basic UI components with the familiar Button, CheckBox, Image, Label, TextBox, PasswordTextBox, and ListPicker components. There are also Canvas (for drawing) and Clock (for timer events) components.
- The database component to store information: Your applications can even store data created by you in a database, using a TinyDB component. You could create a make-a-quiz application, in which teachers can save quiz questions for students to answer later, perhaps something like a flash-card memory-building application, or a game.
- Components for screen layout management: Containers that can contain other controls, and arrange them vertically, horizontally, or in a table.
- Components for simple animation, including an image sprite component, which you can use to create games.
- Media components include a sound component (which also handles making the phone vibrate), a video player, and camera controls.
- The ActivityStarter component lets you fire off an activity, such as another App Inventor application, the camera application, a Web browser/Web search, or the maps application on the phone.
- The SpeechRecognizer and TextToSpeech components’ purpose is obvious from their names. However, information on the Net says that to achieve effective text-to-speech (and presumably, voice recognition), you need to be running at least Android 1.6, Eclair.
Designing
Figure 3 shows the “viewer” area where you drop components from the palette in order to use them.
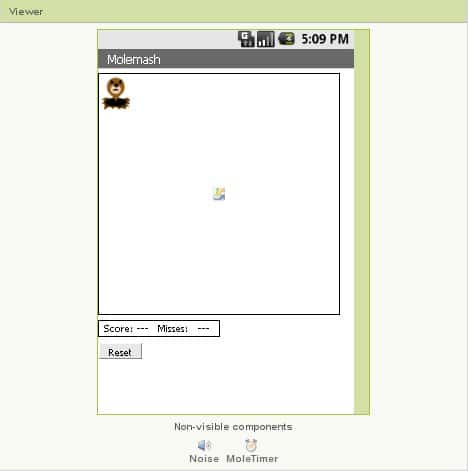
As part of the MoleMash tutorial, I have added a Canvas component containing an ImageSprite, and below the Canvas is a HorizontalArrangement, containing Labels for Score and Misses. Below these is a Reset Button. Below the white canvas area are two non-visible components. (Components can be visible or non-visible. For example, a Button component is visible on-screen to the user, who can interact with it. On the other hand, a Clock component is non-visible; it is a source of timer events for the application, and not an item that the user interacts with.)
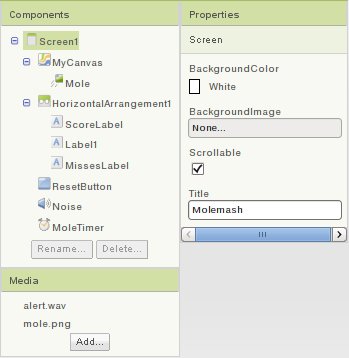
Figure 4 shows both the components tree and the properties pane. The indentation of components below each other in the tree shows a parent (container)/child relationship. For example, the Mole (ImageSprite) component is contained in the MyCanvas component. The Rename and Delete buttons have the obvious functions when a component other than Screen1 is selected.
The screen, which is added by default to every new project, cannot be renamed or deleted; you can, however, change the Title that is displayed to the user, as you can see in the properties pane in this image. Also, it is not possible, at present, to have multiple screens in one project — so you can’t create multi-screen applications with Inventor. However, there is a workaround: have one AIA app launch another AIA app, as documented at here.
The Blocks Editor
The Blocks Editor uses the Open Blocks Java library, distributed by MIT’s Scheller Teacher Education Program. Open Blocks visual programming is closely related to the Scratch programming language, a project of the MIT Media Laboratory’s Lifelong Kindergarten Group. (Incidentally, if you’ve seen or played with the Scratch-like Sugar-TurtleArt package, which is available for Ubuntu, and is one of the activities on the OLPC XO, you’ll find App Inventor somewhat similar.)
The compiler for the visual blocks “language” uses the Kawa Language Framework; Kawa’s dialect of Scheme is developed by Per Bothner and distributed as part of the GNU Operating System by the Free Software Foundation.
Opening the Blocks Editor
Note: I have placed information on the setup in box items, rather than mixing it in here. Please refer to the box items “Platform and setup with FreeRunner” and “Reconnecting the phone to App Inventor” for that information.
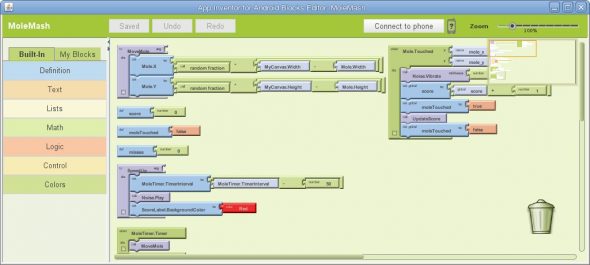
Figure 5 is a screen capture of the Blocks Editor with the MoleMash tutorial open. To open it, click the Open Blocks Editor button in the AIA Web application. The browser asks you what to do with the .jnlpfile you are downloading. Choose to run it with Java Web Start, then wait while the application is downloaded.
Note: For those on data-capped connections, the Blocks Editor downloads every time you open it. If you have problems getting it to communicate with the phone, sometimes you need to close it and reopen it. If you had NoScript enabled in Firefox, where you are running the AIA Web application, Blocks Editor complains that it is unable to get “project information”; you have to close Blocks Editor, disable NoScript, restart Firefox, open App Inventor and your project, and relaunch the Blocks Editor. Why am I mentioning this? From a quick test with Gkrellm’s data-transfer monitoring, the data transferred (both ways) while opening the Blocks Editor is around 3.8+ MB. Multiply that by a few times a day, and it’s something to keep in mind if you’re close to your data cap on your Net connection, or paying per MB of transferred data.
Once the Blocks Editor’s Java Web Start application is downloaded, you should see a prompt asking you whether you want to run the application; click Run. After the Blocks Editor starts up, it sometimes fails to retrieve the open project information from the browser. The note above tells you about Firefox with NoScript — but if you don’t use NoScript and still have this problem, then try (with the Blocks Editor remaining open) clicking My Projects in the AIA Web application, and then reopening the same project you had opened. This will sometimes cause the Blocks Editor to update and display the blocks for your project.
Returning to Figure 5, on the left you see two tabs (palettes) of blocks: Built-In and My Blocks. The first of the two contains App Inventor’s built-in blocks for use in applications. These include:
- Definition: The skeleton blocks of a procedure with a returned result value (commonly called a function); a procedure with no return value; a global variable (at present, local variables are not available, but the Inventor team has accepted a feature request for these, and it should probably soon be available); a name for a parameter block to a procedure, which specifies by what name the corresponding parameter’s value is available for use inside the procedure; and a call (pipe) block, which calls a function and discards the returned value.
- Text: Blocks for several common string operations, including slicing/splitting, sub-string searches, concatenation, and equality checks.
- Lists: Several common array-handling operations
- Math: Blocks for building the Starship Enterprise :-) (No, just kidding, they’re the mathematical operation blocks one would obviously expect from the name.)
- Logic: Boolean logic blocks
- Control: Flow-control blocks, including if, if-else, for each, while, and close screen (i.e., close the application, since each app has only a single screen).
- Colors: Predefined colour blocks that you can snap to the colour properties of other blocks, which will affect the colour of the component as displayed on the screen.
When you drag a component from the palette to the viewer in the AIA Web application, the Blocks Editor creates corresponding blocks for that component. For example, if you drag a Button component to an otherwise empty viewer in the AIA Web application, in the Blocks Editor you will find newly-added blocks for the button’s properties, including Alignment, BackgroundColor, Height, Width, Image (image to display on the button), Text (caption), TextColor, and more, as well as event-handler blocks such as Click(), GotFocus() and LostFocus(). These blocks are contained in the My Blocks tab of the blocks palette, divided into drawers for each component added in the AIA Web application.
Figure 6 shows the My Blocks tab, with the drawer for the button named ResetButton opened. The green blocks, “when ResetButton.Click” (and GotFocus and LostFocus) are event-handler blocks. The light-blue blocks are for property gets (read the value of the property) and the darker blue ones with a socket are property set blocks — they assign a new value to the property, based on what you snap into the socket. (Note that the drawer background is actually semi-transparent, and the blocks ‘behind’ on the canvas show through, giving a cluttered feel; I moved the blocks out of the way in order to give the drawer a clean background in this image capture.)
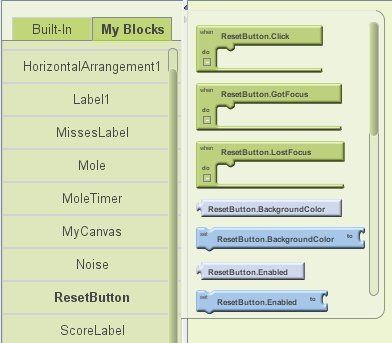
You can drag, for example, the “when ResetButton.Click” block out onto the canvas. To define what happens when you click this button in your app’s interface, you would plug into it other blocks representing logical constructs, other components’ properties (setters and getters), method invocations, etc. Figure 7 shows the blocks I’ve filled into this event handler.
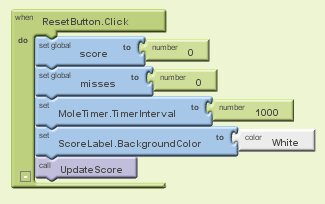
(Note that there are more blocks than there should be according to the tutorial, because I was playing around to add the extra features suggested at the end of the tutorial.) If the text in the image is visible to you in its printed size, here is what the blocks used in the event handler do:
- Set the global variable score to 0 (represented by a number block with the value 0).
- Set the global variable misses to 0.
- Reset the timer’s interval to the default one second (I had defined behaviour to reduce the interval as the score increased — every 50 points, to play a sound, set the score label’s background colour to red, and decrease the timer’s interval).
- Reset the score label’s background colour to white, in case the user hits Reset just after a 50-point “speed-up” score, and the label was red.
- Call a procedure named UpdateScore, whose basic function is to update the text displayed on the labels to the current values of the global variables score and misses (which we have just set to zero).
Oh, wait — the recycle bin at the bottom right of the Blocks Editor is probably obvious, but still: if you have a block on the canvas that you don’t need/want, simply drag the block over the bin, and release, to delete it.
Now, to sum up what we’ve covered this far: we designed the application’s layout (and non-visible components) in the AIA Web application, and defined its behaviour in the Blocks Editor. Next, we move on to the third step in the chain: connecting the Blocks Editor to an Android phone, or to an emulator running on the same PC.
Platform and setup with FreeRunner
- Platform (PC): Dell Studio 1555 laptop running Ubuntu 10.04.1 LTS, with Sun Microsystems Java 6 Update 18 (specifically installed via Synaptic, package named
sun-java6-jre). - Platform (phone): Openmoko FreeRunner GTA02, running Android 1.5 Cupcake and I also tried the emulator packaged with the App Inventor Extras software. (I installed the version distributed by the AndroidOnFreeRunner project, which took over from the Koolu attempt to port Android to the FreeRunner. The project shifted from the Openmoko site to Google Code. Installation instructions are here. Find more information about the project on the same wiki.)
- App Inventor Extras Software:
appinventor-extras_1.0-2_all.deb - Browser: Firefox 3.6.10 with the NoScript extension disabled as advised.
The instructions to set up your phone and computer are here, so I will not repeat them here.
For the Install the App Inventor Extras Software section, since I am running Ubuntu, I visited the Instructions for GNU/Linux and downloaded appinventor-extras_1.0-2_all.deb from the link. I installed it with GDebi (double-clicked the downloaded deb file in Nautilus).
As instructed in the set up your phone section, I found and set Unknown Sources, USB Debugging, Stay Awake and Orientation. However, where they say: “Make sure your phone is unlocked — that is, ready to make a call or run an app. Connect the cable from the phone to the computer’s USB port. You should see two new notifications appear on the phone, with icons in the status bar: A ‘USB connected’ notification that the phone is connected to the computer via USB /and/ A ‘USB debugging connected’ notification that the phone has USB debugging turned on” — here, I found that I was not able to see these notifications.
After rechecking the whole procedure, and still failing to see the notifications, I was stymied, and tried the adb devices command (the Android debug bridge, installed by the App Inventor Extras Software) to see if it found the FreeRunner. But no devices were detected.
A Google search led me to this project site, where I found out what was wrong. The USB networking connection (the eth1 interface on my system) was auto-configured in Network Manager to automatically connect — but to request an IP address via DHCP! Android doesn’t supply that, of course. I changed that to Manual, and assigned the IP address (PC side) as 192.168.0.200/24, since Android on FreeRunner sets the phone’s address to 192.168.0.202. The Connect automatically check-box wouldn’t stay checked, so I used a left-click on the NetworkManager icon in the notification area to get to the list of available connections, where I enabled the Wired connection for the FreeRunner.
After it came up, I ran an adb kill-server command, followed by:
$ ADBHOST=192.168.0.202 adb devices
 List of devices attached
 emulator-5554 device
Strange name, but I was seeing the FreeRunner! To make sure, I tried to view the phone’s log:
$ export ADBHOST=192.168.0.202
$ adb shell "logcat"
 [snip several hundred lines]
 I/ActivityManager( 870): Displayed activity com.android.settings/.DeviceInfoSettings: 879 ms
 D/lights ( 870): Battery charging or low buttons /sys/class/leds/gta02-power:orange ON (255)
 D/dalvikvm( 870): GC freed 13828 objects / 680744 bytes in 191ms
 I/ActivityManager( 870): Starting activity: Intent { action=android.intent.action.MAIN comp={com.android.settings/com.android.settings.ApplicationSettings} }
 I/ActivityManager( 870): Displayed activity com.android.settings/.ApplicationSettings: 609 ms
 I/ActivityManager( 870): Starting activity: Intent { action=android.intent.action.MAIN comp={com.android.settings/com.android.settings.DevelopmentSettings} }
 I/ActivityManager( 870): Displayed activity com.android.settings/.DevelopmentSettings: 805 ms
D/lights ( 870): Battery charging or low buttons /sys/class/leds/gta02-power:orange ON (255)
I had let the phone’s battery drain down to zero, and it was recharging — and besides, I didn’t have any emulator running — so now I knew that adb was indeed showing me a connection to the phone.
Note: For phones running later versions of Android, you will probably see those notifications I didn’t get, but for Android 1.5 Cupcake, especially the port on the FreeRunner, ignore the App Inventor setup page’s points about notifications and icons in the status bar. If adb is connecting to the phone and can give you a log output, it should work.
The next big step was connecting App Inventor to the phone. This is documented here, and again, I won’t repeat any of it. I proceeded with the steps — creating a new project, opening the Blocks Editor, and clicking the Connect to phone button. However, it had been quite a while since my last adb communication with the phone, and so this failed, with an error message that the Blocks Editor could not detect any connected devices. Returning to my terminal window, I ran:
$ adb get-state
adb server is out of date. killing...
* daemon started successfully *
device
Another adb shell 'logcat' returned the previous log (plus much more). With communication with the phone reestablished, I went back to the Blocks Editor, and clicked Connect to phone again. This time, after about 8 to 12 seconds of a “Communicating” message, with an animated icon, it established the connection and opened the (to be designed) application preview on the phone’s screen.
With this working, I proceeded to the tutorials, as advised at the end of the earlier tutorial. However, my experiences with reconnecting the phone with Blocks Editor tended to vary a little, so both for convenience, and for the couple of extra points, I’ve included the following section with a check-list for reconnecting the phone.
Reconnecting the phone to App Inventor
If you disconnect the phone and close the Blocks Editor and the App Inventor site, you have to perform quite a few steps when you want to return to working with App Inventor. Here’s a quick check-list:
- Open the App Inventor site, logging in if required.
- Open the project you were working on, or create a new one. In App Designer, click the “Open Blocks Editor” button and wait while it downloads and runs the editor.
- Reconnect the phone via the USB cable (duh!).
- Check that your USB networking interface (
usb0or, in my case,eth1) has an IP address — runifconfigin a terminal; if it shows the interface without an IP address, check your networking settings. If NetworkManager is not set to connect automatically, left-click the notification-area NM icon, and enable the Wired connection for the FreeRunner. - Run
adb kill-serverfollowed byadb get-stateand you should see something like the following:daemon not running. starting it now * daemon started successfully * device
- Now click the Connect to Phone button in the Blocks Editor, and shortly, you should see the preview screen come up on the phone, and the Blocks Editor button caption changing to “Restart Phone App”.
- If this previous step fails with an error message from the Blocks Editor, as it did infrequently in my case, I have found that pinging the phone (ping 192.168.0.202) and letting around 8 replies come back before hitting Ctrl+C makes the Block Editor “see” the phone. By trial and error, while getting the phone connected the first time, I was again doing data transfer between phone and PC by retrieving several hundred lines of log data, with the
adb shell 'logcat'command. Thus, it may be some peculiarity with my setup, phone, or Android on FreeRunner, that requires some data to flow between phone and PC before the Blocks Editor can communicate with the phone.
Emulator included
I’ve dealt with connecting a phone running Android 1.5 to the PC, and to the Blocks Editor, in the box “Platform and setup with FreeRunner” box item above. However, it can sometimes be irritating to keep plugging in your phone, and tying it up with App Inventor, especially if it’s your main phone. You don’t need to do this. The App Inventor Extras package that you need to download and install on your PC (see the setup box above) includes an emulator for an Android 2.1 phone, so you don’t need a real phone connected to the USB port.
The Android emulator mimics the hardware and software features of a mobile device, with some obvious exceptions: it cannot receive or place actual phone calls; you can’t “shake” it, obviously, since there is no real accelerometer; and without an actual GPS chip, you can’t get real GPS readings. But for all these, it does provide a pretty good simulation of an Android phone.
There are a variety of navigation and control keys, which you can “press” using your mouse or keyboard, to control Android and any applications. An application you are developing in App Inventor, and which is running on the emulator, can use platform services to invoke other applications, access the network, play audio and video, store and retrieve data, put up user notifications, and more.
To let you model and test your application against multiple phones/versions of Android, the emulator supports Android Virtual Device (AVD) configurations, in which you can specify the Android platform version that you want to run in the emulator, as well as the hardware options and emulator skin files that you want to use.
To use the emulator, find the directory where App Inventor Extras were installed, and in it the commands-for-appinventor folder; there, run the command named run-emulator. If you have a terminal open, the locate command can help find it quickly, and a copy/paste will get it going in no time:
$ locate run-emulator
/usr/google/appinventor-extras/commands-for-Appinventor/run-emulator
$ /usr/google/appinventor-extras/commands-for-Appinventor/run-emulator
$ emulator: WARNING: system partition size adjusted to match image file (74 MB > 66 MB)
emulator: warning: opening audio input failed
The emulator, which is based on QEMU, appears in a new window. It takes some time to start — perhaps even a minute or more — because it’s booting up the virtual phone “from scratch”. While booting, it displays first the plain text “Android”, then a stylised and animated Android logo, finally bringing up the Android desktop.
In Figure 8, the Blocks Editor is connected to the emulator, and the MoleMash game tutorial is running. You can see the simulated buttons and keypad on the right of the window.

As you work, you’ll need to switch between the emulator window, the Blocks Editor, and the Designer. The App Inventor team warns: “Don’t connect a physical phone to the computer while you’re using the emulator, or App Inventor will become confused. If you want to switch to testing on a real phone, it would be best to close the Blocks Editor, shut down the emulator, plug in the phone, check that you can find it using adb (see the boxes on the ‘setup’ and on ‘reconnecting’) and then re-open the Blocks Editor.”
Observations
Here are some of my observations while using this experimental service. They are not complaints; I expect that as the App Inventor team continues working, these and other minor glitches will be fixed, and the service will turn out to be a real asset to Google, as well as to people looking to quickly develop applications for Android.
Typeblocking is great!
At some point during the tutorials, you’re introduced to the typeblocking feature of the Blocks Editor, where you start typing the name of a component or variable, and get a pop-up drop-down list containing possible completions. While using this feature, the pop-up frame is way too narrow for even the component names you are advised to use in the tutorials, i.e., it can sometimes be plain guess-work, leaving you unsure whether you’re choosing the right one or not. Still, once you select a component and hit Enter, the block is placed on the canvas for you — and if you had recently worked on a block whose socket accepts the type of this new block, the Blocks Editor obligingly snaps it home in the socket for you! Neat!
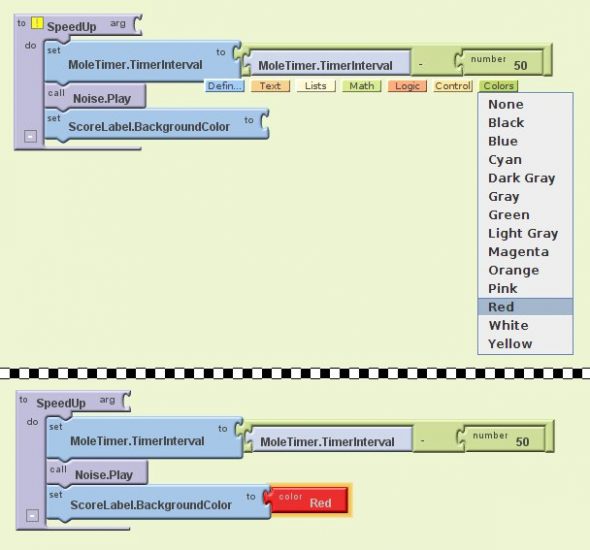
Another feature that saves visiting the blocks drawers for built-in blocks is to left-click on the canvas. This presents you with a menu, from which you can quickly select built-in blocks, as shown in Figure 9. In this case, I needed a colour block, and picked Red from the Colors menu option. This created a colour block with the value red, which I plugged into the socket to complete the action, as you can see in the lower part of the same image.
AIA Web application viewer area
I noted that the App Designer viewer/design canvas area is quite a bit “smaller” than the actual screen area on my FreeRunner, which means that if I try to increase the height or width settings of components to take up more screen space on my phone, I run out of design canvas area in the App Designer. I expect this can be worked around by setting one or more dimensions to that of the screen, or a container, but I haven’t yet tried this out. It’s how GTK and other toolkits work, though, so there should be a solution to this issue.
Name blocks versus value blocks
While setting up the canvas (in the PaintPot tutorial) to draw a circle on the Touched event, I first encountered event parameters. The blue blocks (name x, name y, name touchedSprite) dock in nicely with the event-handler block (green, when DrawingCanvas.Touched) as shown in Figure 10.
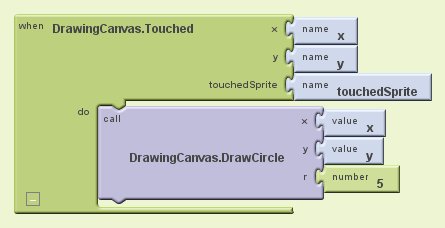
You might expect to be able to click-drag or somehow copy those name blocks and use them as parameters inside the event-handler block — but like me, you’d be wrong. In this case, after I added the call DrawingCanvas.DrawCircle block as the action to perform, I tried to drag the name blocks over and use them. You can’t. You have to pop open the My Definitions drawer under the My Blocks tab, and drag the value x and value y blocks down — and plug them into the x and y parameters for the DrawCircle method. As you can see in Figure 10, the parameter name (in bold) on the name block is the same as the parameter name (in bold) on the value block — that’s how you know they’re the same parameter.
You can rename parameters: click on the parameter name, which is in bold (‘x’ for instance), and type a new name (say, ‘touched_x’) and hit Enter. If you already have a value block corresponding to that parameter on your canvas, that value block’s name also changes to reflect the new parameter name.
My Definitions is global?
At present, all variable declarations are global. However, the App Inventor team has accepted a feature request for local variables, which should probably be implemented soon. What is mildly confusing, though, is that parameter block definitions in My Definitions are apparently also global. While defining the when DrawingCanvas.Dragged block (an event handler to draw lines as the user drags a finger or a stylus across the canvas), the now-familiar name blocks turned up for the parameters to the event-handler block, as shown in Figure 11.
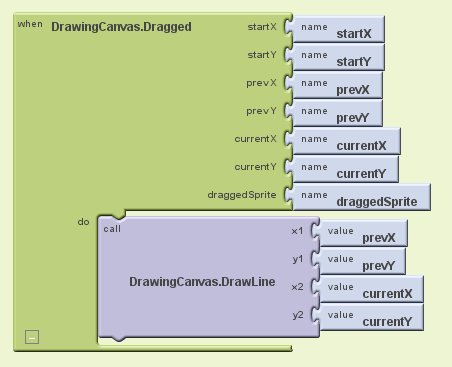
By now we know that the value blocks for these parameters should be in My Definitions — and yes, they are. However, while you’re working on this block, the value blocks from the previous method, when DrawingCanvas.Touched, are also visible there, as you can see in Figure 12. Logically, the parameters for one event handler cannot possibly be valid in another — out of morbid curiosity, I dragged the wrong block, value x, to the x1 socket of DrawingCanvas.DrawLine. You can see the result in Figure 13 — a warning that, “This argument has no value now.” So the Blocks Editor is certainly intelligent enough to know that I’ve dragged the wrong value block to this socket. Yet, it allowed me to do so in the first place…
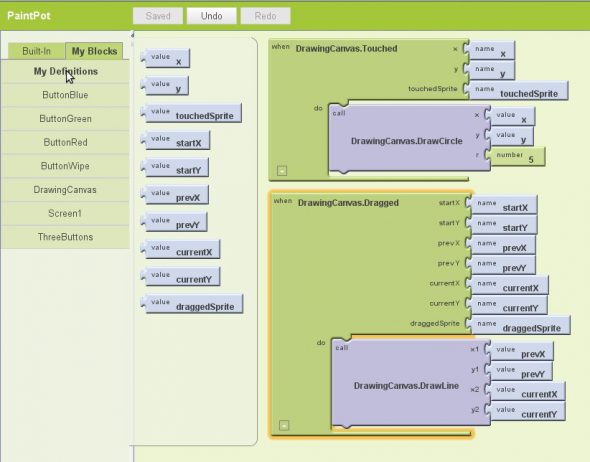
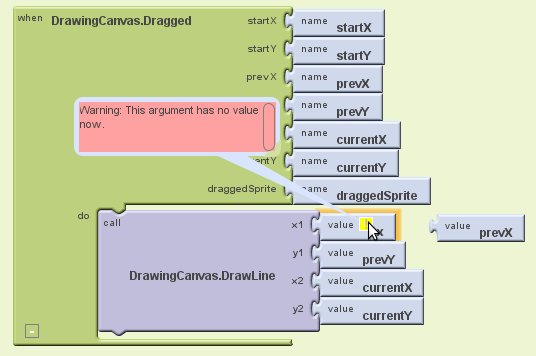
The bigger problem is that, in a moderately complex application, with several event handlers, the My Definitions drawer is going to be overflowing with blocks that are not valid in the context (and the last-added ones are generally at the bottom, leading to a lot of scrolling). Having many unnecessary values there is aggravating; as the number increases, for a slightly complex method like DrawLine, you have to open the drawer four times, read/scroll down to the required block, drag it out, and repeat.
Thankfully, the typeblocking feature takes away a good deal of this pain, once you get used to it. However, the same scoping problem occurs during typeblocking as well, meaning that you also have to do more and more typing as your project grows more complex.
Save As inverts My Definitions
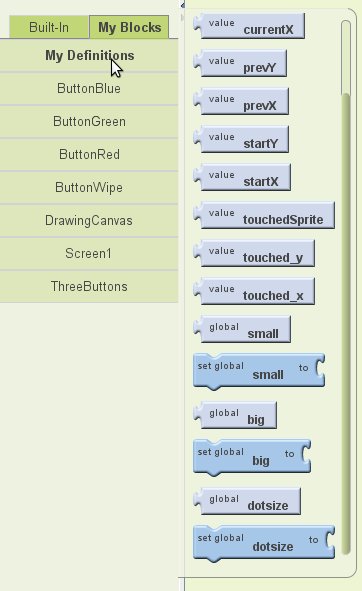
Continuing with Part 2 of the PaintPot tutorial, I did a Save As (in the App Designer) as instructed, before carrying on. After creating the global variables small, big and dotsize, I went to My Definitions and found that the list of definitions had now been inverted — see Figure 14. (You’ll notice that value x and value y have now changed to value touched_x and value touched_y. This is because I had tried renaming the parameters at some earlier point.)
Cannot copy blocks
If there’s a way to copy an existing block on the canvas in order to avoid having to go to the blocks drawers, I haven’t found it. It would be really nice to have such a feature — it would speed up work in some cases. For example, if I’m initialising several variables to the same default value (say, the number zero), then after creating a ‘0’ block once, I should have been able to copy and paste it for the other variables.
Extending this, I’d also have liked that once I define a procedure, I should be able to control-click somewhere on it, and drag out a call <procedurename> block to use in two or three other locations — and having created the call block once, should be able to copy it to the other locations where I need to use it. Finally, like I’ve already said earlier, for name blocks versus value blocks, a control-click and drag (on a name block) would have been such a neat way to obtain the corresponding value block — they are so tantalisingly close by…
No path to Android Marketplace
At present, there’s no way to put up an app you’ve created in App Inventor to the Android Marketplace. Perhaps that feature will come at a price, later — if so, that is fair to Google, and might also prevent hundreds of people uploading “My First Tetris Game” apps to the Marketplace :-) Meanwhile, it is eminently possible to download a .apk Android installable file from the AIA Web application, and there’s no restriction on you sharing that, or even the sources to your application, with other people.
Code sharing and possible vendor lock-in
From one of the App Inventor FAQs, concerning sharing project code with other App Inventor users, the reply is that it’s possible: To share a project, go to the My Projects page, select a project, then choose More Actions –> Download Source. This will create a zip file which you can share with others. To upload a project, go to My Projects, choose More Actions –> Upload Source, and choose a zip file previously downloaded from App Inventor.
However, the source code archives are not executable Android programs (.apk files), nor is the source code Java SDK code — it can only be loaded into App Inventor. This does tend to make one think of vendor lock-in, but so far, I haven’t seen anything that hints that App Inventor will later become a paid-only service. I hope that, following Google’s track record with so many other excellent services, it will reserve the payment option for additional storage or other features — perhaps if one wants to put one or more apps on the Android Marketplace for a price.
All in all, while there are some rough edges, this service is quite enjoyable, and already quite feature-packed. I can see how this will be really useful to non-programmers who want to put together an application for a very specific purpose, tailored to exactly and precisely their personal need — without the burden of having to learn Java and the various Android APIs in order to do it. It could also lend itself (once it gets over the current limitation to a single screen) to creating more generic and yet very useful applications. As the list of components grows, exposing more and more phone functionality, I feel this is just going to get better and better.
So far, I’ve only completed the initial tutorials. As I progress beyond those, if I find more interesting information to share, you could expect a follow-up article on this in a while. However, if you’re really interested in App Inventor, I suspect that before another month is out, you will be playing with your own App Inventor account! If so, enjoy!


