


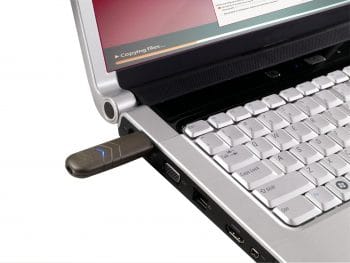
Did you ever wish you could carry your PC, desktop or OS in your pocket and run it anywhere? This is now possible! You can create or install a full Linux desktop (OS) into your USB stick. This pocket Linux desktop also saves the state, which means that all your files will be saved in the USB for you to carry along. In other words, you will be able to view your desktop in exactly the way you left it the last time. The biggest advantage is that you can insert your USB PC into any modern laptop or computer hardware to launch, reboot and enter your personal PC. This is especially useful when you are visiting friends or travelling abroad and dont want to carry your laptop (carrying around a computer is obviously not even an option). All you need is your USB PC in your pocket!
The pre-requisites are:
1. One USB stick of a size that you can choose (I use a 16 GB Sony 3.0 USB for a reliable and fast response).
2. Temporary USB (4 GB). I used an 8 GB Sandisk USB for this experiment.
3. The latest Ubuntu ISO from the following link:
http://www.ubuntu.com/download/desktop (I chose 64-bit Ubuntu 14.04 LTS because I have 64-bit hardware computers and a laptop, but you can choose the 32-bit option too).
4. Linux installer: I used Startup USB Creator that is available on Ubuntu Desktop, but if you have Windows, you can use http://unetbootin.sourceforge.net/
The procedure
Step 1: First download the latest Ubuntu ISO from the location mentioned in pre-requisite number 3. Use a Linux installer to install the downloaded Ubuntu into the temporary Sandisk USB (see Figure 1).
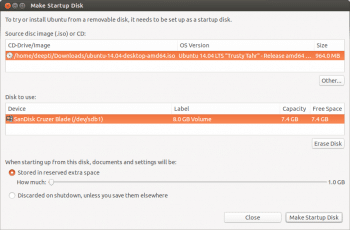
Though this gives you a live Ubuntu desktop, its not good enough as its a trial version and asks for the Trial/Install option every time you use it. While installing the temporary OS, you may be asked to input your sudo password.
This step is essential to do a permanent install of the Linux/Ubuntu desktop into the other USB (Sony 16 GB). In just a few minutes, the temporary OS installation will be completed. The temporary OS is now installed in the Sandisk 8 GB USB.
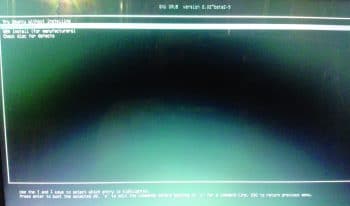
Step 2: Insert the Sandisk USB into the laptop or computer and reboot. While rebooting, press F12 (or a similar key) for booting into the USB. For many laptops, you need to press F12 to boot from the USB; on some hardware, pressing Shift+Del keys works. Use Google to find out the USB boot key if your hardware is not USB bootable, using these keys.
Step 3: You will see a few options after rebooting. Choose the option as seen in Figure 2, and then hit Enter.
From this step onward, the procedure followed is a technique that I have developed for embedding a personal PC into a USB; so you probably will not find this anywhere on the Internet.
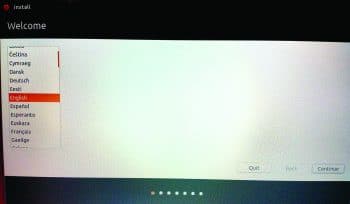
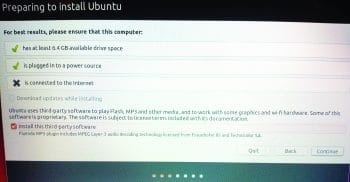
Step 4: Keep hitting the Continue button when you see a
screens like whats shown in Figure 3 & 4. Continue till you see the Installation Type screen.https://www.opensourceforu.com/wp-admin/media-upload.php?post_id=14277&type=image&TB_iframe=1
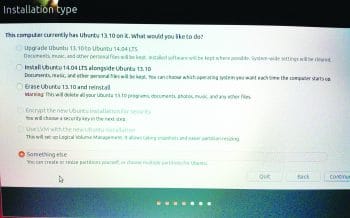
Step 5: This is a critical step. Choose the option that can be seen in Figure 5. Please do not make any mistakes here, or you could lose the contents of the laptop or computer on which you are running this step.
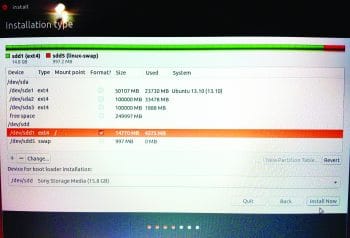
Step 6: Create two partitions on your Sony USB. The first one is ext 4 and the second is swap. See Figure 6. Please ensure that you select the Sony USB for Device for boot loader installation and select the Sony USB ext 4 partition before clicking the Install Now button.
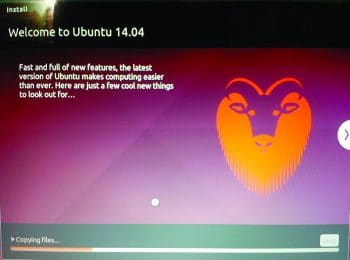
Step 7: Follow the usual steps of installation by clicking Continue/Next. See Figures 7 and 8.

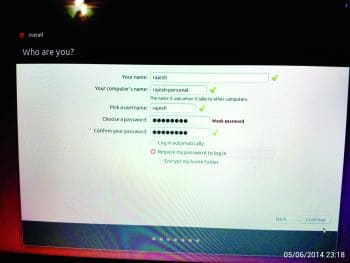
Step 8: When asked about User creation, input details similar to what is seen in Figure 9.
Step 9: Follow the other screen by clicking Continue/Next till you see Figure 10. Congratulations! You now have your OS ready to be carried around in your pocket, ready to be run anywhere!

You can insert your USB PC into any computer or laptop and do a USB boot (remember, you need to press F12 or a similar key to boot from the USB). You will see the screen shown in Figure 11 when you log in.
You can install any software from the Ubuntu Software Centre and it will be available in your USB PC, no matter where you run it.
One important point to note is that you should choose 32-bit Ubuntu (as mentioned in pre-requisite number 3) if you intend to use your USB PC on any hardware. The 64-bit version will work only when you run it on 64-bit hardware (laptops or PCs). And if you decide to choose the 64-bit option, then during embedding (Step 2), you should use a 64-bit laptop or PC.


[…] For more details, click here – https://www.opensourceforu.com/2015/04/embed-your-pc-on-a-usb-and-plug-it-into-any-system/ […]