


This is a tutorial on creating a block jumper game in 3D graphics programming using the first person perspective. This follows up on the previous article about creating a block jumper game in the third person perspective, which was carried in the October 2018 issue of OSFY.
In this article, we shall move on to current times and recreate our previous game, but in first person perspective. We will achieve this by using a different perspective and by manipulating the camera to give an illusion of being in the 3D world.
For this project, we will not use any extra libraries but will solely use native Processing commands.
Note: We will use Processing (Python) with OOP concepts for most of the code; so if you are unsure of OOP in Python, I urge you to clear your concepts before beginning this tutorial.
Setting up the basics
To start off, let’s first create the screen on which we will draw the entire game. Unlike in the previous article, however, we must also define that the rendering is in 3D while defining the size of the screen; and we achieve this by passing in an extra argument to the size function, P3D. This makes Processing recognise that we want 3D rendering, which will allow us to manipulate crucial aspects such as the perspective and the camera.
size(600, 600, P3D)
Note: You can find the entire code at the end of this article.
Defining the path
We must next decide how the world will look to the player in the 2D game. Preferably, it will be blocks coming straight at the player. Now, to interest the player more, we have to define the path or road on which the player runs and jumps over blocks. To create this path, we will use a cuboid that extends along the Z axis set almost at the bottom of the screen. We define this value in setup(), as given below:
base_ht = height-100
To draw this path, we use the following code in draw():
background(137, 207, 240)

fov = PI/3

cameraZ = (height/2.0) / tan(fov/2.0)

perspective(fov, float(width/2)/float(height/2), 50, -cameraZ*20)

pushMatrix()

translate(width/2, base_ht, 0)

fill(0)

box(width/1.5, height/6, 500*100)

popMatrix()
Now, as you see, making a realistic cuboid is quite different from drawing a rectangle in 2D. Before moving to the next steps, it is imperative that you understand the theoretical basis for using these inbuilt functions.
Right from the beginning, we have used some inbuilt functions that you might be able to guess the meaning of. First, we have defined fov, which is the field of view that we will have while viewing the game. Following that, we define the camera of the Z axis, which is basically the parameter we use to control the clipping planes in the Z axis.
Note: Clipping planes are imaginary planes that are used to limit the region in which an object will be rendered.
Then comes one of the most important aspects of the code — the perspective, which decides how the objects will get rendered and be shown on screen. The parameters here are field of view, aspect ratio, near clip and far clip.
Note: In case this is your maiden 3D project using Processing, or if you are new to 3D programming, in general, I urge you to check out the Processing docs for more detailed information, starting with the P3D tutorial by Daniel Shiffman at https://processing.org/tutorials/p3d/.
We can now move on to the next part of drawing the path, which is creating the cuboid in the appropriate location. As you can see, the next segment of the code is enclosed between a push-pop matrix stack.
Here’s another short lesson on the theoretical aspects —a matrix stack is a technique that is used a lot by anyone working on graphics. It allows the programmer to achieve a stack of consecutive code that will not affect anything outside of this matrix stack. So, putting it simply, any code written between the push-pop stack will not be reflected outside the stack segment.
Moving back to our code, the first line we have in our stack is the translation of the axis to the right place. Since by default the axis origin is present at the top left corner of the screen, to make matters easy, we will translate the axis to where we require the object, and then draw it. We then decide the colour of the cuboid, and draw the actual cuboid. We achieve this by calling box(), which takes in three arguments —the lengths of the box in the X, Y and Z axes.
Once we have drawn what we want, we call popMatrix() to revert any changes made. This resets changes to the axes such as translation or rotation, leaving us again with a clean slate for any other transformations that we need later in the code.
Feel free to play around with the values everywhere to get a good feel of what you are changing and how that affects the output, as this will give you a good idea of how you can improve this game, or start any other project that you have in mind.
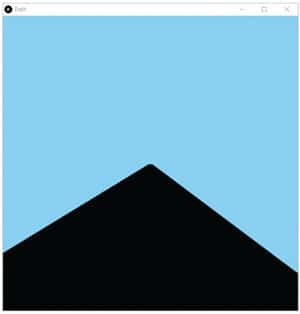
If you have been following the discussion, your output should be looking like what’s shown in Figure 1.
Making the obstacles
The next part of our little game will be to implement some sort of obstacle for the player to jump over. Here, considering a first player view, we shall make our obstacles a wall-like structure, again made using box().
But before moving on to drawing the wall, for ease of use, let us make an obstacle class with what will be related to the obstacle defined.
class obstacle:

def __init__(self, z, ht):

self.z = z

self.ht = ht

def move(self):

self.z += 10

def check_bounds(self):

if self.z > 100:

self.z = -500*10

self.ht = random(100, 150)
Now that we have the class obstacle, we can create a list of obstacles to make. We will do this in the setup(), just like in the previous game.
z_val = -500*10

for i in range(6):

o = obstacle(z_val, random(100, 150))

obs.append(o)

z_val -= 850
As you can see, we start off with the obstacles that are far off on the game screen with a very high negative Z axis value. We also randomise the height so as to present some challenge for the game player. We then append the obstacle to the list and change the Z axis value for the next object.
With that, we can now draw our obstacle in draw(), using the following commands:
for ob in obs:

pushMatrix()

translate(width/2, base_ht-ob.ht, ob.z)

fill(255)

box(200, ob.ht, 50)

popMatrix()

ob.move()

ob.check_bounds()
Now for the explanation—as in the previous game, we iterate through all the objects in the list. For each object, we again use a push-pop matrix stack to change the axis to the correct location.
Here, the reason we need the height to be the base height minus the object height is because the box will be drawn starting from wherever the origin is. In order to avoid unnatural overlap, we must take this into consideration. For the Z axis translation, we will use the values that we had already assigned while creating the game in the setup().
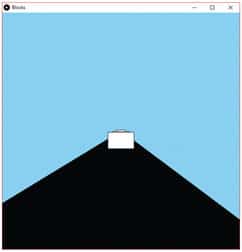
Once drawn, we exit the matrix stack and update the values associated with the object by calling move() and check_bounds(). move() simply increases the Z axis value to make the object appear closer every time draw() is called. And the check_bounds() simply resets the Z axis value back to the initial point if it crosses the view of the player. It also changes the height of the obstacle to give the game a little more difficulty. On executing, you will see something similar to Figure 2.
Putting the player in the game
Now that we have taken care of the obstacles and moving them along the path, we can shift our attention towards somehow recreating the first person view inside the game. In this tutorial, we will make use of camera()—by changing its parameters, we can emulate the game to look as if we are present in it.
Like always, let us start off by creating a player class, and shifting any variables related to the player there. In our case, we only have one variable, fov, and by taking it there, we can easily see what all are related to the player and can easily modify it.
class player:

def __init__(self):

self.j_flag = False

self.grav_flag = True

self.eyeY = 1.5

self.ptY = 1.5

self.fov = PI/3

self.speed = 40

self.flag = 1

self.score = 0

self.highscore = 0
Now we can go on to defining the methods that we will use for the player. There are only three basic methods possible —one for jumping, one to bring the player back down and one to reset these parameters.
def jump(self):

self.eyeY += 0.1

self.ptY +=0.05

def grav(self):

self.eyeY -= 0.1

self.ptY -= 0.05

def reset(self):

self.j_flag = False

self.grav_flag = True
After defining an object, in this case pl, in setup(), we can jump right into draw() where the main part of the player-related logic will be written. But before adding in the extra jumping code, we must first edit perspective() as fov is defined in the player class. This can be easily done as shown below:
cameraZ = (height/2.0) / tan(pl.fov/2.0)

perspective(pl.fov, float(width/2)/float(height/2), 50, -cameraZ*20)
With that done, we must make sure that we can read the key presses on the player. For this, we will use the inbuilt keyPressed() to change the flag values that we have defined in the player class.
def keyPressed():

global pl, gameOver, obs

if key == CODED:

if keyCode == UP and pl.flag == 1:

pl.j_flag = True

pl.grav_flag = False

pl.flag += 1
Going back to draw(), we can now define the logic for jumping, coming back down and resetting the flags. It is also now that we will make use of camera() to emulate the player’s eyes.
if pl.j_flag == True:

pl.jump()

if pl.eyeY >= 4 and pl.ptY >= 3:

pl.reset()

if pl.grav_flag == True:

if pl.eyeY > 1.5 and pl.ptY > 1.5:

pl.grav()

else:

pl.flag = 1

camera(width/2, height/pl.eyeY, 60, width/2, height/pl.ptY, -100, 0, 1, 0)

lights()
Now, before going over the code, let us first see how camera() works. It takes in three sets of arguments:
- The eye position
- Scene centre
- Upwards axis
Note: We will only speak briefly about each one here in this tutorial; however, it is very important that you understand clearly how each of these affect the camera. Hence, it might be necessary for you to refer to the docs as mentioned earlier.
The eye position is exactly what the phrase implies. It tells Processing where you want your eye to be located, so changing this will affect how far up or down your view extends.
The scene centre tells Processing which point of the screen you are looking at. This changes with how near or far you are looking into the screen. For example, giving a high negative Z axis value makes it seem as if you are looking at the horizon.
The upwards axis changes which axis is pointing upwards and by default, in this game, it will be pointing upwards.
We can easily see how the camera motion emulates an actual player. On triggering the j_flag using the key press, the Y axis value of the eye position and the scene centre increase, giving the illusion of jumping. It is here that we also increment the flag value used to count the number of consecutive jumps. This is needed to avoid multiple jumps in mid-air. On hitting the maximum, we call reset() to reset it, and this in turn triggers the grav_flag, calling the grav(). Once the player has returned to the lowest point possible, we stop the recurring call of grav() that was happening; instead, we reset the flag value to 0 so that the player can jump again.
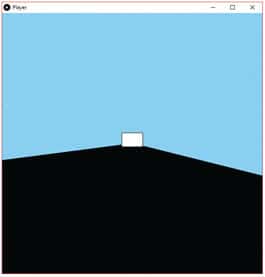
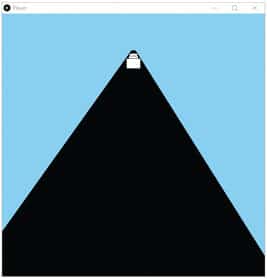
It is in this code segment that we also use the inbuilt function, lights(), which gives the world we are viewing more depth of field by using shading and shadowing. You should now be able to jump and see an output similar to what’s shown in Figures 3 and 4.
Adding ‘game over’
Compared to what we have already achieved in this tutorial, what comes next is quite easy. In this part, we will look at how to add the collision mechanism and also at how to add the replay functionality. We will achieve this in the same way as the previous game, by using a global variable to toggle an if-else block.
gameOver = False
Now, we have to check if the player hits any block during the game play. For this, after checking the bounds of the obstacle in the for loop, simply append the following if statement, as shown below:
for ob in obs:

pushMatrix()

translate(width/2, base_ht-ob.ht, ob.z)

fill(255)

box(200, ob.ht, 50)

popMatrix()

ob.move()

ob.check_bounds()

if ob.z >= 55:

if ((height/pl.eyeY) - (base_ht-ob.ht)) > 0:

gameOver = True
This if block runs if the block is five units away from the camera, in which case it again checks if the collision occurs based on the height of the camera position and the height of the object.
With this, you can create your game’s if-else block to ensure that the game ends when a collision takes place.
if gameOver == False:

#code covered till this point

else:

background(0)

ortho()

textSize(32);

textAlign(CENTER)

fill(200);

text(“GAME OVER”, width/2-2, height/2-2)

fill(255)

text(“GAME OVER”, width/2, height/2)

textSize(14)

text(“Press Space To Replay”, width/2, 550)
As you can see, if gameOver becomes True, we paint the screen black like in the previous game. However, since we are rendering 3D, we need to set the drawing back to 2D before displaying any text, for which we use ortho().
Note: Calling perspective() and camera() will set it back to the defaults, making the result the same as calling ortho(). However, only calling ortho() will make the drawing truly 2D.
Now, to add the replay functionality, we just add another condition to keyPressed(). We can assign the trigger to be the space bar, and when pressed, we simply reset the gameOver variable to be False.
def keyPressed():

global pl, gameOver, obs

#code till this point

if key == ‘ ‘:

gameOver = False

pl.score = 0

pl.speed = 40

z_val = -500*10

for ob in obs:

ob.z = z_val

z_val -= 850
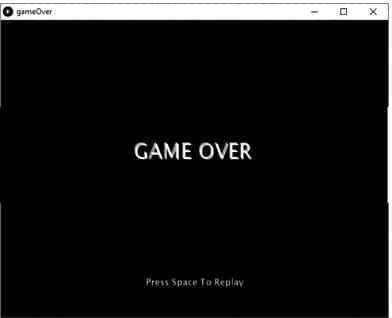
By the end of this part, you should get a screen like the one shown in Figure 5 when you crash into an obstacle.
Adding scores and other functionality
Now, let’s move on to the finishing touches and give the game more features. One thing we can add easily is some sort of score mechanism to introduce the competitive spirit into the game.
To add up the score, we can easily add a method to the player class and also add a way to increase the speed of the game as the player progresses through it, both of which can be called in the main game’s ‘if’ block.
def update(self):

self.score += ( (frameCount/frameCount) * 0.05)

if self.highscore < self.score:

self.highscore = self.score

self.speed += ( (frameCount/frameCount) * 0.005)
Now, for the proper usage of the above function, we add it to draw() as shown in the code segment below:
def draw():

#globals

If gameOver == False:

frameRate( int( pl.speed) )

perspective()

camera()

textSize(14)

textAlign(LEFT)

fill(0)

text(“Press P to Pause”, 0, 15)

text(“Press R to Resume”, 0, 40)

textAlign(RIGHT)

text(int(pl.score), width, 15)

text(int(pl.highscore), width, 40)

text(“Score: “, width-30, 15)

text(“High Score: “, width-30, 40)

#previous code

pl.update()

else:

#previous code
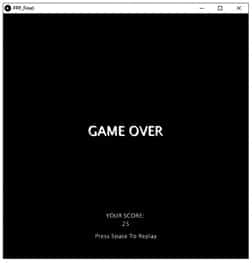
When that last addition gets executed, your game will resemble Figure 6 and the ‘Game Over’ screen will be like what’s shown in Figure 7.

And with that, you have successfully made a 3D game! And if this is your maiden effort in the field of 3D programming, rejoice for your efforts have paid off. You can now proudly say you have dabbled in the world of 3D graphical programming.
The full code for the game
gameOver = False

class player:

def __init__(self):

self.j_flag = False

self.grav_flag = True

self.eyeY = 1.5

self.ptY = 1.5

self.fov = PI/3

self.speed = 40

self.flag = 1

self.score = 0

self.highscore = 0

def jump(self):

self.eyeY += 0.1

self.ptY +=0.05

def grav(self):

self.eyeY -= 0.1

self.ptY -= 0.05

def reset(self):

self.j_flag = False

self.grav_flag = True

def update(self):

self.score += ( (frameCount/frameCount) * 0.05)

if self.highscore < self.score:

self.highscore = self.score

self.speed += ( (frameCount/frameCount) * 0.005)

class obstacle:

def __init__(self, z, ht):

self.z = z

self.ht = ht

def move(self):

self.z += 10

def check_bounds(self):

if self.z > 100:

self.z = -500*10

self.ht = random(100, 150)

def setup():

global pl, obs, base_ht, textArea

size(600, 600, P3D)

base_ht = height-100

pl = player()

obs = []

z_val = -500*10

for i in range(6):

o = obstacle(z_val, random(100, 150))

obs.append(o)

z_val -= 850

textMode(SHAPE)

def draw():

global pl, obs, base_ht, gameOver, textArea

if gameOver == False:

background(137, 207, 240)

frameRate(int(pl.speed))

perspective()

camera()

textSize(14)

textAlign(LEFT)

fill(0)

text(“Press P to Pause”, 0, 15)

text(“Press R to Resume”, 0, 40)

textAlign(RIGHT)

text(int(pl.score), width, 15)

text(int(pl.highscore), width, 40)

text(“Score: “, width-30, 15)

text(“High Score: “, width-30, 40)

cameraZ = (height/2.0) / tan(pl.fov/2.0)

perspective(pl.fov, float(width/2)/float(height/2), 50, -cameraZ*20)

if pl.j_flag == True:

pl.jump()

if pl.eyeY >= 4 and pl.ptY >= 3:

pl.reset()

if pl.grav_flag == True:

if pl.eyeY > 1.5 and pl.ptY > 1.5:

pl.grav()

else:

pl.flag = 1

camera(width/2, height/pl.eyeY, 60, width/2, height/pl.ptY, -100, 0, 1, 0)

lights()

pushMatrix()

translate(width/2, base_ht, 0)

fill(0)

box(width/1.5, height/6, 500*100)

popMatrix()

for ob in obs:

pushMatrix()

translate(width/2, base_ht-ob.ht, ob.z)

fill(255)

box(200, ob.ht, 50)

popMatrix()

ob.move()

ob.check_bounds()

if ob.z >= 55:

if ((height/pl.eyeY) - (base_ht-ob.ht)) > 0:

gameOver = True

pl.update()

else:

background(0)

perspective()

camera()

textSize(32);

textAlign(CENTER)

fill(200);

text(“GAME OVER”, width/2-2, height/2-2)

fill(255)

text(“GAME OVER”, width/2, height/2)

textSize(14)

text(“YOUR SCORE: “, width/2, 500)

text(int(pl.score), width/2, 520)

text(“Press Space To Replay”, width/2, 550)

def keyPressed():

global pl, gameOver, obs

if key == CODED:

if keyCode == UP and pl.flag == 1:

pl.j_flag = True

pl.grav_flag = False

pl.flag += 1

if key == ‘p’ or key == ‘P’:

noLoop()

if key == ‘r’ or key == ‘R’:

loop()

if key == ‘ ‘:

gameOver = False

pl.score = 0

pl.speed = 40

z_val = -500*10

for ob in obs:

ob.z = z_val

z_val -= 850
Acknowledgements
The author is grateful to Sibi Chakkaravarthy Sethuraman and Soubhagya Barpanda at the Department of Computer Science and Engineering, VIT-AP and to Hari Seetha, head, Department of Computer Science and Engineering, VIT-AP.


