

This article introduces you to GraphQL, with a step-by-step example in a Windows 10 environment, so that you are well equipped with it to navigate this ‘new normal’ yourself.
As we are steadily going through the phases of unlock, you may consider visiting a restaurant with friends or family after a long time. In the restaurant, you will typically get two choices: buffet or à la carte. In a buffet, you go to various tables, collect the food you choose and come back to your table. In à la carte, on the other hand, you order as per your wishes and then eat. The waiter takes multiple orders from your table and delivers on a single visit. Sounds familiar?
This is exactly what GraphQL is! It is a query à la carte that aggregates related and non-related resources from various database tables in servers to deliver a single, conglomerated query to the client. Of course, the client can decide how many requests to make, based on various factors, to get the information required. Hence, GraphQL promises a paradigm shift to empower the client to decide on how data is delivered from the server. That is unlikely in REST, where the server dictates how many REST APIs are to be called at what endpoints to retrieve the required information. So, the real power of GraphQL is to decentralise and democratise the request query to make it the client’s choice with greater flexibility.
The story so far
We have already introduced GraphQL. Now let us quickly look at its journey, primarily in the context of Facebook.
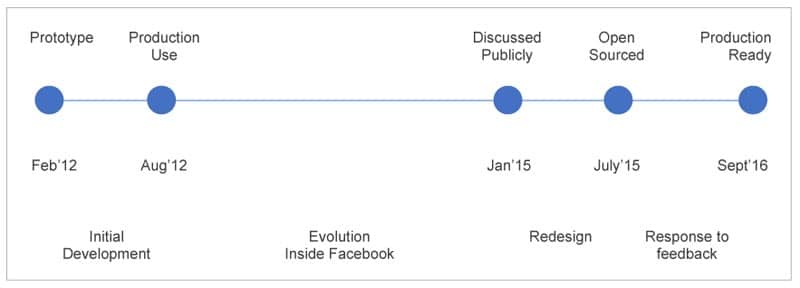
GraphQL was started as a sideways project, SuperGraph, by Facebook way back in 2012. It kept on evolving around mid-2015, when it was open sourced with the ‘Technical Preview’ mode. This led to its ‘Production Ready’ mode in September 2016, almost four years ago. Figure 1, courtesy of GraphQL/Facebook’s Lee Byron’s talk on YouTube, depicts the evolution timeline vividly.
We have already talked about the empowerment and decentralisation of the request query mechanism as the fulcrum of the GraphQL’s value proposition. Let’s understand Figure 2 to get a better overview of GraphQL before delving into the details.
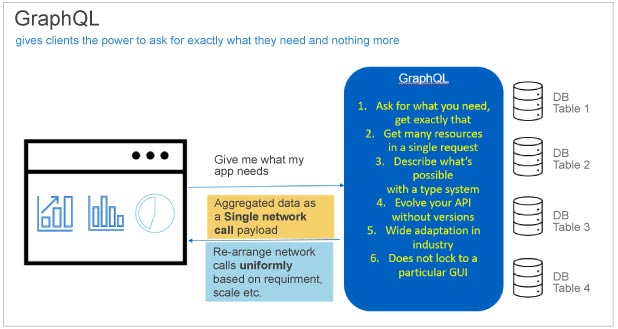
As shown in the figure, the client is making a single http network call, which spans across different database tables in the server, and is typically exposed as four different endpoints through REST API. In GraphQL, the client is making a single POST API call (POST <server_ip>/graphiql -d {query: {….}}) to aggregate the data across four different server tables to return a single response to the client. Now, it is not necessary that the request must be one. Rather, it is up to the client to decide how many requests are to be made, which may be based on the scale or some other parameters. So, the client gets whatever is required, instead of getting it piecemeal as in REST, along with a type safety inbuilt into GraphQL. The latter is generic, not tied to a particular client as such, and widely used in the industry (e.g., GitHub, Facebook, and many more).
Getting hands dirty in Windows 10
Let us look at the little ‘hello world’ GraphQL script as a baby step. We are working with Windows 10. However, the process is equally possible with Linux and Mac also.
1. Install Node.js from https://nodejs.org/en/download/ and create a working directory for the first ‘hello world’ program:
λ node -v
v12.16.3
λ npm -v
6.4.1
λ mkdir my_app
λ cd my_app
2. Install VSCode in your working environment by downloading it from https://code.visualstudio.com/download.
3. Create a package.json in the project directory my_app (we are already inside my_app):
package.json
{
“name”: “graphql-hello-world”,
“private”: true,
“scripts”: {
“start”: “nodemon --ignore data/ server.js”
},
“dependencies”: {
“notarealdb”: “^0.2.2”,
“apollo-server-express”: “^1.4.0”,
“body-parser”: “^1.18.3”,
“cors”: “^2.8.4”,
“express”: “^4.16.3”,
“graphql”: “^0.13.2”,
“graphql-tools”: “^3.1.1”
},
“devDependencies”: {
“nodemon”: “1.17.1”
}
}
4. Install the dependencies through ‘npm install’. This is going to take a few minutes:
λ npm install
5. Create a ‘data’ folder where we will create two files (our data store). Let’s call the files detectives.json and authors.json:
detectives.json
[
{
“id”: “D1”,
“name”:”Prodosh C Mitter”,
“address”:”21 Rajani Sen Road”,
“authorId”: “A1”
},
{
“id”: “D2”,
“name”:”Byomkesh Bakshi”,
“address”: “Keyatala”,
“authorId”: “A2”
},
{
“id”: “D3”,
“name”:”Sherlock Homes”,
“address”:”221B Baker Street”,
“authorId”: “A3”
},
{
“id”: “D4”,
“name”:”Hercule Poirot”,
“address”: “Flat 203 at 56B Whitehaven Mansions”,
“authorId”: “A4”
},
{
“id”: “D5”,
“name”:”Miss Marple”,
“address”:”Danemead Cottage”,
“authorId”: “A4”
}
]
authors.json
[
{
“id”: “A1”,
“author”: “Satyajit Ray”,
“assistant”: “Topse”
},
{
“id”: “A2”,
“author”: “Saradindoo Bandhyapadhyay”,
“assistant”: “Ajit”
},
{
“id”: “A3”,
“author”: “Sir Arthur Conan Doyle”,
“assistant”: “Watson”
},
{
“id”: “A4”,
“author”: “Agatha Christie”,
“assistant”: “Hastings”
}
]
6. Create a DAO layer in the project folder as db.js:
const { DataStore } = require(‘notarealdb’);

const store = new DataStore(‘./data’);

module.exports = {
detectives:store.collection(‘detectives’),
authors:store.collection(‘authors’)
};
7. Create a schema file as schema.graphql in the project folder:
type Query {
test: String,

detectives:[Detective],
detectiveById(id:ID!):Detective,

authors: [Author],
assistantByDetective(id:ID!):Author,
}

type Detective {
id:ID!
name:String
address:String
authorId:String
}

type Author {
id: ID!
author:String
assistant:String
}
8. Create the resolver as resolvers.js:
const db = require(‘./db’)
const Query = {
test: () => ‘Congrats!, GraphQL server is up & running !!’,

detectives: () => db.detectives.list(),
detectiveById: (root, args, context, info) => {
return db.detectives.get(args.id);
},

authors: () => db.authors.list(),
assistantByDetective: (root, args, context, info) => {
return db.authors.get((db.detectives.get(args.id)).authorId);
},
}
module.exports = { Query }
The resolver is very important. This is where we define the different methods that will be called directly by the clients to route the requests to multiple tables to get data; e.g., there are GetAll methods like detectives and authors. Please look at the assistantByDetective method. We purposefully kept the ‘assistant’ (e.g., Dr Watson for Sherlock Homes) in the Author schema just for demonstration purposes. The assistantByDetective is taking the detective’s Id and getting detective schema db.detectives.get(args.id). The detective schema has the authorId. This authorId is used to get the detailed author schema looking into the db.authors list by db.authors.get(…).
9. Finally, create the server.js to host the node app:
const bodyParser = require(‘body-parser’);
const cors = require(‘cors’);
const express = require(‘express’);
const db = require(‘./db’);

const port = process.env.PORT || 8000;
const app = express();

const fs = require(‘fs’)
const typeDefs = fs.readFileSync(‘./schema.graphql’,{encoding:’utf-8’})
const resolvers = require(‘./resolvers’)

const {makeExecutableSchema} = require(‘graphql-tools’)
const schema = makeExecutableSchema({typeDefs, resolvers})

app.use(cors(), bodyParser.json());

const {graphiqlExpress,graphqlExpress} = require(‘apollo-server-express’)
app.use(‘/graphql’,graphqlExpress({schema}))
app.use(‘/graphiql’,graphiqlExpress({endpointURL:’/graphql’}))

app.listen(
port, () => console.info(
`Server started on port ${port}`
)
);
10. The my_app dir will look something like this:
λ dir

Directory of my_app

10/02/2020 11:23 AM <DIR> .
10/02/2020 11:23 AM <DIR> ..
10/02/2020 10:51 AM <DIR> data
10/02/2020 10:58 AM 199 db.js
10/02/2020 10:46 AM <DIR> node_modules
10/02/2020 10:46 AM 102,417 package-lock.json
10/02/2020 10:46 AM 415 package.json
10/02/2020 11:22 AM 112 resolvers.js
10/02/2020 11:17 AM 35 schema.graphql
10/02/2020 11:23 AM 791 server.js
11. Host the app in the localhost’s port 8000:
λ npm start
.........
Server started on port 8000
12. Launch the app pointing the browser to http://localhost:8000/graphiql.
Let us play around a bit with the client at http://localhost:8000/graphiql.
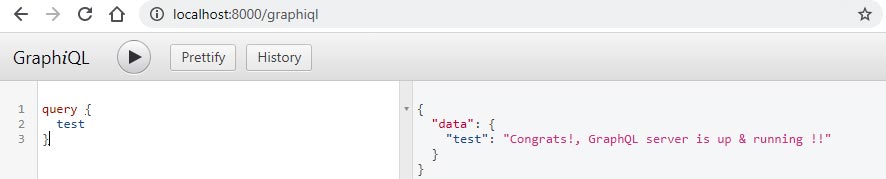
In the client, just type:
query {
test
}
Let us check the output (see Figure 3).
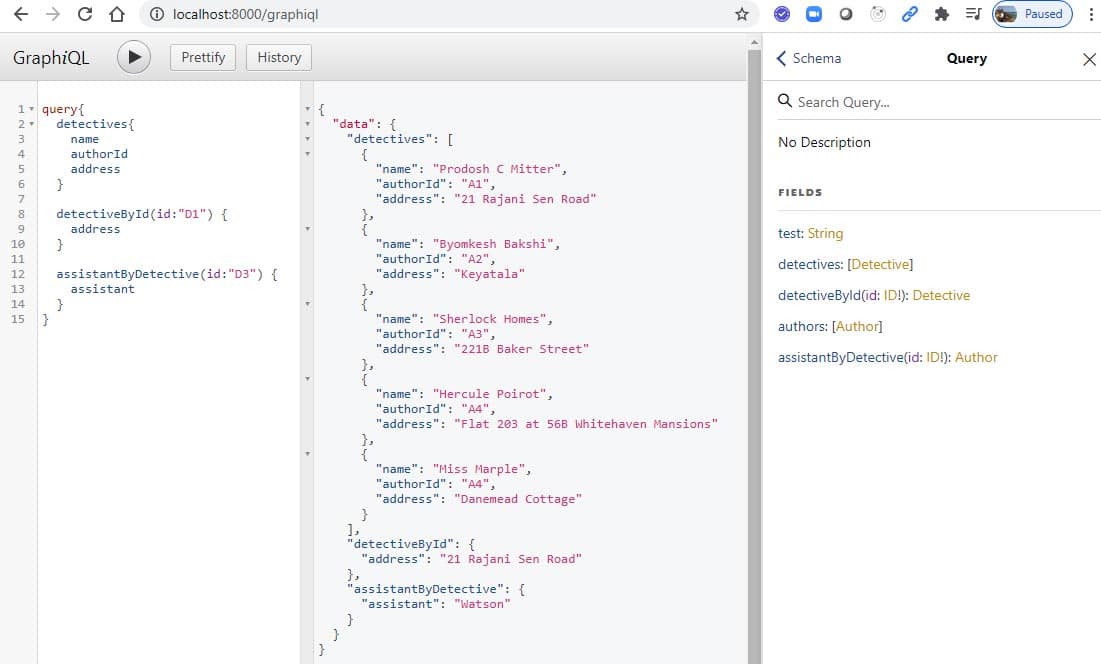
Now, let us check some interesting queries:
query{
detectives {
name
authorId
address
}

detectiveById(id:”D1”) {
address
}

assistantByDetective(id:”D3”) {
assistant
}
}
Let us check the output (see Figure 4).
Looking ahead
In this short article, we have introduced the very basic concept and working environment of GraphQL. There is plenty of stuff that is very interesting in GraphQL. We have just talked about the query feature of GraphQL in our example. There are other concepts like mutations (Create, Edit, Delete operations), relay, notification, etc, that have been built upon over time to solve wide varieties of use cases to make GraphQL useful for a wider audience. Then there are specialised environments like Apollo GraphQL, which make life easy, especially when you are planning to migrate from the existing REST API to GraphQL. Stay tuned to this space for regular updates on the gracious GraphQL.


