


Web applications have become critical components for the growth of a business, as they can handle a large number of different types of customers at the same time. Django, a Python based Web framework, enables you to create Web applications that are both secure and well-developed, in a very short period of time. This article discusses how to develop a basic Web application using Django.
Django is a free and open source Web framework developed and maintained by a non-profit organisation called the Django Software Foundation. Developing applications using Django makes things simple and easy.
In traditional Web application development, the frontend, the database and the part which joins the two are all developed separately. Django, however, takes care of the database connectivity as well as the connection between the frontend and the backend. A server like Xampp was earlier used to host and check the application. Django has an inbuilt server which helps to deploy and test the app.
In this article we will discuss how to develop a basic Web application using Django. We will develop a polling application where people can come and vote on different topics; so let us get started.
You can install Django using the following command:
$ Pip3 install django
To start a Django project, we use the following command:

$django-admin startproject poller
Now run:
$Python3 manage.py runserver
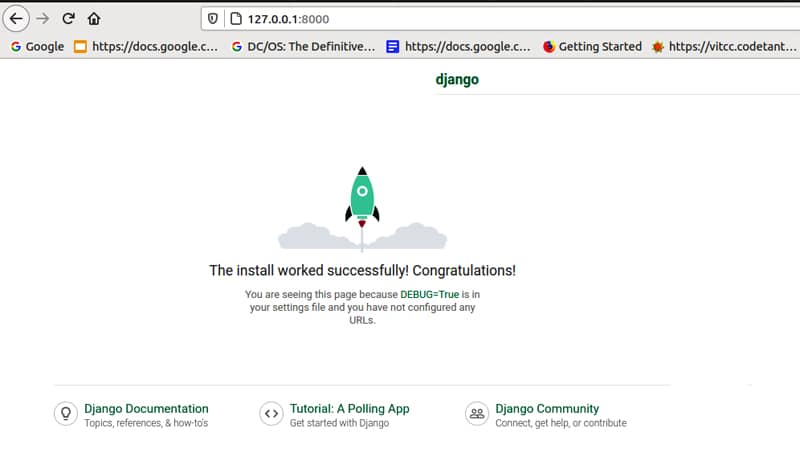
If you go to port number 8000 on your localhost by typing 127.0.0.1:8000 in your browser, you will find your Web application running (Figure 2).
Once the server is set up and running, we can create our first app. Run:
$Python3 manage.py startapp poll
In Django, every module is called an app. To develop each module, we have to create a new app for it using the above command. Now create a folder named templates in the poller folder. In the different files that are formed, we add the code as given below:
INSTALLED_APPS = [
	‘polls.apps.PollsConfig’,
	‘django.contrib.admin’,
	‘django.contrib.auth’,
	‘django.contrib.contenttypes’,
	‘django.contrib.sessions’,
	‘django.contrib.messages’,
	‘django.contrib.staticfiles’,
	‘polls’,
]
Basically, we need to include all the newly created apps in the ‘installed apps’ section, where there are already a few pre-created apps. What we do is to include our newly created app in this file every time an app is created.
poller/urls.py

urlpatterns = [
	path(‘polls/’, include(‘polls.urls’)),
	path(‘admin/’, admin.site.urls),
	url(r’^$’,homepage,name=’home’),]
The urls.py file has all the new URLs that we need for each page, and we have to include them here in this file:
polls/admin.py

from polls.models import Question,Choice
admin.site.site_header=”surveyEarth Admin”
admin.site.site_title=”surveyEarth Admin Page”
admin.site.index_title=”Welcome to the surveyEarth Admin Page”
class ChoiceInLine(admin.TabularInline):
	model=Choice
	extra = 3
class QuestionAdmin(admin.ModelAdmin):
	fieldsets=[(None,{‘fields’:[‘question_text’]}),
	(‘Date Information’,{‘fields’:[‘pub_date’],’classes’:[‘collapse’]}),]
	inlines=[ChoiceInLine]
admin.site.register(Question,QuestionAdmin)
The admin file is created by default, and we need to add the code here in order to create the questions and answers.
polls/models.py

class Question(models.Model):
question_text=models.CharField(max_length=200)
pub_date=models.DateTimeField(‘date published’)
def __str__(self):
return self.question_text
class Choice(models.Model):
question=models.ForeignKey(Question, on_delete=models.CASCADE)
choice_text=models.CharField(max_length=200)
votes=models.IntegerField(default=0)
def __str__(self):
return self.choice_text
Each model that we have, such as questions and options, needs to be added to our models.py file.
polls/urls.py

from . import views
app_name=’polls’
urlpatterns=[
	path(‘’,views.index, name=’index’),
	path(‘<int:question_id>/’, views.detail, name=’detail’),
	path(‘<int:question_id>/results/’, views.results, name=’results’),
	path(‘<int:question_id>/vote/’,views.vote,name=’vote’),
	path(‘resultsdata/<str:obj>/’, views.resultsData, name=”resultsdata”),
]
polls/views.py

from django.template import loader
from django.http import HttpResponse, HttpResponseRedirect
from django.shortcuts import get_object_or_404, render
from django.urls import reverse
from django.core.mail import send_mail
# Create your views here.
from .models import Question,Choice
def homepage(request):
	context={
    	“title”:”Home Page”,
	}
	return render(request, “home.html”,context)
def ownerpage(request):
	context={
    	“title”:”Owner Page”,
	}
	return render(request, “owner.html”,context)
def contactpage(request):
	if request.method==”POST”:
    	messagename=request.POST[‘fullname’]
    	email=request.POST[‘email’]
    	message=request.POST[‘content’]
    	send_mail(
        	‘surveyEarth’, #subject
        	message,  #message
        	email, # from email
        	[‘jishnusaurav@gmail.com’],  #to email
    	)
    	return render(request,’contact.html’,{‘messagename’:messagename})
	else:
    	return render(request, “contact.html”,{})
def index(request):
latest_question_list=Question.objects.order_by(‘-pub_date’)[:5]
	context={‘latest_question_list’:latest_question_list}
	return render(request,’polls/index.html’,context)
def detail(request,question_id):
	try:
    	question=Question.objects.get(pk=question_id)
	except Question.DoesNotExist:
    	raise Http404(“Question does not exist”)
	return render(request,’polls/detail.html’,{‘question’:question})
def results(request,question_id):
	question=get_object_or_404(Question,pk=question_id)
return render(request,’polls/results.html’,{‘question’:question})
def vote(request, question_id):
	question = get_object_or_404(Question, pk=question_id)
	try:
    	selected_choice = question.choice_set.get(pk=request.POST[‘choice’])
	except (KeyError, Choice.DoesNotExist):
    	return render(request, ‘polls/detail.html’, {
        	‘question’: question,
        	‘error_message’: “You didn’t select a choice.”,
    	})
	else:
    	selected_choice.votes += 1
    	selected_choice.save()
    	return HttpResponseRedirect(reverse(‘polls:results’, args=(question.id,)))
def resultsData(request, obj):
	votedata = []
	question = Question.objects.get(id=obj)
	votes = question.choice_set.all()
	for i in votes:
    	votedata.append({i.choice_text:i.votes})
	print(votedata)
Each page to be rendered should be shown as a view, and we need to include it in this file. Basically, each view is what we want the user to see.
The following are all our HTML files for making our website’s frontend.
templates/base.html

<!DOCTYPE html>
<html lang=”en”>
<head>
<meta charset=”UTF-8”>
<meta name=”viewport” content=”width=device-width, initial-scale=1.0”>
<meta http-equiv=”X-UA-Compatible” content=”ie=edge”>
<link
rel=”stylesheet”
href=”https://stackpath.bootstrapcdn.com/bootstrap/4.3.1/css/bootstrap.min.css”
integrity=”sha384-ggOyR0iXCbMQv3Xipma34MD+dH/1fQ784/j6cY/iJTQUOhcWr7x9JvoRxT2MZw1T”
crossorigin=”anonymous”
/>
<title>surveyEarth {% block title %}{% endblock %}</title>
</head>
<body>
{% include ‘navbar.html’ with brand_name=’vote’ %}
<div class=”container”>
<div class=”row”>
<div class=”col-md-6 m-auto”>
{% block content %}{% endblock %}
</div>
</div>
</div>
</body>
</html>

templates/home.html

{% extends ‘base.html’ %}
{% block content %}
<div style=”background-color: #404040; width: 500px; height: 200px; color: white; margin: 200px 50px 100px 50px;”>
<h1>Welcome!!</h1>
<br>
<h3>Click on start to start the survey</h3>
<center><a class = “btn btn-success “ href=”{% url ‘polls:index’ %}”>Start</a></center>
</div>
{% endblock %}
Now you can refresh your browser page and your polling application will be running. In case there is a problem, run the following commands:
Python3 manage.py makemigration
Python3 manage.py migrate
Python3 manage.py runserver
Now refresh your browser and the application should be working well, as shown in Figure 3.
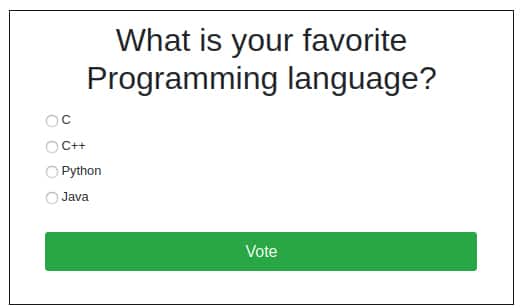
That’s it. If you have done this you have officially developed your first Django project. It’s great, isn’t it? Do give it a try, and if you have any more doubts or want to explore more in Django, do check out its official documentation. Happy coding!


