


Building DIY projects with Arduino is super easy and a lot of fun. However, it may not always be as straightforward for beginners with absolutely no background knowledge in hardware or programming. In this article, we cover everything you need to know for getting started with your first Arduino project. That includes an overview of the Arduino board, the IDE, the programming language and a simple project to wet your beak.
Arduino is an open source project developed for students, hobbyists, artists and programmers who are interested in combining hardware and software to make DIY (Do It Yourself) devices and utilities. It was created in 2005 by Massimo Banzi and his colleagues and students at the Interaction Design Institute Ivrea, Italy. The primary purpose behind the creation of the Arduino project was to provide enthusiasts and professionals with a platform consisting of a programming language, an IDE, and a printed circuit board to create simple and effective DIY projects. The project quickly gained steam and by 2011, an estimated 300,000 Arduino boards were in circulation globally. By 2013, that number was 700,000.
Today, the Arduino project is a mammoth with 100+ devices consisting of various types of boards, shields, carriers, kits and other accessories. All the information regarding the Arduino project is available at its official website arduino.cc
So what makes Arduino so attractive? Go to YouTube and search ‘Cool Arduino Projects’ and the answer will become glaringly obvious. Arduino offers developers the freedom and autonomy to get creative with their circuit design, and write innovative code to make DIY devices and utilities that not only help make life better but are also artistic and innovative in their approach.
Consider life before Arduino. If you wanted to build a light that turns on automatically, you would have to design the entire circuit diagram yourself. Solder it all together on a board. Write low level machine code yourself and create your own mechanism to power the whole thing up.
With Arduino, you can do all that in 5 minutes. Just connect a few pins here and there using an Arduino and a breadboard. Write the code in a language that is as simple as C and run the code with the click of a button. That’s it! Arduino massively simplifies your life as an engineer. What’s more, it is designed keeping students in mind, which means it is cheap to buy.
The anatomy of an Arduino device
Before we get to the code part, it is necessary to have a basic understanding of the Arduino board. Every Arduino board is differently constructed based on the purpose it serves. For this article, we shall be using the beginner-friendly and most popular Arduino board, i.e., the Arduino Uno. Figure 1 shows the anatomy of an Arduino Uno.
There are four major components of an Arduino Uno board — digital pins, analog pins, USB connector, and battery power.
Digital pins: As shown in Figure 1, there are 14 digital pins in the Arduino Uno. Digital pins can be used both as INPUT and OUTPUT ports. They have two states, i.e., HIGH and LOW. A HIGH state indicates the presence of current in the pin whereas the LOW state indicates the opposite. Digital pins can be used for various purposes such as blinking of LED lights. When set to HIGH, the light will turn on and when set to LOW, it will turn off. This can be done in a loop to create a blinking effect.
Analog pins: There are six analog pins in an Arduino Uno, as shown in Figure 1. They are indexed as A0 to A5 on the board. These pins are used for reading sensor data. A lot of the work done in your Arduino projects will require sensor data. For instance, if you are creating a light that turns on when it detects movement, then that will require you to use a sensor to detect motion. The analog pins can register readings between the values of 0 and 1023.
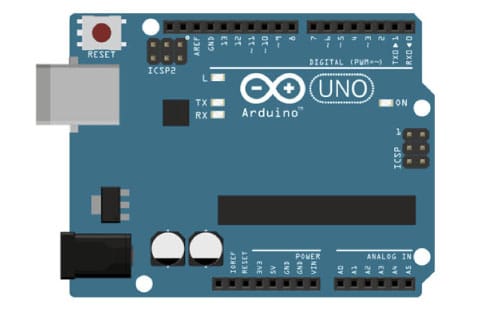
USB connector: The USB connector helps you to connect your Arduino to the computer so you may upload your code.
Battery power: You can use the battery power connector as shown in Figure 1 to connect your Arduino Uno to a remote battery. This will make your device portable and deployable to places where you may not be able to connect it to a computer or a continuous power source.
The Arduino IDE
To write code for your Arduino project, you will have to download and install the latest Arduino IDE. You can download this from the official Arduino website Arduino c.c
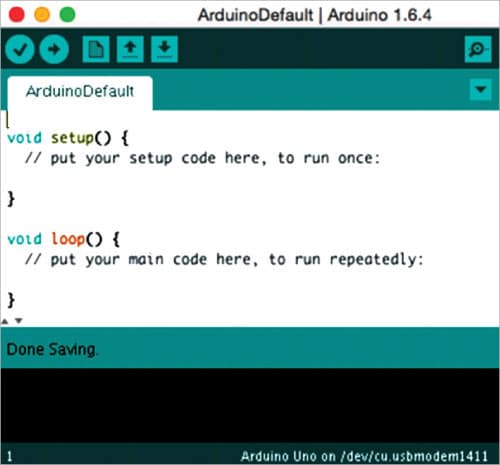
Figure 2 shows the default view of an Arduino IDE. Let us go through some of its major features. There are three major components in the IDE, i.e., Toolbar, Status window, and Serial Monitor window.
Toolbar: The Toolbar is the pane on the top as shown in Figure 2. It contains shortcuts to the most commonly used options in the IDE. We shall go through each shortcut in a left to right order.
- Compile: This is the first button from the left used for compiling and verifying the code for any syntactic or logical errors.
- Upload: The second button from the left, it is used for uploading the code onto the Arduino device. The results of each upload can be viewed in the Status window at the bottom.
- New: This button is used for creating a new code document.
- Open: This button is used for re-opening an already existing code document.
- Save: This is used for saving the progress on a code document.
- Serial monitor: This is the last button on the right that lets you access the Serial Monitor window.
Status window: Status window is the pane shown at the bottom of Figure 2. Whenever you compile or upload your code to the Arduino device, the Status window shows the status of your actions. It is also used for displaying any error messages.
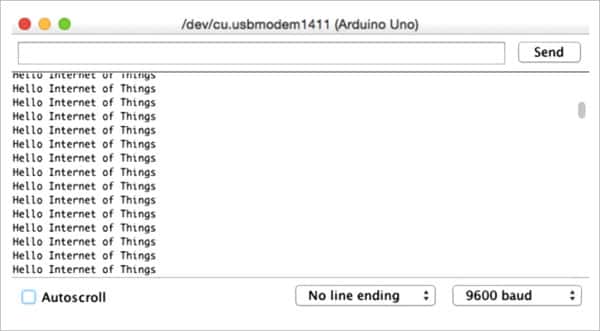
Serial Monitor window: The Serial Monitor window logs all the messages generated by your code. Whenever we use commands such as Serial.print() or Serial.println() to log any details of our code, they will be displayed on the Serial Monitor window, as shown in Figure 3.
Arduino programming constructs
Before we begin to write and execute our first Arduino code, let us get familiar with the Arduino programming language. In this section we will cover all the basic constructs used in the Arduino programming language. These are more than enough to get you started with writing beginner to intermediate level code for your Arduino projects.
The basic programming constructs are listed below.
- Int: Used for integer values such as 12345
- Float: Used for decimal values such as 1.34
- char[]: Used for string values such as ‘Car’
- HIGH: Denotes digital pin with current
- LOW: Denotes digital pin without current
- INPUT: To assign a pin to read
- OUTPUT: To assign a pin to set
- A0 – A7: Constants used for each analog pin
- 0 – 13: Values used for each digital pin
- analogRead(): Returns the value of the analog pin
- analogWrite(): Sets the value of the analog pin
- digitalRead(): Returns the value of the digital pin
- digitalWrite(): Sets the value of the digital pin
- Serial.begin(): Initialises the serial monitor
- Serial.print(): Outputs a message on the serial monitor
- Serial.println(): Outputs a message on the serial monitor in a new line
- delay(): To add wait time in processing in milliseconds
- setup(): The standard function in Arduino to be only called once
- loop(): The standard function in Arduino to be called repeatedly
- if …. Else: Used for conditional statements
- //: Used for adding single line comments
- /* */: Used for adding multi-line comments
- #define: Used for defining a constant value
- #include: Used for including external libraries
Structuring the Arduino code
Arduino code should ideally be structured in three parts, i.e., external libraries, constants and variables, and functions. Each part follows the other. We start by calling the necessary external libraries for our project. Next, we define any necessary constants or variables required. This is followed with the required functions.
There are two standard functions that must be called in every program, i.e., setup() and loop(). The setup() function is used for initialising the code while the loop() runs certain methods for a certain number of iterations depending upon your requirements.
Shared below is an example of what an ideal code structure should look like. We shall output the message ‘Hello Internet of Things’ on the Serial Monitor window every 3000 milliseconds.
// External Libraries
#include <SPI.h>
// Constants and Variables
char text = “Hello Internet of Things”;
// Custom function(s)
void sayHello()
{
Serial.println(text);
}
// Standard functions
void setup()
{
Serial.begin(9600); // For initializing the serial port
}
void loop()
{
sayHello();
delay(3000);
}
Executing the Arduino code
Now that we have the code written and structured in the proper order, we shall start the execution process. In order to run the code, you will need to do the following.
Step 1: Connect your Arduino device to the computer using the USB cable.
Step 2: In your IDE, select the Arduino board that you will be using by clicking Tools > Board.
Step 3: Next, you will be selecting the port by clicking on Tools > Port. Select the port that corresponds to the USB modem of your Arduino device.
Step 4: Click on the Upload button and open the Serial Monitor window. Figure 3 shows the output on this window.
Learning to use an Arduino device can be a rewarding experience. Whether you end up liking IoT or not, just the feel of using an Arduino will give you a taste of programming hardware from the ground up. The greatest challenge that beginners face with Arduino is not the code as much as the debugging. Many times, newbie developers write code without any unit testing. My recommendation if you are just getting started with Arduino is not to get frustrated if your programs don’t run properly. It can be challenging at first to find out where you may have gone wrong with your code or circuits. But over time, you will learn to create checks for your code at every level. Once you get a hang of that, the sky’s the limit! Every day, people are coming up with new and interesting ways of using an Arduino device in their DIY projects. I look forward to seeing what you do with it.


