


The fourth part of this series on integration of network function virtualization with the DevOps pipeline discusses open source cloud computing platforms in general, and OpenStack in particular.
It is very easy these days to deploy any server and make your service public through the internet. All you have to do is opt for paid hosting infrastructures such as Amazon Elastic Compute Cloud (EC2), Google Cloud Platform, Microsoft Azure, or any other from the many available. You can choose an internet-based system as per your requirement and that’s it — your service is online. You don’t have to bother about what system is driving your application or how it is being hosted — you just pay for the specifications you are using. This new model for providing computing services is called cloud computing.
There’s been a surge in the use of technology in the past decade, and today’s applications ask for numerous computing and storage requirements. Since this demand cannot be catered to by in-house infrastructure, many companies are now looking for vendors of cloud services to fulfill this requirement. Other factors pushing their adoption include the reliability and robustness that the cloud provides, and the fact that applications using cloud services experience less downtime. Users don’t have to care about where this infrastructure is deployed, because for them everything is available locally through the internet.
With the availability of cloud services, organisations can now choose their hardware configurations based on their requirements, operating systems, middleware applications, and other platform-based tools. As the traffic on the application changes, the infrastructure can be easily up scaled or downscaled, while eliminating any cost associated with its internal deployment.
Cloud computing models
Cloud computing is usually viewed under three stacks of service models. These are: Infrastructure as a Service (IaaS), Platform as a Service (PaaS), and Software as a Service (SaaS). SaaS gives the capability to use an application over the cloud environment of a service provider. The application can be used via a web browser. PaaS allows the user to provision, facilitate, and run the applications over the cloud computing environment. In this environment, users need not worry about the infrastructure underneath. It’s typically associated with developing and deploying the application and its configurations. IaaS provides its users with computation, networking, and storage resources in the cloud computing environment. The user has control over the operating system, storage, and deployed applications.
Open-Source cloud computing platforms
The open source community is also making numerous contributions to open source cloud computing projects. These projects are being developed to help deploy the cloud computing solutions and interfaces to manage the infrastructure underneath. An open source cloud promises no vendor lock-in, and endeavours seamless integration of applications deployed over different platforms. The source code is widely available for these cloud projects and adopters can modify it as per their requirements. Today, there is a growing concern about the confidentiality of data of organisations, and in-house open source cloud computing platforms help secure the perimeters of the data. A few common open source cloud computing projects are OpenStack, CloudStack, and OpenNebula.
OpenStack
One of the more popular open source cloud computing projects is OpenStack. It is deployed worldwide as Infrastructure-as-a-Service both in public and private clouds. OpenStack serves virtual machines and other computing resources to its users while abstracting the physical hardware it is deployed on. It controls large pools of resources, which include computation, networking, and storage. These resources are managed via APIs, which can be accessed through the command-line interface or the graphical user interface. OpenStack is well regarded as the operating system for cloud setup. Its features are not limited to the basic services of the cloud platform. It also provides orchestration, fault management, and service management, and ensures high availability for the user applications deployed over it.
OpenStack architecture
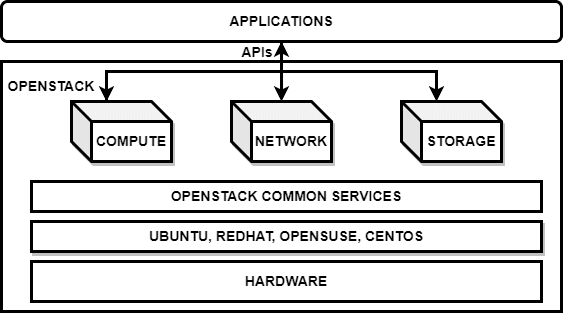
Scalability and openness have always been the selling point of OpenStack. However, it has also made a great name in the IT industry and among researchers because of its unique landscape. OpenStack is an amalgam of various components that come together to provide cloud computing services. Its architecture offers plug-and-play scenarios, where components can be included within OpenStack based on users’ needs. It has a modular architecture (Figure 1) and provides various services such as computing, hardware life cycle, storage, networking, shared services, orchestration, workload provisioning, application life cycle, API proxies, and web front-ends. Basically, OpenStack is designed for administrators and researchers to deploy IaaS infrastructure while providing tools and services to manage virtual machines on top of existing resources.
OpenStack components
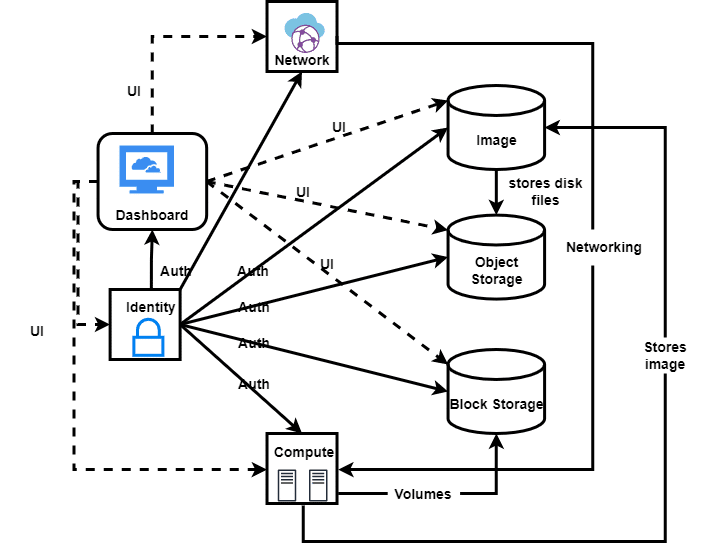
Compute, networking, block storage, identity, image, object storage, and dashboard comprise major components of OpenStack (Figure 2). All these components collaborate to produce an environment that is viable and reliable for IaaS. The dashboard provides the user interface (UI) to all the other components of the system. Similarly, identity provides authentication (auth) services to all the installed components in the OpenStack cluster. The network section provides networking to the compute of OpenStack. Compute provides volumes to the running instances via block storage and uses the cloud images from object storage.
Compute: Nova is the project associated with the computation component of OpenStack. The main role of Nova is to manage the life cycle of virtual machines, which are initiated by OpenStack users. It is also responsible for managing CPU, memory usage, disk usage, and network interfaces on these virtual machines. Nova runs as a set of daemons on top of existing Linux servers to provide that service.
Networking: Neutron is a software-defined networking (SDN) project of OpenStack that is responsible for delivering networking as a service in virtual computing environments. Neutron’s key responsibilities include providing IP addresses to virtual machines, subnets, topologies, and traffic routing. IP address allocation can be both static and dynamic. Users can also configure floating IPs to forward or reroute traffic. Neutron manages all networking facets for the virtual networking infrastructure (VNI) and the access layer aspects of the physical networking infrastructure (PNI) in the OpenStack environment.
Block storage: Cinder handles the block storage devices in OpenStack. It is responsible for providing APIs to users so they can manage and consume block storage on their virtual instances. It provides volumes to Nova virtual machines, ironic bare metal hosts, containers, and more while ensuring high availability, fault tolerance, recoverability, and open standards.
Identity: Keystone is responsible for providing API client authentication, service discovery, and distributed multi-tenant authorisation by implementing OpenStack’s identity API. It provides role-based access control for OpenStack components.
Image: Image service is provided by project Glance in OpenStack. With this service, users can upload and discover data assets that are meant to be used with other services. This currently includes images and metadata definitions. Glance manages virtual machines’ disk images, and provides image delivery to virtual machines as well as snapshot (backup) services.
Object storage: Swift in OpenStack provides object-level storage via a RESTful API. Swift is a highly available, distributed, eventually consistent object/blob store. Organisations can use it to store lots of data efficiently, safely, and cheaply.
Dashboard: The Horizon project provides administrators with a graphical user interface to administer OpenStack and its various components. Horizon is the canonical implementation of OpenStack’s dashboard, which provides a web-based user interface to OpenStack services including Nova, Swift, Keystone, etc.
OpenStack installation
OpenStack is a combination of various systems and separately installed components. These services connect via APIs and provide users with useful resources like computing, networking, and storage. You can either install OpenStack via a script or individually install its various components.
DevStack: DevStack is an Ubuntu-based minimal installation of OpenStack. It follows a certain template and installs all the components and services. The installation given here is for the OpenStack experience and the development environment.
The local installation was done on an Ubuntu 20.04.4 LTS virtual machine, with 4 CPUs, 12GB of memory, and 150GB of storage.
First, let’s update and upgrade our target platform:
$ sudo apt update
$ sudo apt upgrade
We create a stack user who will be responsible for handling all the DevStack services on the created virtual machine. DevStack services should be run as a non-root user with sudo permissions. The following commands create a stack user with the appropriate permissions:
$ sudo useradd -s /bin/bash -d/opt/stack -m stack
$ echo “stack ALL=(ALL) NOPASSWD: ALL” | sudo tee /etc/sudoers.d/stack
$ sudo -u stack -i
We’ll clone the DevStack repository and change the directory accordingly:
$ git clone https://opendev.org/openstack/devstack
$ cd devstack
In the devstack directory, we’ll have to make changes in the local.conf file and add passwords to the various services in DevStack:
[[ local | localrc ]]
ADMIN_PASSWORD=password
DATABASE_PASSWORD=$ADMIN_PASSWORD
RABBIT_PASSWORD=$ADMIN_PASSWORD
SERVICE_PASSWORD=$ADMIN_PASSWORD
And that’s it; you have successfully configured DevStack. It’s time to install the services, and run the following command:
$ ./stack.sh
Figure 3 showcases all the successful installations of DevStack and its various default services. The IP address can be used to visit the dashboard of DevStack. The figure also prompts the password and default users created.
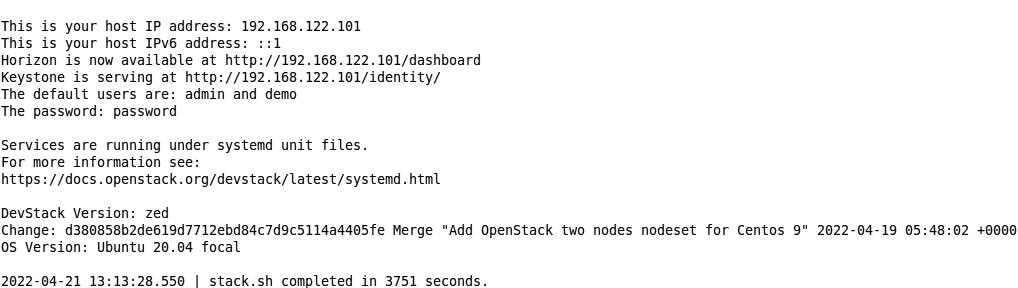
Figure 4 shows the login page of the DevStack — the user name and passwords can be obtained from the end of the installation script. The login page is produced by the Horizon service in OpenStack.
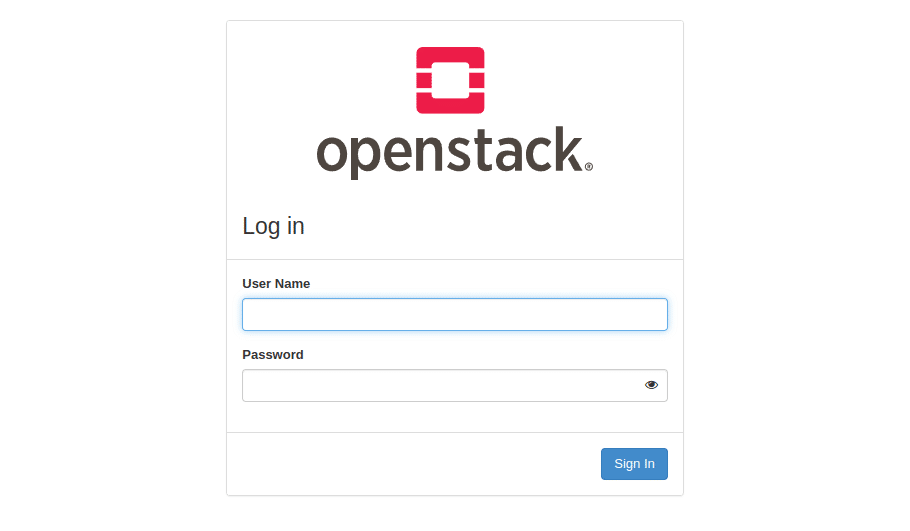
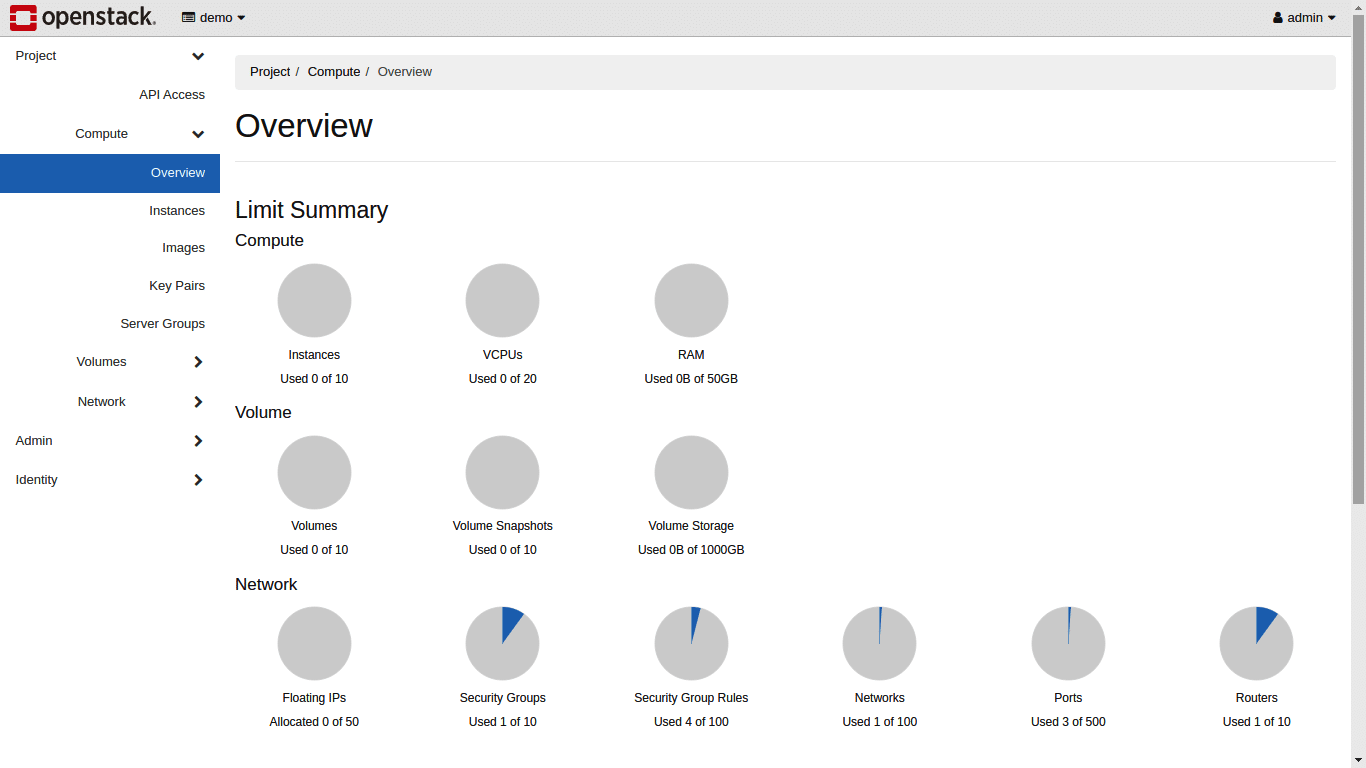
Figure 5 shows the default dashboard of OpenStack. The dashboard is produced via the Horizon component, where all the other services of OpenStack communicate their metadata, which is published on the dashboard. The Overview showcases the limited summaries of Compute, Volume, and Network. A default network and its related components are created by DevStack on installation.
Manual installation: Manual installation is a bit more complicated than the DevStack installation. Here, you have to individually handle the network and configurations on multiple nodes — Compute, Controller and Block. Many services such as Etcd, Memcache, MySQL, and RabbitMQ are installed and configured to work on all the nodes. After the installation of basic services, all the OpenStack components are installed such as Identity, Glance, Neutron, Nova, and more.
The installation procedure is quite complex and involves a plethora of steps. The complete installation instructions are kept in the GitHub repository, and the link for the same can be found at https://github.com/shubhamaggarwal890/nginx-vod/blob/master/OpenStack-Manual.md.
Figure 6 shows the login page of the Ubuntu-based OpenStack; the user name, password, and domain are set by the administrator during the installation process. The login page is produced by Horizon service in OpenStack.
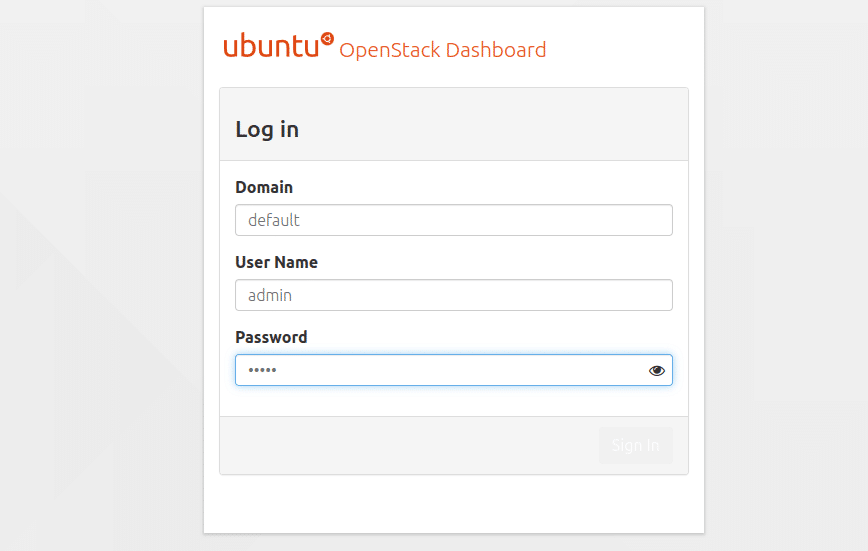
Figure 7 shows the default dashboard of OpenStack produced by the Horizon component. Here, all the other services of OpenStack communicate their metadata and it is published on the dashboard. Since in our installation of OpenStack we didn’t install the Cinder component, which is responsible for storing the metadata of all the other components, the limited summaries of Compute, Volumes, and Network are not visible.
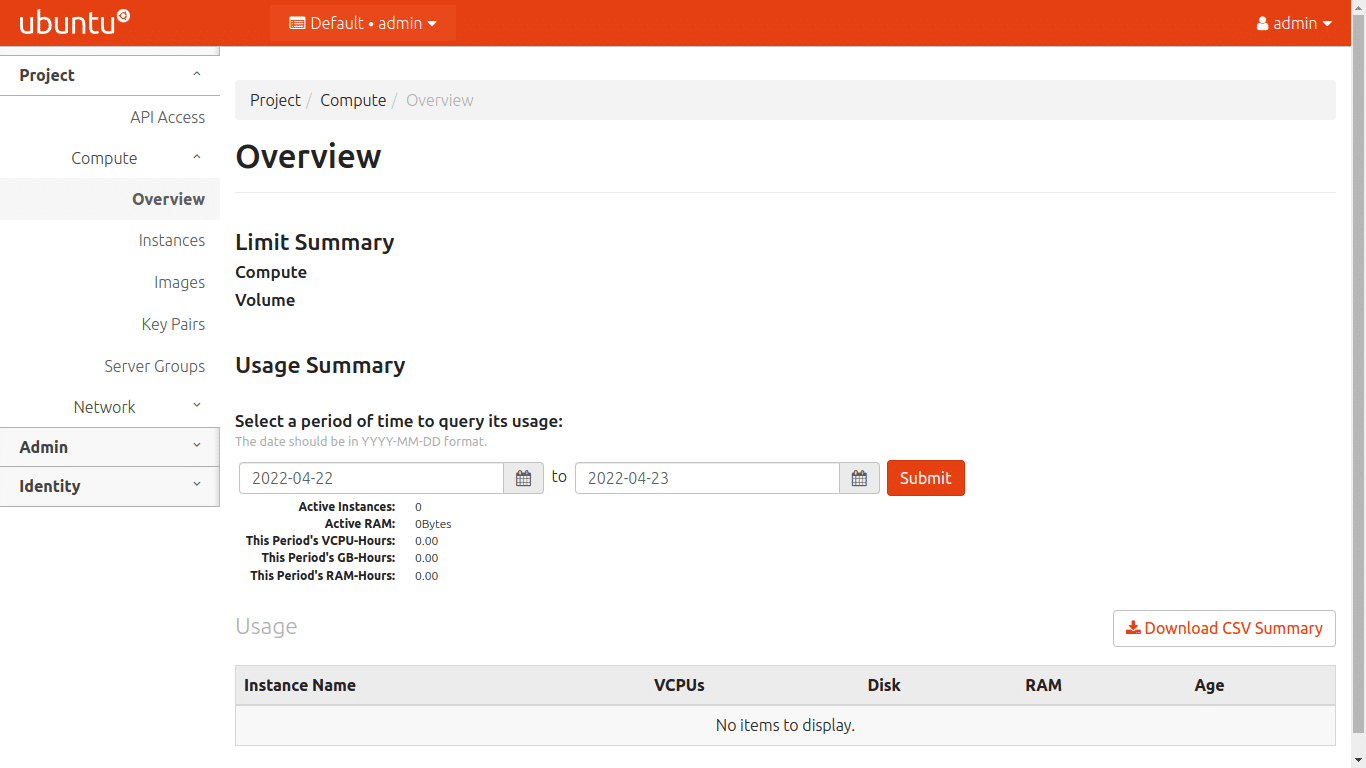
Figure 8 shows all the installed services contributing to the OpenStack system. Every service exposes endpoint APIs, which can be invoked by admin, internally and publically.
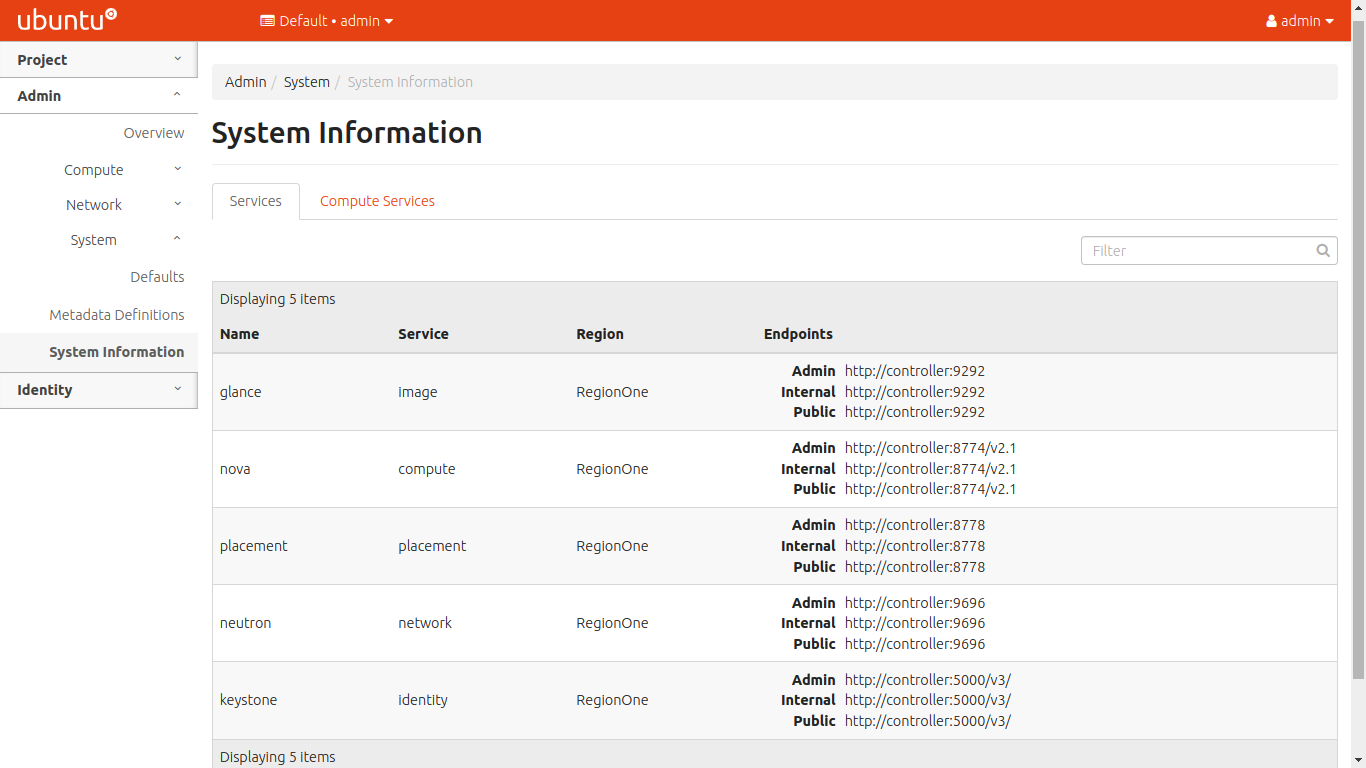
Figure 9 shows all the hypervisors attached to the OpenStack cluster. In the produced cluster, we went with one Compute node with type Quick Emulator (QEMU). The Hypervisor summary also shows the VCPUs used, along with other details such as RAM and storage size.
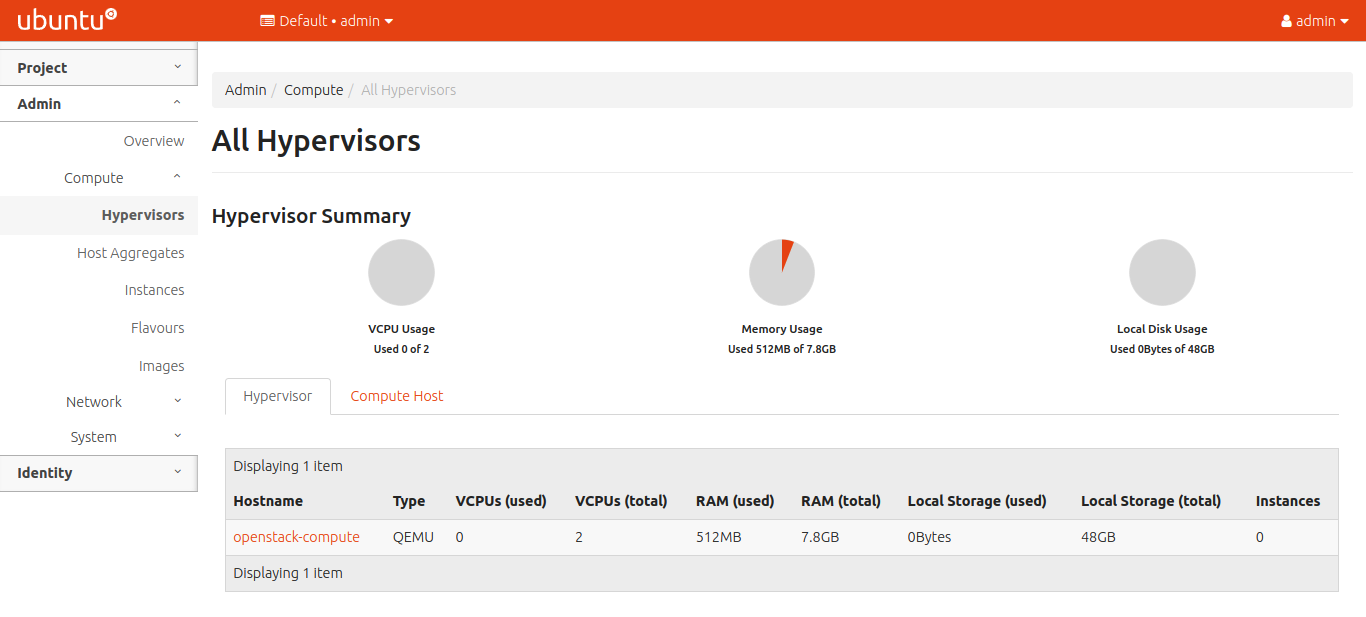
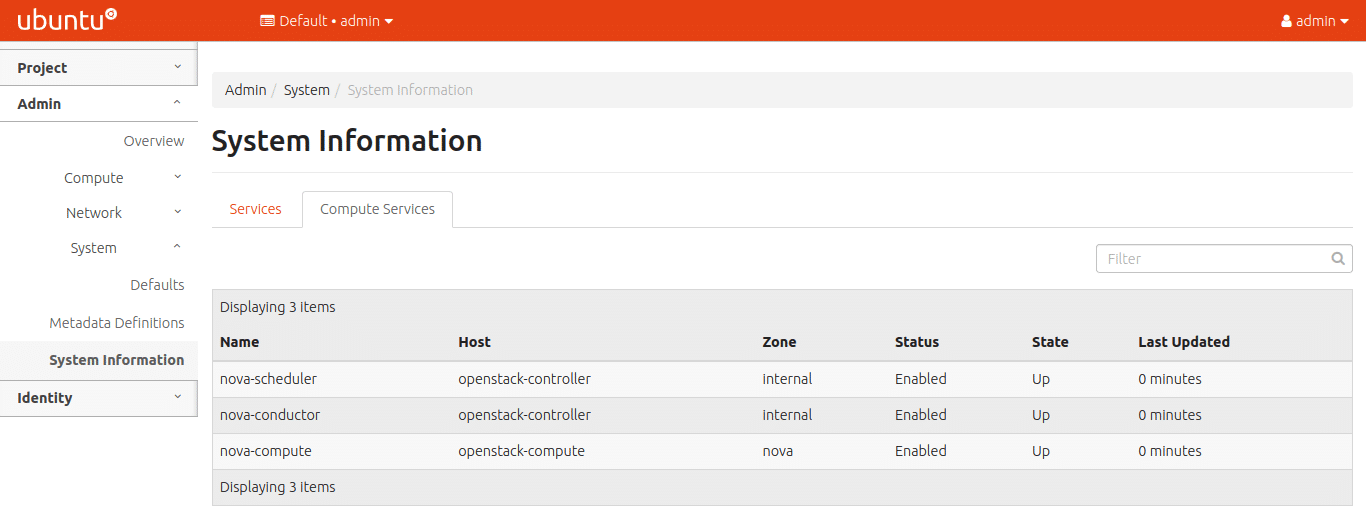
Figure 10 shows all the compute services running on their respective host nodes. The columns further detail the status and the current state of these services. The zone is the logical partition of the services.
One can argue that DevStack is easier to install than the manual installation of each service in OpenStack, as it handles all the components and their communication through an extensible script, bringing up the OpenStack environment in no time. But this type of installation has its own limitations. The DevStack environment cannot be tailored as per the administrator’s requirements. Moreover, DevStack is only for developer-based environments; such a cluster cannot and should not be deployed over production systems. To enable distributed systems and their communication, one must go for manual installation of OpenStack.
We saw that OpenStack abstracts most of the network functions, where we can deploy various networking functionalities through its dashboard or via the call of APIs. Traditionally, the setup of such an infrastructure would require the use of plenty of proprietary hardware. But today that’s not the case, because with software-defined networking, all these networking functionalities have been virtualised as software.


