


VirtualBox has been around for seven years now and it is a good free and open source alternative to proprietary virtualisation platforms like VMware, Microsoft Hyper V, etc. It provides all the functionality that one expects from a virtualisation platform, and with Oracle as its backbone one need not worry about quality and support.
In this article, well tackle some challenges and work out solutions using VirtualBox. However, if you wish to first familiarise yourself with virtualisation concepts and terminology, please refer to the article titled Kick-Starting Virtualisation with VirtualBox published in the March 2013 edition of Open Source For You.
Downloading and installing VirtualBox
Follow these steps to download and install VirtualBox on your machine.
Step 1: Navigate to https://www.virtualbox.org/wiki/Downloads and download the VirtualBox setup file for Microsoft Windows. The current version, at the time of writing this article, is 4.3.10.
Step 2: Open the location where the setup file has been downloaded and execute the file named VirtualBox-4.3.10-93012-Win.exe.
Step 3: Proceed with the installation in the following manner.
Welcome window: Press Next.
Custom Setup window: Change installation location if you wish to install VirtualBox in a different location, or else leave everything as is and press Next. Uncheck the default settings if you do not wish VirtualBox icons to appear on the desktop or the Quick Launch bar. However, keep the Register file associations box checked (this will ensure that files associated with VirtualBox open only with VirtualBox). Then press Next.
Network Interfaces Warning window: During installation, VirtualBox will reset the network connections. So make sure that any network dependent tasks are completed before proceeding. Press Yes when ready.
Ready to Install window: Press Install to begin the installation.
Note: VirtualBox needs to install a few drivers in order to complete the installation. Check Always trust software from Oracle Corporation and press Install when the pop-up is displayed.
Installation Complete window: It should take about 5-6 minutes for the installation to complete. Keep the Start Oracle VirtualBox 4.3.10 after installation option checked and press Finish.
Use-case 1: Create a remote PC and
remote storage
Amidst all the chaos around governments breaching our privacy and cloud storage vendors data centres getting hacked, one thought that often crosses ones mind is: If only I had my own cloud storage. Look no further. With VirtualBox, a virtual machine (VM) can be created and remote access can be allowed to it. This will eliminate the risk of the host system getting exposed and will provide a sandboxed environment for accessing data remotely. This VM can also be used as a remote PC for working on the go.
Creating the VM
Well be using Microsoft Windows 8.1 Enterprise. A 90-day evaluation version of Windows 8.1 Enterprise can be downloaded from http://goo.gl/P7E0q5.
Note: A Microsoft account is required to download this image file. In case you dont have a Microsoft account, create one at http://goo.gl/JDNIZZ.
Once the image file has finished downloading, open VirtualBox and follow the instructions given below to create the VM.
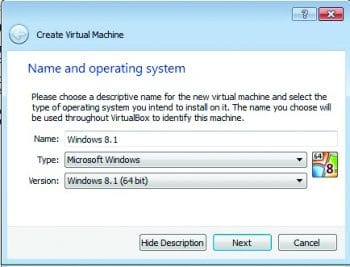
Step 1: In the VirtualBox console, press the New icon and fill in the information, as shown in Figure 1, in the Name and Operating system window before pressing Next.
Note: In the above window, the Windows 8.1 (64-bit) option has been selected. 64-bit options will appear only if the host system has a 64-bit processor and it supports virtualisation technology. By default, most systems have the virtualisation support option disabled, so youll need to enable it in the BIOS.
Note: If you are using the 32-bit image of Windows 8.1, select the Windows 8.1 (32-bit) option from the Version drop-down list.
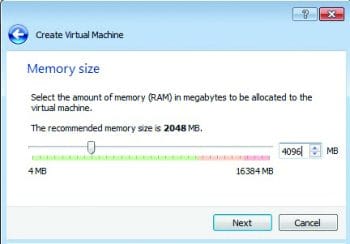
Step 2: By default, VirtualBox assigns 2048 MB of RAM to a Windows 8.1 virtual machine. You can increase it to any amount as long as the pointer lies in the green area (as shown in Figure 2). Press Next, once done.
Note: 2048 MB of RAM is recommended only if youre not planning to run any memory intensive applications (e.g., Microsoft Office, an antivirus, etc) on the VM. If you wish to use this VM as an alternate PC, you may want to increase the RAM to a more suitable amount.
Steps 3 – 5: In the next three windows, select the following options:
Hard drive: Create a virtual hard drive now
Hard drive file type: VDI (VirtualBox Disk Image)
Storage on physical hard drive: Dynamically allocated
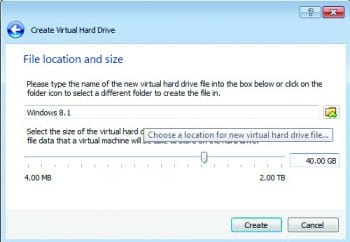
Step 6: Specify the location and size of the virtual hard drive. Though 25 GB, available by default, will be sufficient for the purposes of this article, you can set it to any amount, depending on the free storage capacity available on the host system. Once done, press Create.
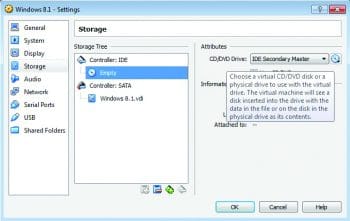
Step 7: Before switching on the VM, well need to point it to the Windows 8.1 Enterprise (90-day evaluation) image file to install the operating system. To do this select Windows 8.1 and press the Settings icon in the top menu. Select Storage and then select Empty under the Controller: IDE section. Press the disk icon in the Attributes section, and select the Choose a virtual CD/DVD disk file option. Navigate to the location of the image file, select it and press Open. Press OK to close the Settings window.
Step 8: Press Start in the top menu and proceed with the Windows 8.1 installation.
Note: Post installation, select Use Express Settings on the Settings page.
Step 9: The last step in this section is to install VirtualBox Guest Additions on the virtual machine. To do this, select the Insert Guest Additions CD Image option from the Devices menu in the Virtual Machine window. Open This PC on the VM, double click on VirtualBox Guest Additions CD Drive and proceed with the installation. Reboot the VM when the installation is finished.
Setting up shared folders
Once the virtual machine is ready, well need to set up a shared folder between the host system and the VM. This folder will be used to place the files you want to access remotely.

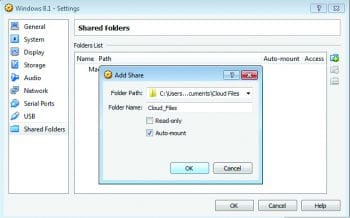
To set up a shared folder, follow these instructions. In the VirtualBox console, select Windows 8.1. Click on the Settings icon and select Shared Folders. Press the + icon to add a folder and specify the desired folder path. Specify the folder name, as it should appear in the VM (without spaces). Uncheck Read-only. Check Auto-mount, press OK and close the Settings window.
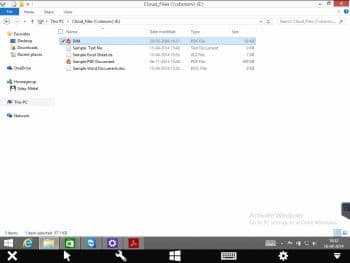
Start the VM and open This PC. The shared folder should appear as a drive, as shown in Figure 6.
Accessing the shared folder remotely
Now that our backend setup is in place, let’s work to make it remotely accessible. Well do this with the help of Teamviewer, which is a must-have remote desktop sharing tool. In addition to its core functionality, it provides features like remote file sharing, virtual meetings, etc. Also, since it has a mobile client for all major platforms, it ensures that you will have access to your data irrespective of the type of device you use.
Log on to http://www.teamviewer.com from the VM, download the setup and install it.
Note: If you do not wish to install Teamviewer, there is an option to execute it in Run-only (One time use) mode. Also, in response to How do you wish to use it?, select Personal / non-commercial as were using it for personal use only.
Once Teamviewer is up and running, note down the ID and password shown under the Allow Remote Control section. These credentials will be used to access this VM remotely.
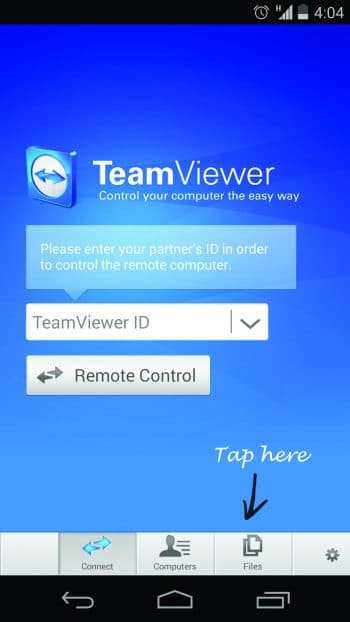
Next, on your mobile device (well use an Android device for the purpose of this article) install the Teamviewer app from the Google Play store (or the respective app store for your device). Open the app and follow the instructions displayed on the screens as shown in Figure 7.
You can also install productivity applications (like Adobe Reader, Office 365, etc) on the Windows 8.1 VM and convert it into an on-the-fly office. Some sample screens of this VM, when accessed via an Apple iPad, are shown in Figure 8.
Use-case 2: Try Chrome OS with VirtualBox
Google Chromebook is the latest offering in the world of thin client computing. While you can buy a Chromebook for around Rs 22,000, you can own a virtual one for free. To know how, keep reading.
Chromebook runs on Chrome OS, which is the commercial version of Chromium OS (a Linux-based open source project initiated by Google). So all that needs to be done is to download the VirtualBox image of Chromium OS and create a VM to run it.
Downloading Chromium OS
Navigate to http://goo.gl/pXLro and download the VirtualBox image of Chromium OS compiled by Hexxeh.
Once the download is complete, extract the zipped file to a folder named Chromium OS. Next, well need to create a VM for this image to run.
Creating a VM from a VirtualBox image
Open VirtualBox and create a new VM based on the following instructions:
- Name and operating system
Name: Chromium OS
Type: Linux
Version: Other Linux (32-bit) - Memory size: 1024 MB
Note: It can also work with 512 MB of RAM but thats recommended only when the host machine has 2 GB, or less, of RAM. - Hard drive: Select the Use an existing virtual hard drive file option and spe Use an existing virtual hard drive file cify the location of the extracted Chromium OS VDI file and press Create.
- Settings configuration: Before starting the Chromium OS VM, the following settings need to be in place:
- Enable Physical Address Extension: Navigate to Settings > System > Processor and check Enable PAE/NX
- Network adapter type: Navigate to Settings > Network > Adapter 1 > Advanced and change the adapter type to Intel PRO/1000 MT Desktop (82540EM)
Executing the VM
In the VirtualBox console, select Chromium OS and press Start from the top menu.
On starting, the VM window will show the notifications regarding Auto capture keyboard and Mouse Pointer Integration stating that the VM supports these features and they have been turned on by default.
For some reason, the mouse integration doesnt work well with Chromium OS VM, so well need to disable it for the mouse pointer to work in the VM environment. Do so by selecting Disable Mouse Pointer Integration from the Machine menu in the VM window. The next time you click inside the VM window, the pop-up shown in Figure 9 will appear.
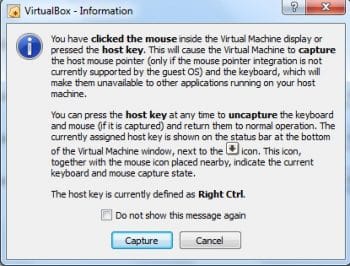
Check Do not show this message again and press Capture.
Chromium OS
On the first run, Chromium OS will require you to specify certain settings for it to work. Once the configuration is complete, youll be shown the welcome screen.
Congratulations! Youre now the proud owner of a virtual Chromebook. To explore more, visit the official Chromebook Help website at http://goo.gl/Lz2aBC.
Apart from running other OSs, there are several uses to which a VirtualBox can be put.
Use-case 3: Run legacy applications and operating systems
In the course of a day’s work, one may come across applications which will only run on a particular configuration. For example, even today, there are many Web-based applications that can only run on Internet Explorer 6. These configurations might be obsolete (just like IE 6) and can be hard to find in a production environment.
Apart from these, there could be times when a vendor stops supporting a version of an operating system, and since organisations cannot make a switch easily, they will be stuck. One recent example is Microsoft withdrawing support for Windows XP.
In situations like these, VirtualBox can be of great help. Create a VM of that particular configuration or operating system and move on with life. These VMs can be used till the applications are ported to a newer configuration or OS, and then can be discarded.
Use-case 4: Test suspicious files
Lets assume that you’ve got an email from a friend that has an attachment, but you’re feeling a bit sceptical about it. Why take a risk by opening it on your system? Use VirtualBox. Create a master VM, clone it and open the attachment on the clone. Once you’re sure about the integrity of the file, discard the clone. This setup can also come in handy if you like to study or experiment with computer viruses. You can unleash the virus on one of the clones and then study its effect on it all the fun without compromising the security of the host system.
Use-case 5: Set up a multi-platform development environment
VirtualBox can be a real boon for application and Web developers. Using VirtualBox, they can set up a development environment comprising various platforms (servers, Windows, Linux, Solaris, etc) and with the help of the shared folders feature, a central repository of code can be set up. This code can then be tested on different platforms. This saves you the trouble of setting up a physical lab and then replicating code on each of the systems.
Use-case 6: Create a virtual lab to learn enterprise software
This is by far one of my favourite use cases of VirtualBox. Being a curious Tom, I love to get my hands dirty by learning the enterprise software used at workmail server software, directory software, whatever. VirtualBox is a wonderful resource in such cases. You can use it to create a mini-virtual lab consisting of server(s) and a few client machines. You can then deploy the software you wish to learn in this virtual lab and experiment with it.
Best practices and recommendations
A few tips and tricks can go a long way to help you get the best out of VirtualBox. Based on my experience with it, I am listing a few below.
Use a 64-bit processor: Usually, a machine with a 32-bit processor limits the usable RAM to 3 GB. This, in turn, limits the amount of RAM you can assign to a VM and also the number of VMs you can create. On the other hand, a 64-bit processor gives you the flexibility to use up to 16 GB of RAM on the host system, thereby increasing the amount of RAM that can be allocated to VMs.
Enable virtualisation in the BIOS: As stated earlier, most of the systems have this feature disabled, by default. If you wish to create 64-bit VMs, you’ll need to enable this option in the BIOS.
Use NAT: Unless you’re planning to create an internal network, use NAT as a network mode. This would save you the trouble of configuring the VM to access the Internet, because with NAT VMs hide behind the IP address of the host machine and can access the Internet as long as host system has access to it.
Use auto-mount for shared folders: Keeping the auto-mount setting checked while creating the shared folder will ensure that the folder is visible as soon as the VM boots up.
Use a separate partition or hard drive: By default, VirtualBox stores the VM files in the C drive. This can fill the drive pretty fast, if you’re working with multiple VMs. In order to keep the C drive clean, it is recommended that you use either a separate partition or a hard drive to store the VMs.
Install guest additions: VirtualBox guest additions install certain drivers on the VM, which enable it to function like a normal machine. For example, without guest additions installed, a VM will not occupy the full screen even in the Full Screen mode.
RAM allocation: Never allocate more than 75 per cent of available RAM to a single VM or else the host systems performance will be affected. You must keep RAM allocation within the green region in the Memory Size window.
Common errors and resolutions
Error: VT-x/AMD-V hardware acceleration has been enabled, but is not operational
This error comes up when you’re trying to boot a 64-bit VM but VirtualBox isn’t able to find hardware virtualisation capabilities on the host machine. This can be fixed by turning on the VT – x or Virtualization option in the BIOS.
Error: 0x0000225
This error is related to I/O APIC (Advanced Programmable Interrupt Controllers) settings. APIC provides a mechanism by which the devices attached to the VM communicate with the processor. If you’re using a 64-bit VM, I/O APIC settings need to be enabled. You can enable this by going to Settings > System and checking Enable I/O APIC’ in the Extended Features section.
Error: Error loading operating system
This is the most common type of error that users face when migrating Windows VMs from VMware to VirtualBox. This can be fixed easily by changing the controller of the virtual hard drive from SCSI to IDE and then repairing the boot manager using the installation disk. The link http://goo.gl/PzOAyo contains a detailed tutorial on fixing this error.
Besides the above mentioned use cases, virtualisation technology also makes it possible to optimally use hardware. Organisations are today implementing a virtualised infrastructure for their employees to work in. This not only reduces the amount of e-waste but also serves as a secure computing environment. Even home users can efficiently utilise their old hardware with the help of virtualisation tools like VirtualBox.
If you have any other use case for VirtualBox, or if you use VirtualBox to tackle any other day-to-day challenges, do share them.


