Kubernetes is a production-grade open source container orchestration tool. It automates the deployment, scaling and management of containerised applications. Along with Kubernetes, this article will help you get acquainted with its package manager, Helm—its charts will help you install and even upgrade complex Kubernetes applications.
Did you know that with the appropriate settings, you can run more than 1000 lightweight virtual machines on your desktop computer? You don’t need high-end servers to run such a large number of containers. Also, managing all the containers manually is a cumbersome task. To ease this task, we can use open source tools like Docker Swarm, Mesos, CoreOS Fleet, etc.
An introduction to Kubernetes
The use of containers increased tremendously with the advent of the Docker tool. For a large scale single application such as an online shopping system, multiple containers are used to achieve high availability, continuous deployment, failover mechanisms, high performance, etc. In such cases, the number of containers deployed is huge, and depends on the requirements. Sometimes the containers are deployed on multiple hosts. Since all these containers and hosts needed to be managed, the concept of ‘orchestration of containers’ came about.
Kubernetes is the latest buzz word in the world of orchestrating containers. It is an open source container orchestration tool with a great set of features. Kubernetes is widely used amongst other container orchestration tools.
This article guides readers on how to set up a Kubernetes cluster using Minikube in an Ubuntu system. There are many ways to install a Kubernetes cluster, depending on the infrastructure being used. Using Minikube is one of the straightforward methods. Minikube abstracts lots of internals such as initialising the core pods, pod networking and exposing services, and makes it easy to fire up a Kubernetes cluster.
So let us set up and run a Kubernetes cluster locally with Minikube and then explore how to deploy applications on to the cluster, using the Kubernetes package manager called Helm.
Kubernetes internals
Kubernetes has been created by Google, based on its experience in running huge workloads. It is designed to work in different environments such as virtual machines, on bare metal systems or on the cloud. It is completely open source and is widely used these days. It is very modular and can be customised up to the core. It offers multiple options for setting up the cluster, right from networking to container runtimes.
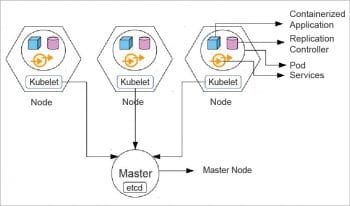
There are some important components of Kubernetes that we need to understand before jumping into the installation process. Figure 2 shows a typical Kubernetes cluster, with master nodes and slaves (simply called nodes). The master node takes care of the slaves and the deployment of the various components of Kubernetes in each of them. The master node uses etcd to store the information about what is to be deployed at what point in time in each of the slaves, and hence maintains the state of the cluster. A cluster can be formed using more than one system, which is why the components are packaged into nodes.
Details of some other important components of a Kubernetes cluster are given below.
- Pods: A group of containers on the same host is called a pod, and all the containers in a pod share the same network settings such as the Internet Protocol (IP) address.
- Cluster: A cluster is a set of nodes whose resources are used to run a set of applications.
- Services: The services provided are load balancers for the pods in a cluster, exposing them to the outside world.
- Replication controller: This controls the number of replicas of each pod in a cluster, and also makes sure the number of pods is equal to the replica count set in the configuration.
- Labels: Labels are tags used to differentiate pods, services and other components.
- Namespaces: Namespaces help in managing pods in environments where developers are spread across multiple projects. They divide cluster resources between multiple users. Namespaces can be skipped in clusters with less than ten users.


Setting up a Kubernetes cluster using Minikube
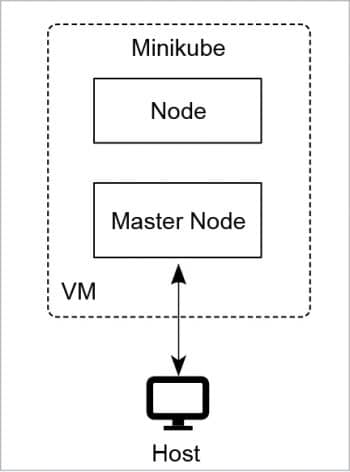
Minikube, which is a part of the official Kubernetes project, is a command line tool to install and run Kubernetes clusters locally. The cluster can be started or stopped, just like any other service in Linux. Minikube runs all the components of the cluster like the nodes, pods, etc, in a virtual machine on the host. Therefore, it is required to either have VirtualBox or Kernel Virtual Machine (kvm) installed on the host system. Minikube, however, can only run a single node cluster.
Installing Minikube
Run the commands as shown in Figure 4.
The curl command first checks if the location is correct or needs to be redirected using the L flag. It then downloads the latest version of Minikube and saves the output to a file instead of stdout, using the o flag. The && command is used to run multiple commands sequentially, one after the other but as a single command. The chmod command gives appropriate permissions to the downloaded file, and the last command moves it into the /usr/local/bin folder so that it can run from any directory since the PATH is set by default.
How to talk to the cluster
Install Kubectl, which is a command line tool, to talk to the cluster and get the necessary information about it. It is like a medium of communication between the user and the cluster. Kubectl can be used to start, modify or delete parts of the cluster. More details on Kubectl can be found at https://kubernetes.io/docs/setup/pick-right-solution/. To install Kubectl, run the commands as shown in Figure 5.
Similar to the Minikube installation, these commands download the binary file of Kubectl, give it appropriate permissions and move it to /usr/local/bin. The inner curl command extracts the latest version number.

Starting Minikube
Run the following command from a terminal:
$minikube start
In no time, the cluster will be fired up and running.
To check if Kubectl and Minikube are installed properly, run the commands as shown in Figure 6.
The output is a table with six columns. The first column indicates the namespace to which a pod belongs. The second column indicates the name of the pod. The third column shows the number of pods to be scheduled and the number of currently running pods. The fourth column shows the status of the pod. The fifth column shows the number of times the given pod has restarted. The last column shows the age of the pod, i.e., the time since the creation of the pod.
Now we have a Kubernetes cluster running locally. As you can see, we didn’t have to configure the network or any other resource specifically. Minikube takes care of all the internal configurations. Hence, Minikube saves a lot of time when deploying applications in a development environment locally.
Stopping a cluster
Sometimes we may have to stop the cluster to free computing resources. In such a scenario, run the following command:
$minikube stop
Now that we have set up a cluster, let us investigate Helm, with which we can deploy applications like WordPress or MySQL on the cluster, with just a single command.
Using Helm
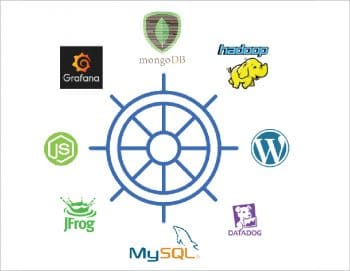
Helm is a package manager for Kubernetes that streamlines the process of installing and managing applications on the cluster. You can relate to it as apt/ ebuild/ yum/ homebrew for Kubernetes. The name ‘Helm’ refers to the steering wheel of a ship. In the context of Kubernetes, instead of steering a ship, Helm steers the cluster, hence managing applications as illustrated in Figure 7.
Helm applications are written as Helm charts, which help us define, install and upgrade any Kubernetes application. Charts are generally preconfigured Kubernetes resources.
Helm can be used for the following tasks:
a. Manage releases of applications
b. Share applications as charts
c. Manage Kubernetes manifest files
d. Search and use already existing applications packaged as charts
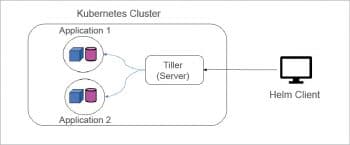
Helm comprises two parts—Helm (a client) and Tiller
(a server), as shown in Figure 8. Tiller runs inside Kubernetes and manages the installation of Kubernetes charts. Helm can be installed on laptops, servers, or on continuous integration or continuous delivery tools like Jenkins or Chef.
Kubernetes charts can be stored on a disk or they can be fetched from remote repositories. A chart consists of two important things: Chart.yml (description of the chart) and one or more templates containing Kubernetes manifest files.
To use Helm in a secure and efficient way, you need a Kubernetes cluster, Helm and Tiller configuration. You need to decide what security configurations to apply to your installation such as controlling the cluster in network environments, multi-tenant clusters, clusters with access to important data, etc. More information on securing Helm can be found at https://docs.helm.sh/using_helm/#securing-your-helm-installation/.

Deploying applications using Helm
First, we need to install Helm in order to be able to deploy applications with it. To install Helm, run the command shown in Figure 9.
These commands will download the Helm script and save it as the get_helm.sh file, then the required permissions are given, and the script installs Helm.
To start Helm, execute the following command:
$helm init
This will create a server as a pod and configure the cluster to run Helm. There are many applications that can be installed using Helm. An exhaustive list of Helm-supported applications can be found at Kubeapps Hub [6].
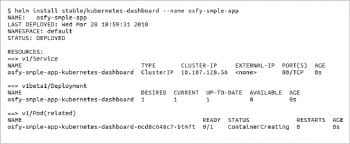
Let us install the Kubernetes dashboard by running the commands shown in Figure 10.
This will install the dashboard application as a pod on the Kubernetes cluster. After a while, running the command from Figure 6, you will see a pod running with the name ‘osfy-smple-app-kubernetes-dashboard-xxxxx-xx’. The last few characters are randomly assigned by the cluster itself.
Once the pod is running, execute the commands as shown in Figure 11 to access the application. These commands are needed to expose the port of the dashboard to your host, so as to access the application from your host.
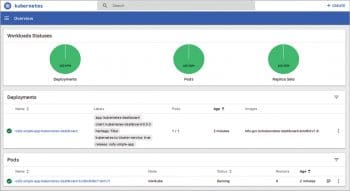
After a few seconds, open the URL http://localhost:9090 in your browser. You will find the dashboard of your Kubernetes cluster as shown in Figure 12. The dashboard has three figures on the top, which indicate the running status of all the deployments, pods and replica sets in the cluster. The other things on the dashboard are self-explanatory.
Sometimes, we may want to delete the applications deployed for various reasons. To do so, run the following command:
$helm delete osfy-smple-app
As you have seen, it is easy to run a Kubernetes cluster locally, and Helm makes it simple to deploy applications on the cluster. Helm charts make it easier for anyone to package their applications and deploy them on the cluster. In this article, we have only discussed deploying applications, but once that is done, in a later article we can look into the features of Kubernetes—like self-healing, replica-sets, scaling the pods, stateful sets, custom resource definitions, etc.


