In the era of rapid application development and deployment as well as concerns around security and privacy, the OAuth2 authorisation is a huge boon.
When you try to access a mobile app or website (Web app), you are often asked to use your Google or Facebook account to log into it. You type in the credentials (your ID and password) and are presented with a screen that allows access to some of the information (e.g., access to your contact, access to SMS, camera, etc). You trust it and proceed. It sends a SMS with an OTP. You key in the OTP and voila, you have access to the app or website.
This is something we have done a number of times.
This article talks about the fundamental principle around this mechanism – the all-pervasive and ubiquitous Open Authorization, aka OAuth. The current version is 2 or OAuth2.
What is OAuth2?
OAuth2 is an authorisation standard or framework, and not really a protocol as such. It has nothing to do with authentication, but is an authorisation delegation framework. Apps practice authorisation in other ways also. One standard way is the session token based system. The sequence diagram in Figure 1 explains this.
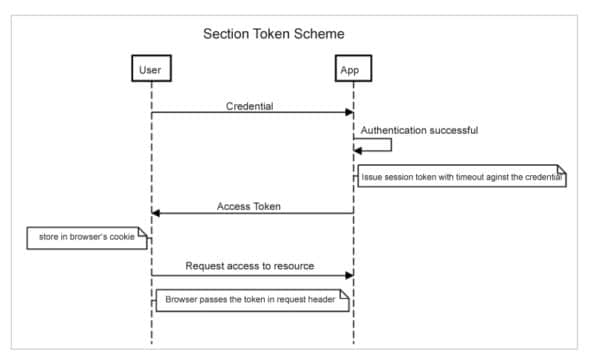
However, nowadays, applications are far from monolithic. They often deploy domain sharding (sub-domaining) for the resources in order to extract more parallelism out of the networking layer — layer-4 in the networking stack. Every domain needs to consult the same store of access tokens against credentials, every time a user accesses the resource. Hence, the token store is a single point of failure for the whole application ecosystem.
Tenets of OAuth2
Table 1 lists different participants or tenets in the OAuth2 ecosystem.
| Tenet | Description |
| Resource owner or user | You may have data stored somewhere in the cloud. For example, you may have uploaded some of your photos to Google, and may want to print them through a trendy app (e.g., an app that predicts how you will look at the age of 80). It is your photo. So, the photo is the resource, and ‘you’ are the user, who owns the resource. |
| Application or client | The photo app we just mentioned above is called a client, because it is an ‘authorisation’ client to the authorisation (OAuth2) server. |
| Resource server (server) | The server (physical, VM, container, pod), service or microservice stores the resource (in this case, the photo). |
| Authorisation server (auth server) |
This is the server (physical, VM, container, pod), service or microservice that hosts OAuth2. It is always a best practice to keep the resource server separate from the auth server. The resource server is for supporting the resource management (say, through REST API or GraphQL), whereas the auth server is for authorisation only. This is like the present day doctors who specialise in one field. The concept of a general physician is passé. |
| Scope | This refers to the resource that accesses the application required to do its job. For example, the photo app needs to access your photos and camera. |
| Authorisation code / Key / Token |
This is the first ‘magic number’ the application/client receives from the auth server in the process of authorisation. |
| Access token | This is the JSON Web token (JWT) format code application/client received from the auth server as a part of authorisation negotiation. This code application is saved inside a safe vault, and passes on every resource request to the resource server for authorisation, through the https header. |
| Lease / Expiry / Timeout | Every access token comes with a lease for some time; e.g., it may be valid for a day. Beyond that it becomes invalid. |
| JWT | This format of access token – the JSON Web token – will be discussed in detail later on. |
Table 1: Tenets of Oauth2
How OAuth2 works
Let us start with an interaction diagram (Figure 2).
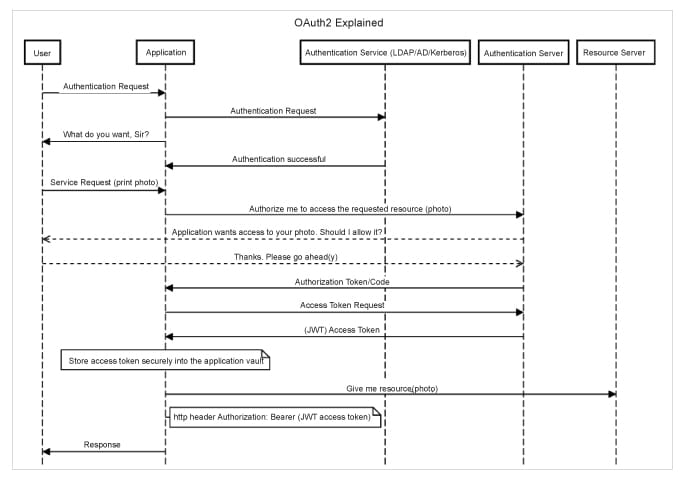
Here are the steps:
1. User wants to print a photo using a photo application.
2. User opens the photo application.
3. User authenticates using credentials. The application, in turn, contacts the authentication entity (AD, Kerberos, etc) for the user identification.
4. Authentication is successful.
5. Now, OAuth2 comes into play.
6. Photo application contacts authorisation server for access permission with specifying scope (“please allow me to access user’s photos stored in your server”).
7. Auth server silently asks the user if it can trust the photo application.
8. User gives a nod.
9. Auth server issues an authorisation token.
10. The authorisation token is passed to the application.
11. Application asks for an access token for passing the authorisation token.
12. Auth server verifies the auth token, and gives a JWT format access token with a limited expiry. (This double token business — authorisation and access token—is for safety, as it will be very difficult for both to be compromised.)
13. Application securely stores it in its vault.
14. Application contacts the resource server by passing the JWT token as the http Authorization: bearer <JWT Access Token> to the resource server (the photo store).
15. The photo is presented to the application.
16. The application processes it and returns it to the user.
OAuth2 and microservices
The workflow we discussed above is the standard reference sequence of how OAuth2 works. However, in practice, we sometimes see a slight variation of the above. Step 9 to Step 11 (authorisation token and access token) are generally shortened into one step. This variation is called ‘Implicit OAuth2’.
How does this microservice architecture fit into this whole OAuth2 story? The client microservice contacts the auth microservice to acquire the authorisation token and subsequently the access token, to get served by the resource microservices.
JWT
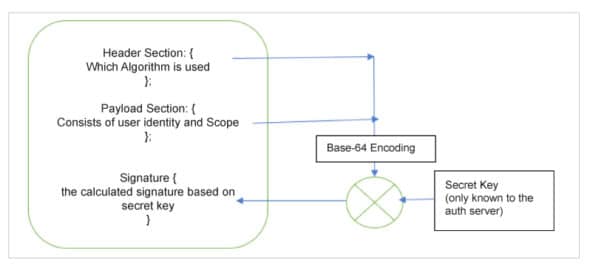
Let us look at what is inside the JSON Web token (JWT). The access token anatomy looks like what is shown in Figure 3.
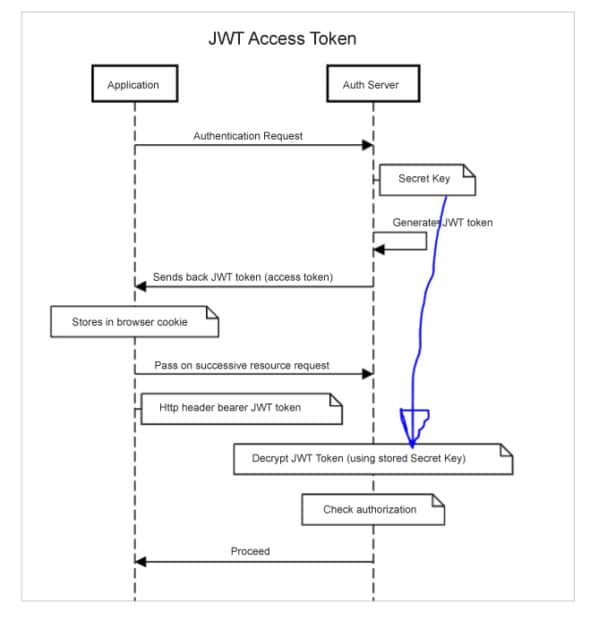
In case it is found that the JWT token is stolen or compromised, the server can be notified of this incident and it can blacklist the token. Figure 4 gives the sequence diagram of how this works.
Takeaway
When we loosely say ‘auth’, it indicates two completely orthogonal but correlated things—the authentication and the authorisation. In this article, we talked about the latter using the industry standard OAuth2 mechanism. The idea behind OAuth2 is the delegation of authorisation using an independent authorisation server or microservice. An application, in lieu of the user, asks for authorisation permission from the authorisation server in two steps: the authorisation token, followed by the access token. The access token has three layers of security — the secret key that is never passed out of the authorisation server, the token that comes with a predefined expiry stored securely in the application, and the application to resource server which is SSL/TSL encrypted. In this way, OAuth2 ensures airtight and invincible security, making it a widely accepted and adopted framework for authorisation.


