The Colour Pick and Zoom tools
The next set of the GIMP tools are:
Colour Pick: Just as the name suggests, this tool lets you pick colours from any image or layer and provides you the exact colour code for the selected colour (something like #FG34B3). You can also set the selected colour to foreground/background colour swatches from the settings.
Zoom: This tool lets you zoom in and out of the images, providing the zoom level according to your resolution and workspace.
The Measure and Alignment tools
The next set, Measure and Alignment tools, are mediocre and hardly come into play, except for the Move tool. The set begins with the Measure tool that lets you measure the distance between two desired points. Just drag and leave it; the tool will display the dimensions in the lower part of the GIMP near the Zoom tool.
This set also comes with the Alignment tool that lets you easily align the selected part of the image to a pre-set desired area. Just select the alignment area, and that part of the image will be moved into the same position.
The Crop tool lets you crop an image. I generally don’t use this tool and prefer the rectangular selection tool to achieve similar results.
Transformation tools
This very powerful set of tools provides arrays of effects, letting you create wonderful effects with a few simple clicks. Some of the tools let you create 3D effects in a 2D raster image editor (refer to Figure 8).
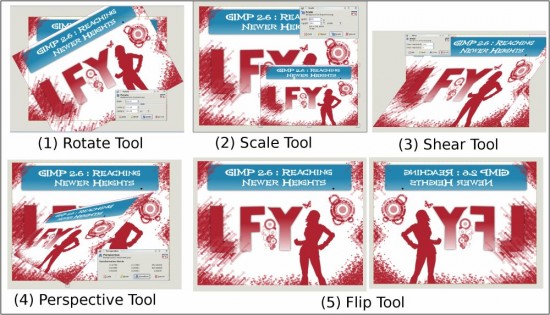
Rotate: This lets you rotate the image 360 degrees. Select the tool and click on the image, then move the image in a clockwise or anti-clockwise direction to rotate it [Image 1, Figure 8].
Scale: Scaling images has never been so easy; you don’t have to mug up any resolutions—just drag the image to gain the final output with the new resolution/size [Image 2, Figure 8].
Shear: Shear moves one part of the image, making the image a bit inclined. It distorts the image by changing its nature or type. To use it, just select the tool and click on the image. Then move the mouse left or right by holding the left mouse button, and shear as you want to [Image 3, Figure 8].
Perspective: This is another tool that I like to use a lot. Perspective gives a 3D look to an image—you can easily change the way it looks. Effects like Flip Switch, Cover flow, etc, can be achieved using this tool. It works in the same way other Transformation tools do [Image 4, Figure 8].
Flip: This tool flips the image either diagonally or vertically. Just select the tool and click on the image to flip it [Image 5, Figure 8].
Note: Unlike other transformation tools, the Flip tool does not provide a preview, but directly applies the changes. In order to undo the changes, press CTRL+Z.
Text: This lets you add text to an image. It, however, only allows you to add simple text to an image, though you can change fonts and size as per your needs. To add special text effects, we must resort to other GIMP tools and options.















[…] […]
[…] […]
Nice work buddy…Keep the good work up. Will be watching you..
Thank you, your explanations are short and to the point, which makes it easy to understand.
I look forward to more similar tutorials.
I am a Gimp beginner.