


If you have just begun working with Arduino, connecting to the internet can be a very daunting task. I remember my own struggles with it in my early days of Arduino coding. With the lack of a proper interface and no inbuilt debugging tools, it can be hard to figure out where you went wrong. In this article, we shall cover everything you need to know about connecting your Arduino board to the internet, including the code.
When I first began playing around with my Arduino Uno, I was very proud of making LEDs blink and sensors beep. But I soon realised that the true potential of an Arduino can only be achieved once you connect it to the internet.
Pretty much any intermediate to advanced level Arduino project will require you to connect to the internet for various reasons, be it logging data on the cloud such as weather data or passing on real-time commands to your device remotely such as via an app on your phone.
In this tutorial article, we are going to look at how to connect your Arduino device to the internet comprehensively. Everything — from the hardware to the circuit and code — will be covered.
Connecting via the Ethernet
The first option for connecting your Arduino to the internet is via an Ethernet cable. If you are using an Arduino board that comes with a built-in Ethernet port such as an Arduino Yún, then you can skip the ‘Hardware requirements’ section and the circuit design description given below. Just connect the Ethernet cable to your device and start coding. However, if, like most people, you own a simpler version of Arduino such as Arduino Uno that does not have a built in Ethernet port, then you will have to buy a separate device called ‘Ethernet Shield’ to attach to your Arduino.
Hardware requirements
You will require an Ethernet cable with internet, an Arduino Uno board and an Ethernet Shield. Here’s a description of the circuit design.
- Connect the Ethernet Shield on top of the Arduino Uno.
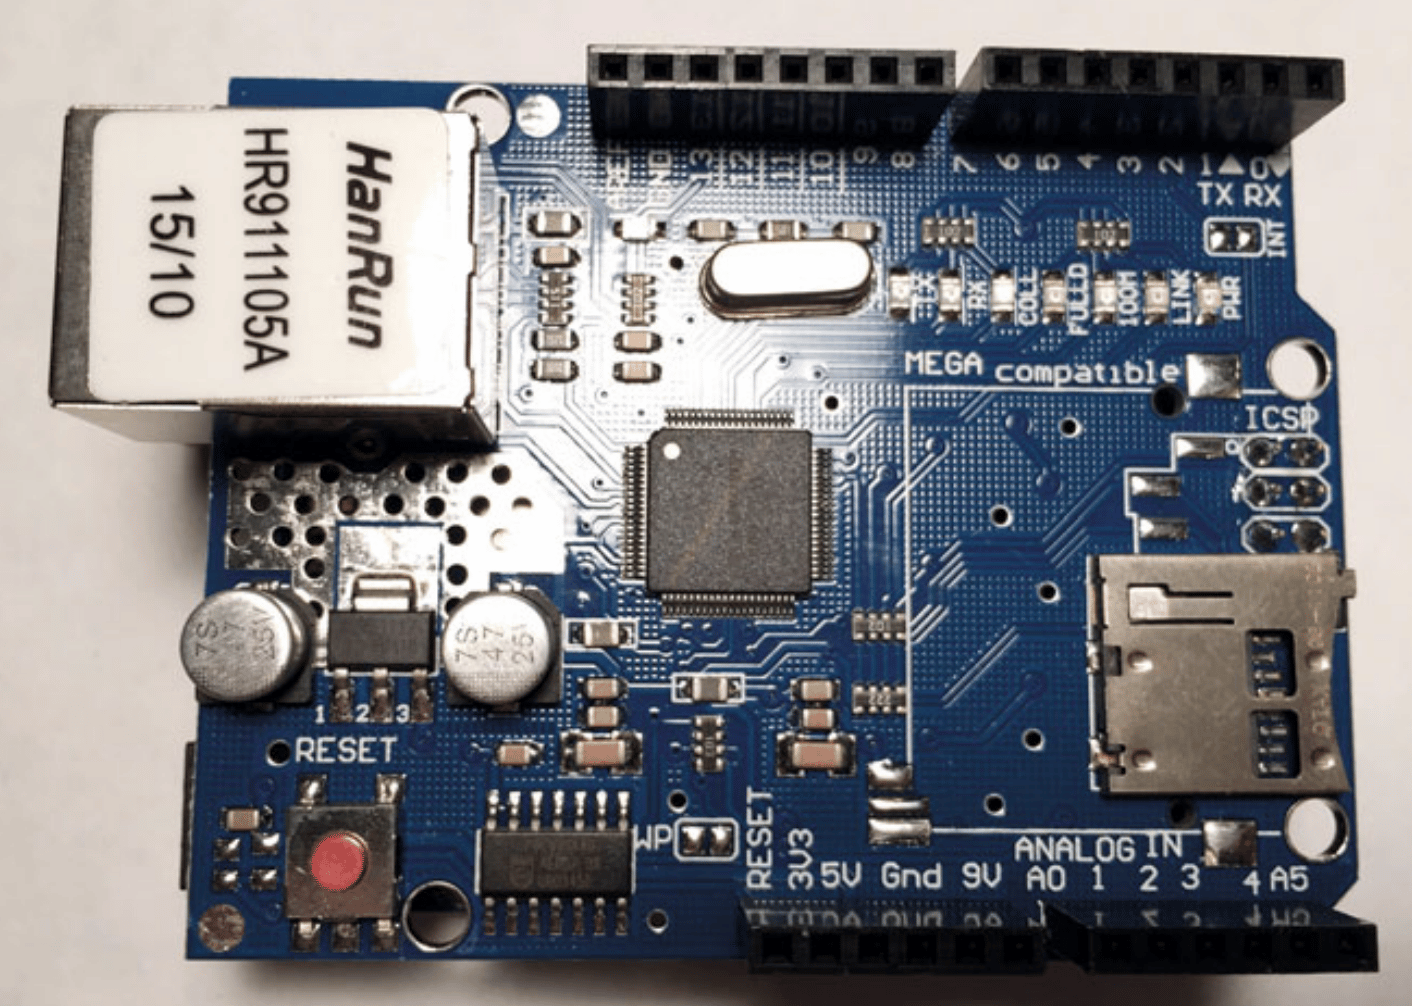
Figure 1: Arduino Uno and Ethernet Shield - Connect the Ethernet cable to the Ethernet Shield.
Figure 1 shows the circuit design of Arduino Uno and the Ethernet Shield. After connecting the two, your Arduino Uno should look like the one in Figure 2.
The code
Before getting started with the code for connecting the Arduino to the internet, we first need to include an external library to use in the program. This library will help us establish a connection and send/receive data over the internet.
| Note: This library should come preinstalled with your IDE. If for some reason you run into errors, please download this library from the official GitHub repository of the Arduino Project. |
#include <Ethernet.h>
In the next step, we will be defining some constants and variables required for this program. First, we need the MAC address. This is often printed on a sticker on your Ethernet Shield. Next, we need to define a static IP address. Make sure that the IP address that you are adding isn’t being used by any other user. Lastly, we shall define the EthernetClient variable.
byte mac[] = { oxDE, oxAD, oxBE, oxEF, oxFE, oxED };
IPAddress staticIP(10, 0, 0, 20);

EthernetClient client;
We can now write the method for connecting to the internet. There are two steps here. First, we try to get an IP via the DHCP (dynamic host configuration protocol), i.e., try to fetch your dynamic IP. If that step fails, then we fall back to the staticIP that we have defined above.
void connectToInternet()
{
// Step 1 - Try connecting with DHCP
If (Ethernet.begin(mac) == 0)
{
Serial.print(“[ERROR] Failed to connect via DHCP”);
Ethernet.begin(mac, staticIP); // Connect via static IP defined earlier
}
// Add a delay for initialization
delay(1000);

Serial.println(“[INFO] Connection Successful”);
Serial.print(“”);
printConnectionInformation(); // Custom method
Serial.println(“---------------------------------”);
Serial.println(“”);
}
As you can see in the code above, we used a custom method printConnectionInformation() for displaying the connection information. So let us go ahead and write the code for that.
void printConnectionInformation()
{
// Print IP Address
Serial.print(“[INFO] IP Address: ”);
Serial.println(Ethernet.localIP());

// Print Subnet Mask
Serial.print(“[INFO] Subnet Mask: ”);
Serial.println(Ethernet.subnetMask());

// Print Gateway
Serial.print(“[INFO] Gateway: ”);
Serial.println(Ethernet.gatewayIP());

// Print DNS
Serial.print(“[INFO] DNS: ”);
Serial.println(Ethernet.dnsServerIP());
}
Finally, we shall write the standard functions for the program, i.e., setup() and loop().
void setup()
{
Serial.begin(9600);

// Connect to the internet
connectToInternet();
}

void loop()
{
// Nothing much to do here.
}
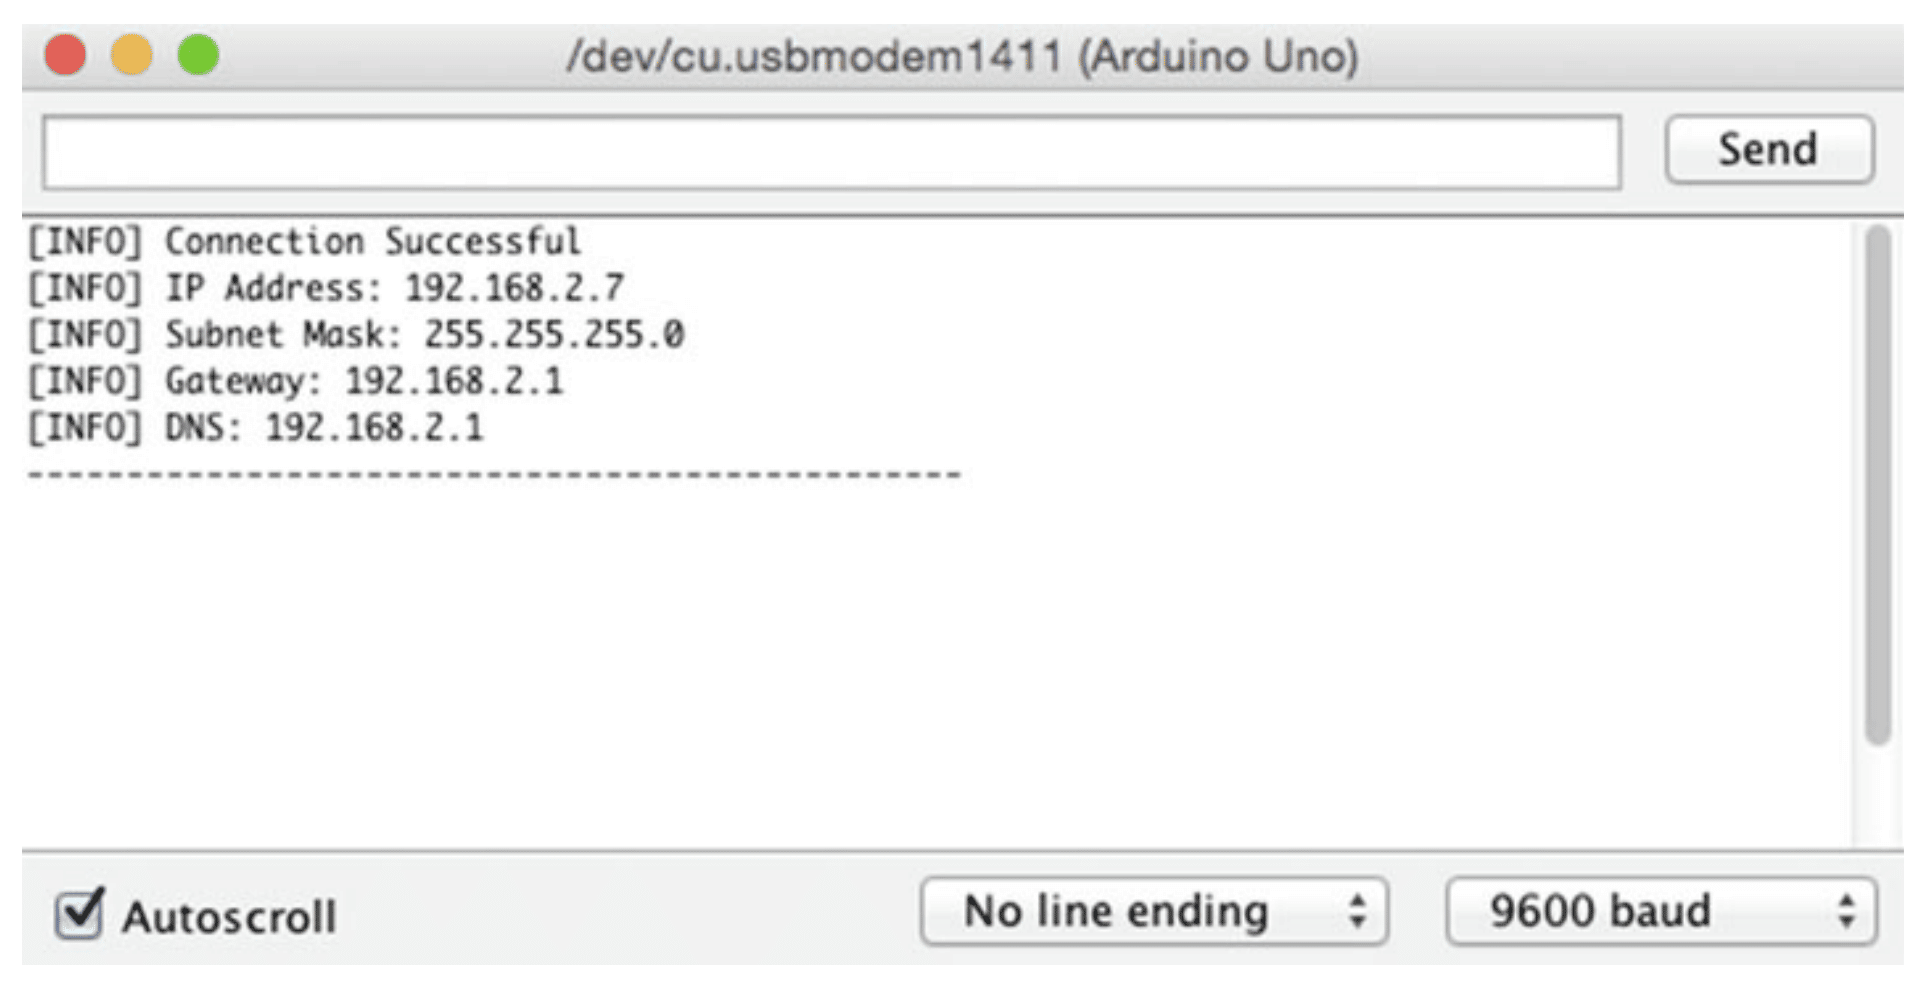
If everything checks out, then you should be seeing an output similar to Figure 3 on the Serial Monitor window.
Connecting via Wi-Fi
The second option is to connect your Arduino to the internet wirelessly via Wi-Fi. If, like most people, you own an Arduino Uno or any other Arduino board that does not have a built-in Wi-Fi capability, then you will have to buy a ‘Wireless Shield’ separately, just as we bought the Ethernet Shield in the previous section.
If you own an Arduino Yún or any other Arduino board with built-in wireless capability, then you can skip the ‘Hardware requirements’ and the description of the circuit design given below and get started with the code right away.
Hardware requirements
You will need an Arduino Uno and a Wireless Shield. Here’s a description of the circuit design.
1. Connect the Wireless Shield on top of the Arduino Uno.
2. Connect the Arduino Uno to your computer via the USB port.

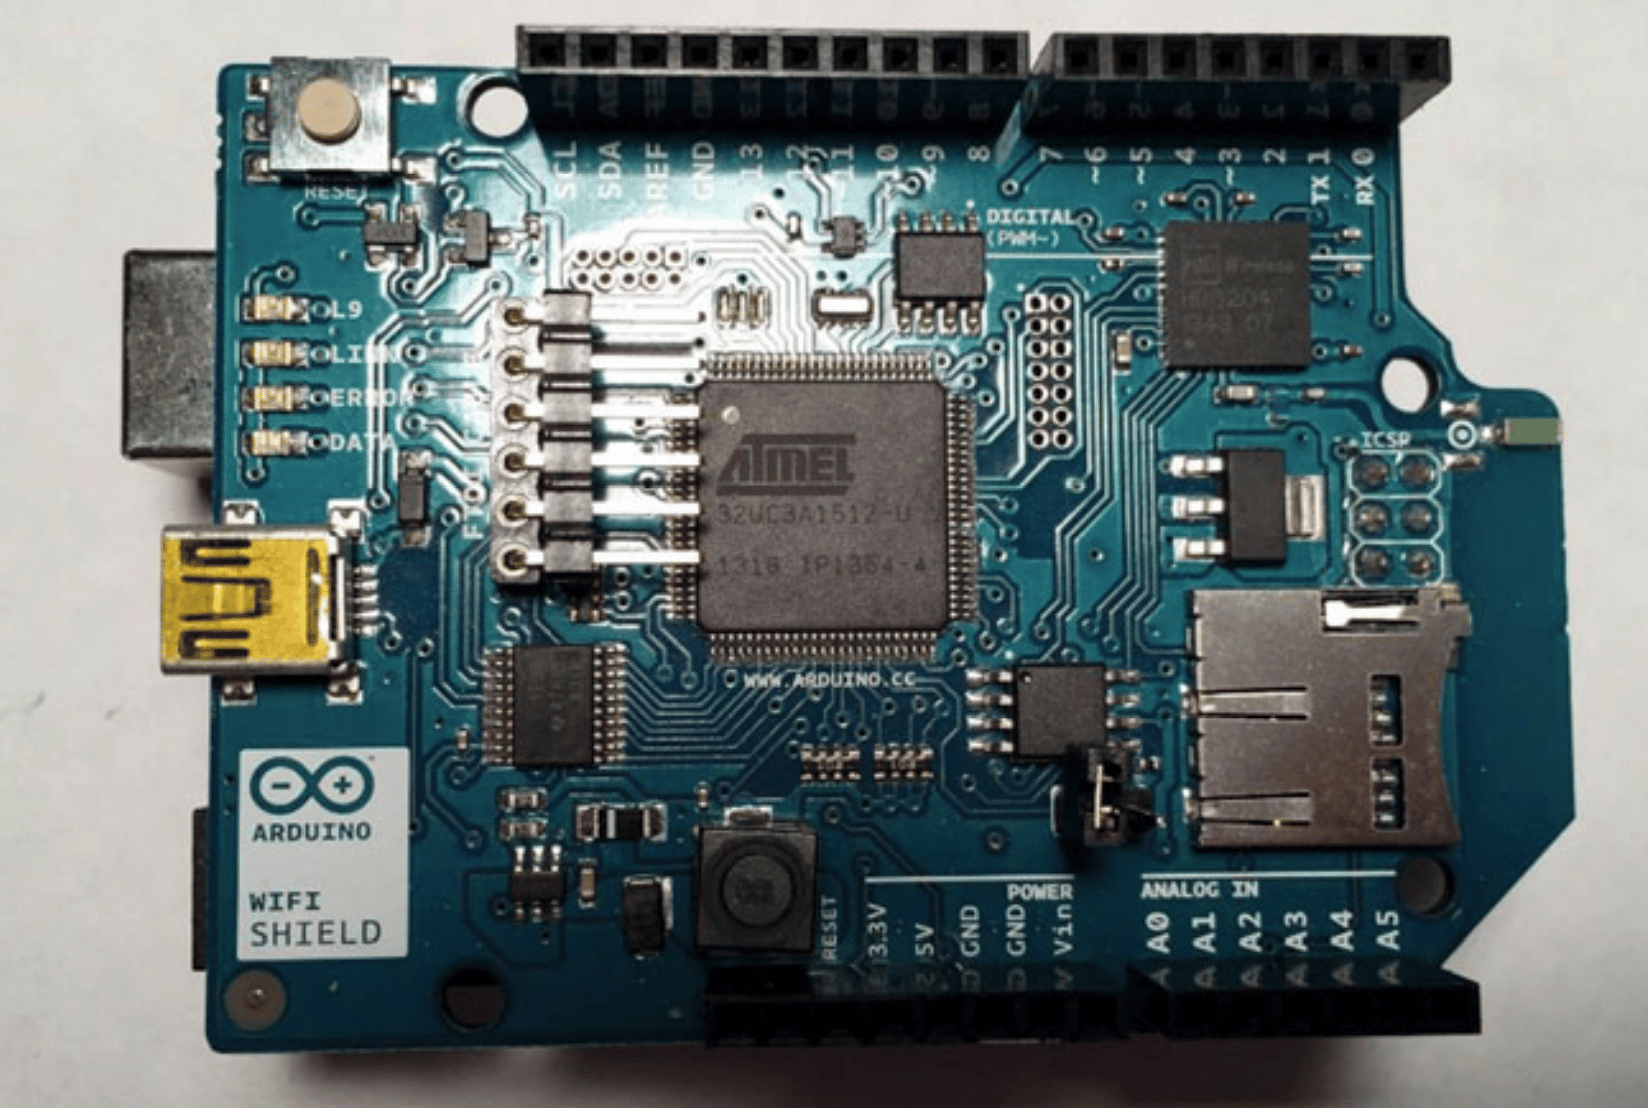
Figure 4 shows the circuit design of the Arduino Uno and the Wireless Shield. If everything is connected properly, your Arduino Uno board should look like the one in Figure 5.
The code
When connecting to the internet via Ethernet, we had used the external library <Ethernet.h>. Similarly, for connecting the internet wirelessly, we shall be using the external library <WiFi.h>.
| Note: This library should come preinstalled with your IDE. If for some reason you run into errors, please download this library from the official GitHub repository of the Arduino Project. |
#include <SPI.h>
#include <WiFi.h>
Next, we shall define the constants and variables required for connecting wirelessly. For connecting with the Wi-Fi, we require the ssid and password of the Wi-Fi that we shall be using. We shall also create a WiFiClient variable for connecting to the internet.
char ssid[] = “Write WiFi SSID here”;
char pass[] = “Write WiFi password here”;

int keyIndex - 0;
int status = WL_IDLE_STATUS;

WiFiClient client;
Now we shall define some custom methods for connecting and sending/receiving data over the internet. First up, let us create a method connectToInternet() for connecting with the internet.
void connectToInternet()
{
status = WiFi.status();

if (status == WL_NO_SHIELD)
{
Serial.println(“[ERROR] WiFi Shield Not Present”);
while (true);
}

while ( status != WL_CONNECTED)
{
Serial.print(“[INFO] Attempting Connection - WPA SSID: ”);
Serial.println(ssid);

status = WiFi.begin(ssid, pass);
}

Serial.print(“[INFO] Connection Successful”);
Serial.print(“”);
printConnectionInformation();
Serial.println(“-------------------------”);
Serial.println(“”);
}
As you can see in the code above, we have called a custom method printConnectionInformation() to display the information of our Wi-Fi connection. So let us go ahead and write that method:
void printConnectionInformation()
{
Serial.print(“[INFO] SSID: ”);
Serial.println(WiFi.SSID());

// Print Router’s MAC address
byte bssid[6];
WiFi.BSSID(bssid);
Serial.print(“[INFO] BSSID: ”);

Serial.print(bssid[5], HEX);
Serial.print(“:”);

Serial.print(bssid[4], HEX);
Serial.print(“:”);

Serial.print(bssid[3], HEX);
Serial.print(“:”);

Serial.print(bssid[2], HEX);
Serial.print(“:”);

Serial.print(bssid[1], HEX);
Serial.print(“:”);

Serial.println(bssid[0], HEX);

// Print Signal Strength
long rssi = WiFi.RSSI();
Serial.print(“[INFO] Signal Strength (RSSI) : ”);
Serial.println(rssi);

// Print Encryption type
byte encryption = WiFi.encryptionType();
Serial.print(“[INFO] Encryption Type : ”);
Serial.println(encryption, HEX);
// Print WiFi Shield’s IP address
IPAddress ip = WiFi.localIP();
Serial.print(“[INFO] IP Address : ”);
Serial.println(ip);

// Print MAC address
byte mac[6];
WiFi.macAddress(mac);

Serial.print(“[INFO] MAC Address: ”);

Serial.print(mac[5], HEX);
Serial.print(“:”);

Serial.print(mac[4], HEX);
Serial.print(“:”);

Serial.print(mac[3], HEX);
Serial.print(“:”);

Serial.print(mac[2], HEX);
Serial.print(“:”);

Serial.print(mac[1], HEX);
Serial.print(“:”);

Serial.println(mac[0], HEX);
}
Finally, let us write down the standard functions, i.e., setup() and loop():
void setup()
{
Serial.begin(9600);

// Connect to the internet
connectToInternet();
}

void loop()
{
// Nothing to do here
}
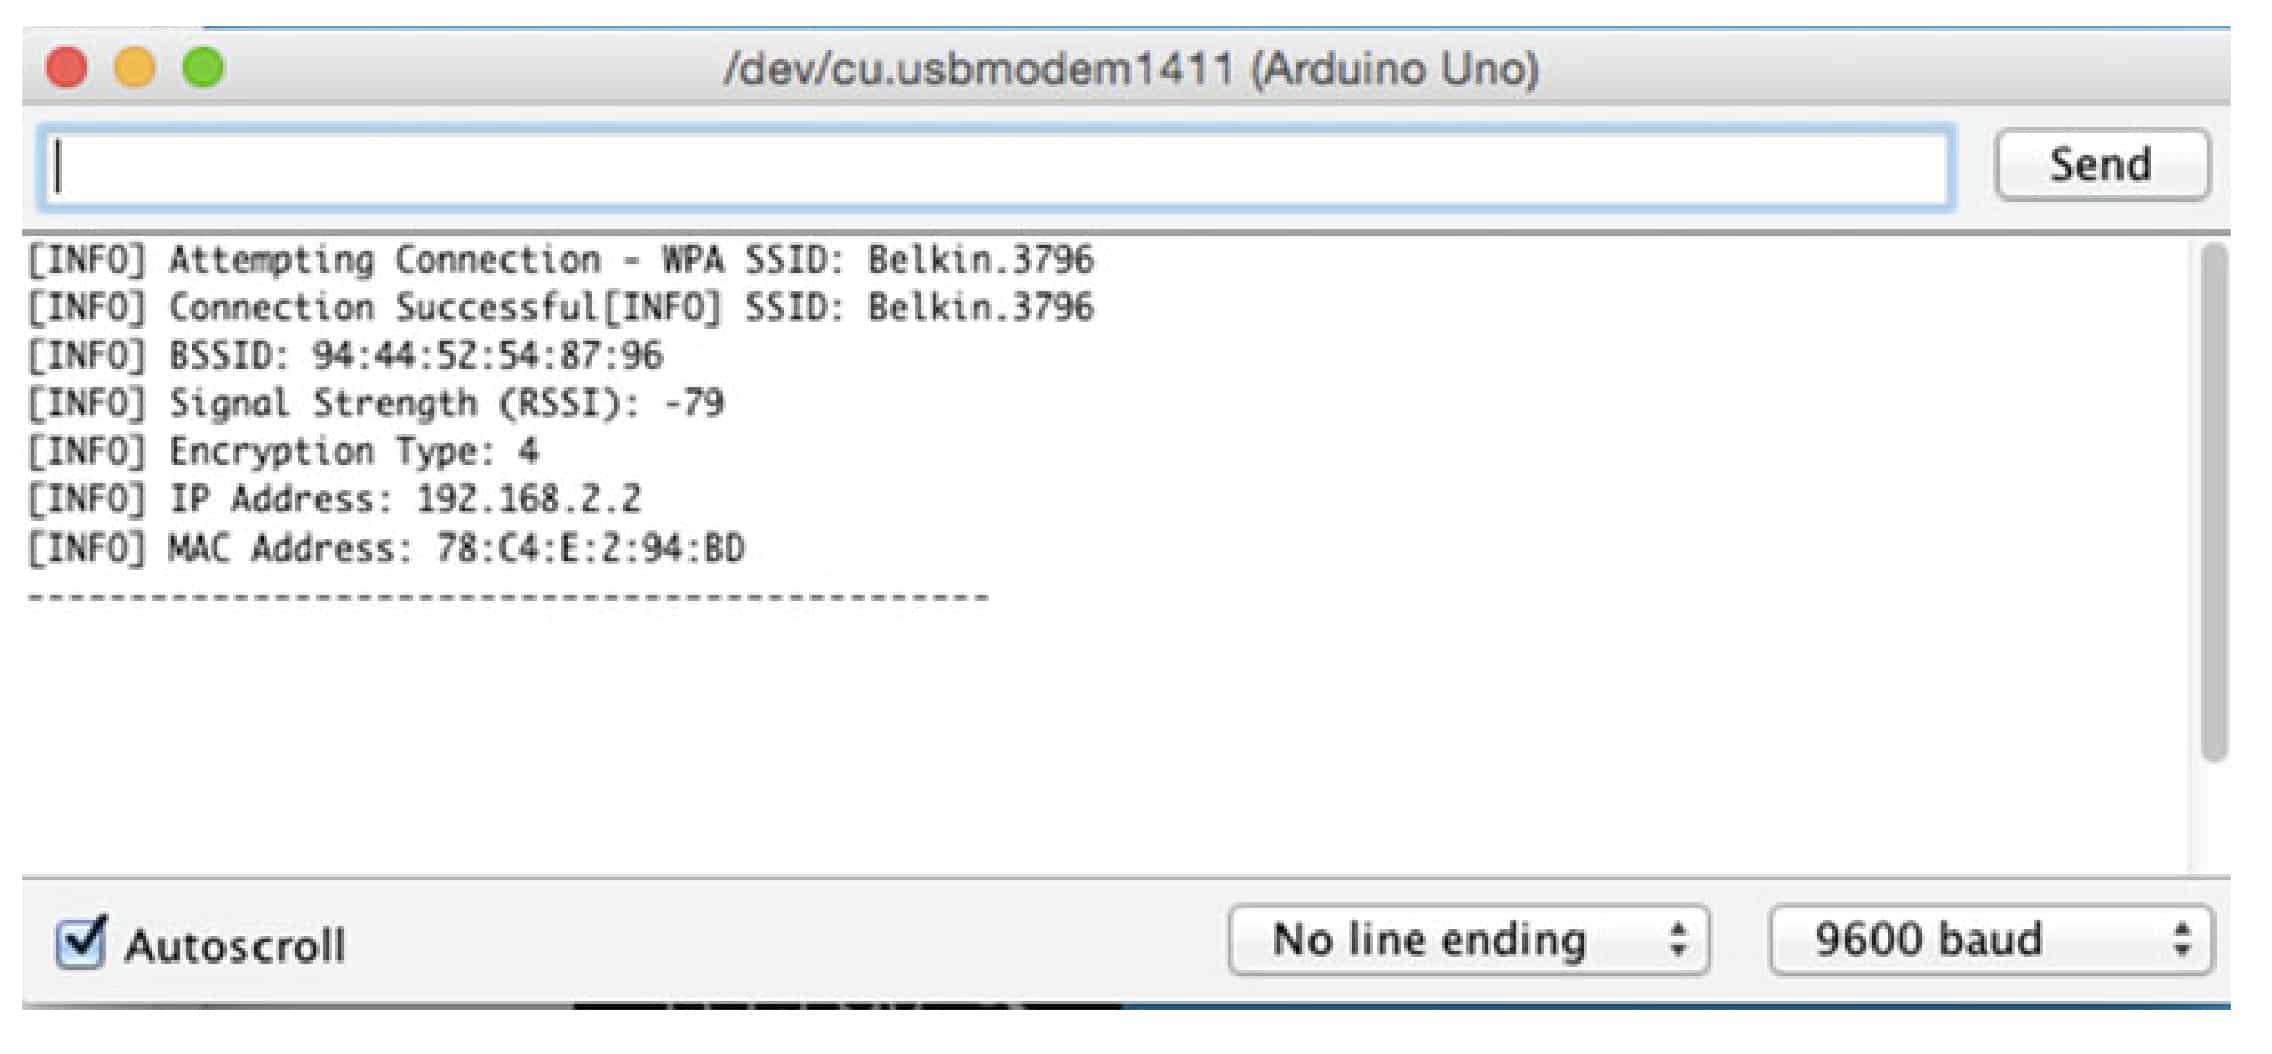
Hurray! We are done with the Arduino code for connecting to the internet via Wi-Fi. Should there be no errors, the output on your Serial Monitor window should look like the output in Figure 6.


