


In the last article in this series on AI and machine learning, we developed further insights on the workings of neural networks. Subsequently, we enhanced our understanding of unsupervised learning through the use of scikit-learn. Finally, we embarked on learning PyTorch, a machine learning framework built on the Torch library. In this ninth article in the series on AI, we will focus on a topic that has not yet been covered — natural language processing (NLP). For this purpose, we will utilise both PyTorch and the NLTK (natural language toolkit) libraries. We will also discuss PySpark, an interface for Apache Spark in Python. However, as always, we will start by solidifying our theoretical grasp of AI and machine learning.
Before we delve deeper into our discussion of neural networks, let us take a moment to consider the current state of affairs. If you examine the recent trends in the Indian engineering education sector, you will see a growing interest among young students to study computer science engineering. Although some tech companies have started layoffs, I believe the fascination with computer science engineering among the younger generation will not decline in the near future. Of course, I may be wrong, and only time can tell. Now, what about the areas of interest among students who have recently begun studying computer science engineering? Many students today are interested only in fields like AI, machine learning, and data science. This choice is understandable, given the emergence of AI based tools like ChatGPT. The abundance of literature in this field can make it difficult to keep up with the new terminology that is constantly being introduced. I recently participated in evaluating several undergraduate level academic projects based on AI and machine learning. The amount of new jargon presented by the project groups was both fascinating and concerning. Given that many of our bright young students plan to work in the fields of AI and machine learning in the near future, it is essential for us to have a good understanding of the popular jargon in these fields. That is why I believe our discussions on AI, machine learning, data science, neural networks, and related topics are well justified.
Recall that in the last few articles in this series, we thoroughly covered neural networks. We talked about using TensorFlow and Keras to build and test models based on neural networks. However, it’s important to note that our approach to neural networks was largely practical in nature. Remember that in the previous two articles in this series, we created and examined a neural network model capable of classifying images of handwritten digits. Now, I believe it is the right time to delve into the various types of neural networks that can be employed in such models.
The origin of neural networks can be traced back to the early 1940s, prior to the development of digital computers itself. In 1943, Warren McCulloch and Walter Pitts introduced perceptron (also called McCulloch-Pitts neuron), a mathematical representation of a simple neuron capable of processing and transmitting information like the neurons in the human brain. Despite the groundbreaking proposal, neural networks didn’t immediately become the dominant technology in the field of AI. Instead, other techniques such as support vector machines and linear regression were favoured in the development of AI and machine learning applications. It wasn’t until the 1990s that neural networks saw a resurgence in popularity. In the next section, we will explore some of the commonly used neural networks and list the corresponding Python libraries for implementing them.
First, let us discuss feedforward neural networks (FNN). FNNs are the simplest of all the neural networks. In an FNN, information flows only in one direction — from the input layer to the output layer. These networks are used for a wide range of tasks, including image classification and regression analysis. A single-layer perceptron is one of the simplest FNNs, consisting of just an input layer and an output layer. They are often used for supervised learning of binary classifiers. There are also multilayer perceptrons which are far more powerful than single-layer perceptrons. Unlike single-layer perceptrons, multilayer perceptrons have one or more hidden layers in addition to an input layer and an output layer. Multilayer perceptrons are often used for regression analysis. TensorFlow/Keras and PyTorch can be used to implement FNNs in Python. Consider the Python script named mlp.py shown below which uses a library called torchvision — part of the PyTorch framework. If this library is not part of the version of PyTorch installed in your system, use Anaconda Navigator to install it. The Python script mlp.py generates a multi-layer perceptron (MLP). Figure 1 shows the output of the Python script named mlp.py.

import torch
import torchvision.ops as ops

mlp = ops.MLP(in_channels=5, hidden_channels=[5, 5])
inp = torch.randn(1, 5)
print(inp)
output = mlp(inp)
print(output)
Now, let us discuss convolutional neural networks (CNN). A CNN is a type of FNN. CNNs are specifically designed to process image data. They are often used for image classification, object detection, image segmentation, etc. TensorFlow/Keras and PyTorch can be used to implement CNNs in Python. CNNs are made of a number of convolutional layers. Recall that our model for classifying images of handwritten digits used convolutional layers. Consider the Python script named cnn.py shown below. This Python script generates a 2D convolution layer using PyTorch. Figure 2 shows the output of the Python script named cnn.py.
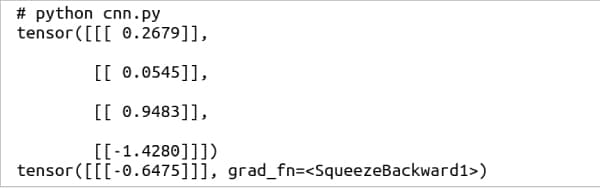
import torch
import torch.nn as nn
model = nn.Conv2d(4, 1, 1)
inp = torch.randn(4, 1, 1)
print(inp)
output = model(inp)
print(output)
Now, let’s discuss recurrent neural networks (RNN) and long short-term memory networks (LSTM). RNNs have loops that enable information to be passed from one step to the next. LSTM, on the other hand, is a more sophisticated type of RNN that uses specialised memory cells and gates to selectively remember or forget information over time. Thus, RNN and LSTM can be referred to as feedback neural networks. Both are neural networks specifically designed to process sequential data such as natural language text. LSTMs can be implemented in Python using TensorFlow/Keras or PyTorch. The class tf.keras.layers.LSTM( ) generates LSTM layers using TensorFlow/Keras and the class torch.nn.LSTM( ) generates LSTM layers using PyTorch. Notice that FNNs, CNNs, RNNs, and LSTMs are used to implement supervised learning models.
Let us now turn our attention to generative adversarial networks (GAN), which are a specific type of neural network used for generative modelling. A GAN is composed of two separate neural networks — a generator and a discriminator. The generator is trained to create new data that resembles the training data, while the discriminator is trained to distinguish between the generated data and real data. It is worth noting that GANs are distinct from the other neural networks we have discussed so far in that they are used for unsupervised learning. GANs can be implemented in Python using TensorFlow/Keras or PyTorch. GANs typically rely on a variety of different types of layers, including dense layers, convolutional layers, convolutional transpose layers, activation layers, and dropout layers. For example, in TensorFlow/Keras, the tf.keras.layers module provides a range of pre-built layers that can be used for implementing GANs, while PyTorch offers similar functionality through its torch.nn module.
Let us now turn our attention to autoencoders. They are another type of neural network used for unsupervised learning. An autoencoder is made up of two parts, an encoder and a decoder. Autoencoders are trained to reconstruct the input data. They are often used for tasks such as anomaly detection and dimensionality reduction. Python offers several ways to implement autoencoders, which includes usage of TensorFlow/Keras or PyTorch. The implementation of autoencoders can be done by using the tf.keras.module module in TensorFlow/Keras or by using the torch.nn module in PyTorch.
Besides the neural networks that we have discussed, there are numerous other notable neural networks to be considered. Some of these include the Hopfield network, which was introduced in 1982, and is a type of recurrent neural network that stores and retrieves patterns; Boltzmann machines (BM), which are stochastic neural networks that represent complex probability distributions; restricted Boltzmann machines (RBM) introduced in 1986, which are Boltzmann machines with a restricted architecture that facilitates efficient training; and deep belief networks (DBNs), which are generative models with multiple layers of RBMs. Let us now shift our focus to the more practical aspects of developing applications based on AI and machine learning.
NLP using PyTorch
First, let us discuss natural language processing or NLP, which plays a critical role in automation. Notice that NLP faces significant challenges due to the sheer number of languages spoken globally — eight languages are spoken by more than 100 million people each, and 27 languages are spoken by at least 50 million people each (source: Wikipedia). These languages differ in their grammatical structures, idiomatic expressions, and linguistic features, making analysis and modelling difficult. Additionally, in our globalised world, text often contains words from multiple languages, some of which may even be from relatively obscure languages. Processing the vast amount of data involved in NLP presents another significant challenge, along with the inherent ambiguity of natural languages. Despite these difficulties, we have access to excellent tools for NLP such as Python powered with PyTorch. Now, let us briefly discuss the use of PyTorch for NLP.
Recall that we have already seen examples of how PyTorch can be used for building neural networks, which are commonly employed in NLP. In this section, we will examine some of the key PyTorch modules and classes that are particularly useful for NLP. Specifically, the torch.nn module offers a range of classes for building neural networks such as CNN, RNN, etc, as well as activation functions like ReLU, Sigmoid, etc. The torch.optim module provides various optimisation algorithms such as stochastic gradient descent (SGD), RMSprop, Adam, etc, which can be used to train neural networks. Recall that we used the Adam optimisation algorithm in our neural network model to classify images of handwritten digits. However, keep in mind that our model was implemented using Keras. The torch.utils.data module provides a set of tools for working with data sets and loading data. The main classes provided by torch.utils.data are Dataset and DataLoader, which provide interfaces for accessing data and loading samples from a data set, respectively.
PyTorch provides not only the above mentioned standard features but also a dedicated library for NLP called TorchText. TorchText offers a number of data processing functions and several NLP data sets. It is composed of five main classes: data, datasets, nn, utils, and vocab. To illustrate the working, let us take a look at a simple example that demonstrates the use of TorchText (imported as torchtext) for text processing. Consider the Python script named torch1.py shown below (line numbers are added for ease of explanation).
1. import torchtext
2. from torchtext.data import get_tokenizer
3. from torchtext.data.utils import ngrams_iterator
4. tokenizer = get_tokenizer(“basic_english”)
5. tokens = tokenizer(“Be the change you wish to see in the world”)
6. print(tokens)
7. print(list(ngrams_iterator(tokens, 2)))
The Python script shown above finds the tokens in a string and prints all the bigrams formed from the tokens identified. But first, we need to understand what an n-gram is. An n-gram is a continuous sequence of n tokens from a given sample of text or speech. Bigrams are a special case of the n-gram, where n is 2. But why are bigrams or n-grams critical in NLP? Well, often a lot more information can be obtained from a text or speech by considering n-grams over individual words. For example, if a word is preceded by the definite article ‘the’, typically this indicates that the word is being used in a specific sense rather than in a general sense. For example, consider the string ‘the book’; it refers to a specific book that has been previously mentioned whereas the word ‘a book’ refers to any book without specifying a particular one.
Now, let us go through the code line by line. In our script torch1.py, we are considering words in the string as tokens. Line 1 imports the library torchtext. Lines 2 and 3 import the methods get_tokenizer( ) and ngrams_iterator( ). Line 4 defines a tokeniser which splits the string into tokens after normalisation. Line 5 applies the tokeniser on the string ‘Be the change you wish to see in the world’. Line 6 prints the tokens generated. Finally, Line 7 prints all the bigrams formed from the tokens. Figure 3 shows the output of the Python script torch1.py. If you replace Line 7 with the line of code, ‘print(list(ngrams_iterator(tokens, 3)))’, then all the trigrams formed from the tokens will be printed. Trigrams are another special case of the n-gram, where n is 3. PyTorch is a general machine learning framework with a lot of features for NLP. However, there are also libraries designed specifically for NLP. Next, we discuss one such library called natural language toolkit (NLTK).

NLP using NLTK
NLTK is a symbolic and statistical NLP Python library. It is free and open source software licensed under Apache License version 2.0. NLTK can be used for text processing, tokenisation, part-of-speech tagging, sentiment analysis, etc. As usual, the installation of NLTK can be done easily with the help of Anaconda Navigator. Now, let us see how a Python script similar to torch1.py can be written using NLTK. Consider the program nltk1.py shown below, which finds the tokens in a string and prints all the bigrams formed from the tokens identified (line numbers are added for ease of explanation).
1. import nltk
2. from nltk.tokenize import word_tokenize
3. tokens = nltk.word_tokenize(“Be the change you wish to see in the world”)
4. print(tokens)
5. print(list(nltk.ngrams(tokens, 2)))
Now let us go through the code line by line. Line 1 imports the nltk library. Line 2 imports the method word_tokenize( ). Line 3 applies the function word_tokenize( ) on the string ‘Be the change you wish to see in the world’. Line 4 prints the generated tokens, and finally, Line 5 prints all the bigrams formed from the tokens. Figure 4 shows the output of the Python script nltk1.py. If you replace line 5 with the line of code ‘print(list(nltk.ngrams(tokens, 3)))’, then all the trigrams formed from the tokens will be printed. Notice that NLTK also provides a function called bigrams( ) which will generate all the bigrams from a set of tokens.

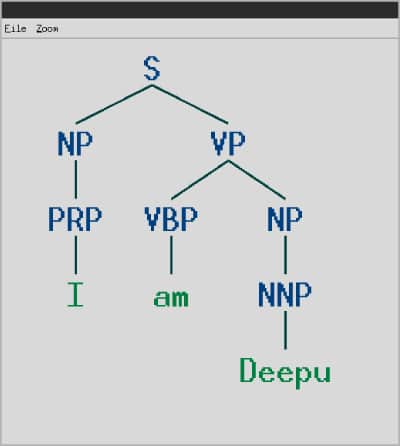
Now, let us familiarise ourselves with a Python script that prints the parse tree of a string. First, let us try to understand what a parse tree is. A parse tree represents the syntactic structure of a sentence in a graphical format, where each node in the tree represents a part of the sentence. The tree is constructed by breaking down the sentence into its parts and grouping them into phrases based on their grammatical relationships. Parse trees are important in NLP because they help to understand the grammatical structure of a sentence. Now, consider the Python script nltk2.py shown below, which generates a parse tree for a given string (line numbers are added for ease of explanation).
1. from nltk.corpus.reader.bracket_parse import BracketParseCorpusReader
2. corpus_root = ‘/media/deepu/Data’
3. corpus = BracketParseCorpusReader(corpus_root, r’.*\.mrg’)
4. tree = corpus.parsed_sents(‘test.mrg’)[0]
5. tree.draw()
Before trying to understand how the code works, we need to discuss treebanks. According to Wikipedia, “In linguistics, a treebank is a parsed text corpus that annotates syntactic or semantic sentence structure.” Not a very simple explanation, I suppose. Well, think of treebanks as data sets that tag different words as one among the different parts of speech in English. Of course, this is an oversimplification. In English, the eight parts of speech are noun, verb, adjective, adverb, pronoun, preposition, conjunction, and interjection. If you are not familiar with these concepts, I suggest you pause and read at least the Wikipedia article titled ‘Parts of speech’. If you plan to work extensively on NLP, I suggest that you receive proper training from a linguistics expert. One of the most popular treebanks available for use is the Penn treebank (PTB), a data set maintained by the University of Pennsylvania. PTB contains over four million annotated words. To generate parse trees, sample files from PTB can be accessed using the method ‘treebank.parsed_sents( )’ provided by the module nltk.corpus. However, the sample files available in PTB are relatively large and difficult to understand. Therefore, I have manually created a simple file in PTB format (a file with extension .mrg). The sample file, called test.mrg, shown below, contains the PTB format for the sentence ‘I am Deepu’.
(S (NP (PRP I)) (VP (VBP am) (NP (NNP Deepu))))
The file above represents a simple tree structure that can display the given sentence as a hierarchical structure of phrases. First, the subject ‘I’ is shown as a noun phrase (NP) and the predicate ‘am Deepu’ is shown as a verb phrase (VP). Later, the next level in the hierarchy shows the word ‘I’ as a personal pronoun (PRP), the word ‘am’ as a verb in the base form (VBP) and the word ‘Deepu’ as a noun phrase (NP). Finally, in the last level, the word ‘Deepu’ is shown as a proper noun (NNP). Now, let us try to understand the Python script nltk2.py line by line. Line 1 imports the BracketParseCorpusReader( ) method which is used to read files in PTB format. Line 2 stores the path to the directory containing the test file in PTB format. Line 3 uses the BracketParseCorpusReader( ) method to define a reader capable of reading and processing files in formats like PTB. Line 4 reads the test file named test.mrg which is stored in the PTB format. Finally, Line 5 draws the parse tree for the string ‘I am Deepu’ from the file test.mrg. Figure 5 shows the parse tree generated by the Python script nltk2.py.Figure 5: An example for a parse tree
NLTK offers many other features for NLP. Remember that we often have to download data sets and parsers to work with NLTK. An example of a parser that can be downloaded and used while working with NLTK is the Stanford parser. A detailed discussion of parsers and context-free grammars (CFG), which are used to build parsers, is beyond the scope of our discussion. However, for extremely eager students, I suggest the popular textbook ‘Introduction to Automata Theory, Languages, and Computation’ by John E. Hopcroft, Rajeev Motwani, and Jeffrey D. Ullman. But keep in mind that ‘Theory of Computation’ is a relatively difficult area in computer science to learn. Now, let us shift our focus to data science.
Introduction to PySpark
If you recall the Venn diagram from the first article in this series, you will know that data science intersects with AI and machine learning. Data science also includes sub-fields like Big Data analytics, which usually doesn’t involve AI or machine learning. This section focuses on introducing the development of NLP-based data science applications using PySpark, an interface for Apache Spark in Python. Apache Spark is an open source analytics engine for large scale data processing. It is written in Scala and licensed under Apache License version 2.0.
Let us now talk about the significance of PySpark, which is powered by machine learning. It has three main modules: pyspark.sql for structured data and DataFrames, pyspark.ml for high-level API machine learning models, and pyspark.mllib for low-level API machine learning models. While Apache Hadoop is a widely-used framework for Big Data analytics, it lacks AI and machine learning capabilities. However, PySpark can be combined with Hadoop to provide it with the power of AI and machine learning. PySpark offers distributed computing and APIs for Big Data processing, while Hadoop provides storage, scalability, and fault-tolerance for handling large data sets. This combination with Hadoop makes PySpark an important tool in data science and Big Data analytics.
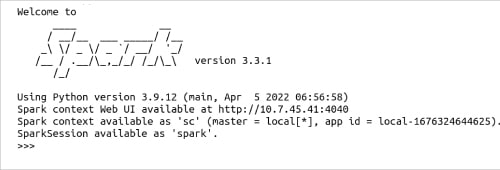
Now, let us install PySpark in our system. As always, Anaconda Navigator can be used to install PySpark. However, if you execute the command ‘pip3 install pyspark[sql, ml, mllib]’ in the terminal, all three important PySpark modules will be installed instantly. You are free to use either of these methods to install PySpark. After installation, execute the command ‘pyspark –master local[*]’ in the terminal to launch a PySpark interactive shell with the local machine as the master, while using all available cores for parallel processing. Figure 6 shows the PySpark interactive shell.
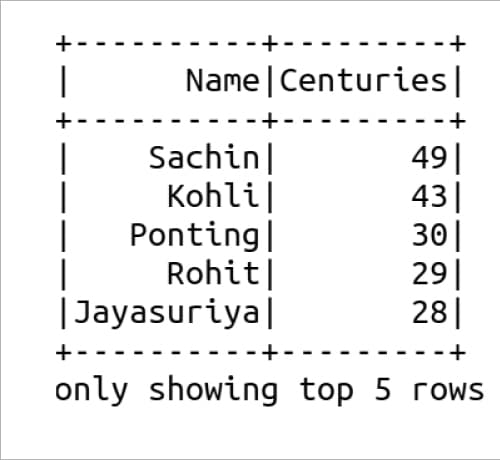
Let us now consider the simple Python script named spark.py shown below, which uses PySpark to read a CSV file from our system and display the content on the terminal (line numbers are added for ease of explanation).
1. from pyspark.sql import SparkSession
2. spark = SparkSession.builder.appName(“ReadCSV”).getOrCreate()
3. df = spark.read.csv(“cricket.csv”, header=True, inferSchema=True)
4. df.show(5)
First, let us try to understand the working of the Python script spark.py. Line 1 imports the SparkSession class from the pyspark.sql module in the PySpark library. The SparkSession class provides methods for manipulating data with PySpark, and is used to create data frames and execute SQL queries in a distributed computing environment. Line 2 creates a SparkSession object named spark. The getOrCreate( ) method is used to either get the existing SparkSession or create a new one if it does not exist. Line 3 reads a CSV file named cricket.csv. Finally, Line 4 prints the first five rows of the CSV file cricket.csv. Figure 7 shows the output of the Python script spark.py.
Now let us address a crucial question: We have previously performed the same tasks using Pandas quite some time ago. In that case, what is the need for PySpark? While Pandas is a great tool for handling and analysing data from small to medium-sized data sets, PySpark is a scalable distributed computing platform designed to manage large data volumes. If your data set is large, PySpark is the better choice. Pandas is only suitable for small to medium-sized data sets that do not require a distributed system.
Now, it is time to wind up this article. Here we first delved deep into the theory of neural networks and then turned our attention to NLP. We utilised PyTorch and NLTK to gain an understanding of NLP. Afterwards, we introduced PySpark and thus marked our first visit into the fields of data science and Big Data analytics in this series. In the upcoming article in this series, we will focus on computer vision using AI and machine learning, and reacquaint ourselves with OpenCV, a library for real-time computer vision.


