


This IoT system shows a simple and effective way to send sensor data using an ESP8266 microchip.
Modern IoT systems rely on sensors to collect real-world data and transmit it to public cloud servers or private on-premises servers for monitoring, analytics, and decision-making. Here’s the core working logic of an ESP8266-based IoT node that reads temperature and humidity data and sends it securely to a remote server while also exposing the data locally.
Overview of the system architecture
The code implements a hybrid, dual-mode architecture for an IoT device (like an ESP8266 microcontroller) designed for maximum flexibility in different scenarios. The system doesn’t just do one thing; it intelligently operates in two distinct modes, making it useful both when connected to the internet and when operating locally.
Remote data push (Client mode): Sensor data is periodically sent to a private/public server using HTTP POST (JSON format). This is ideal for cloud dashboards, databases, or analytics pipelines.
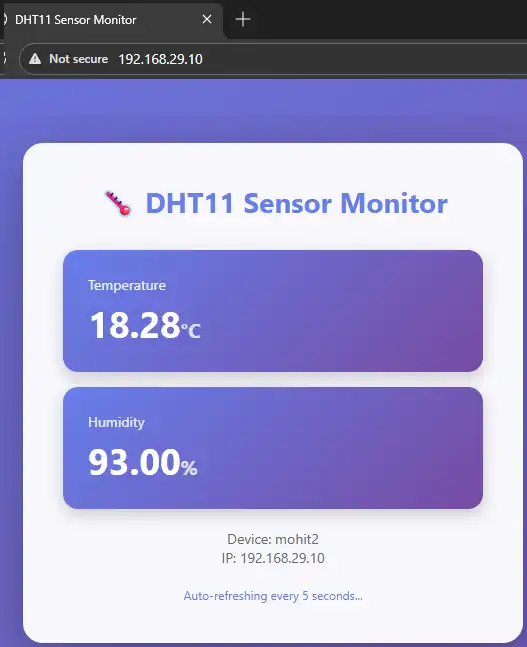
Local data access (Server mode): ESP8266 runs a lightweight web server. Nearby devices can fetch live sensor data directly using a browser or REST call.
This hybrid model is commonly used in smart homes, industrial monitoring, and edge computing systems.
We will now see how this IoT system works.
→ Library and hardware abstraction is as follows:
#include <ESP8266WiFi.h>
#include <ESP8266HTTPClient.h>
#include <WiFiClient.h>
#include “DHT.h”
These libraries provide:
- Wi-Fi connectivity (ESP8266WiFi)
- HTTP communication (ESP8266HTTPClient)
- Low-level TCP client support (WiFiClient)
- Sensor abstraction for the DHT11 temperature and humidity sensor
The abstraction ensures that networking and sensor handling remain clean and modular.
→ Device identity and network configuration is:
const char* deviceName = “mohit2”;
const char* ssid = “Jiowisdom”;
const char* password = “Mo980616”;
- deviceName uniquely identifies the IoT node on the network and server.
- ssid and password allow the ESP8266 to connect as a Wi-Fi station (STA mode).
In production systems, credentials are usually stored securely or provisioned dynamically.
→ Remote server configuration (public/private) setup is:
const char* serverHost = “13.233…..”;
const int serverPort = 5002;
const char* serverPath = “/data”;
This allows:
- Sending data to a cloud VM, private LAN server, or edge gateway.
- A Flask or Node.js backend can easily parse incoming JSON.
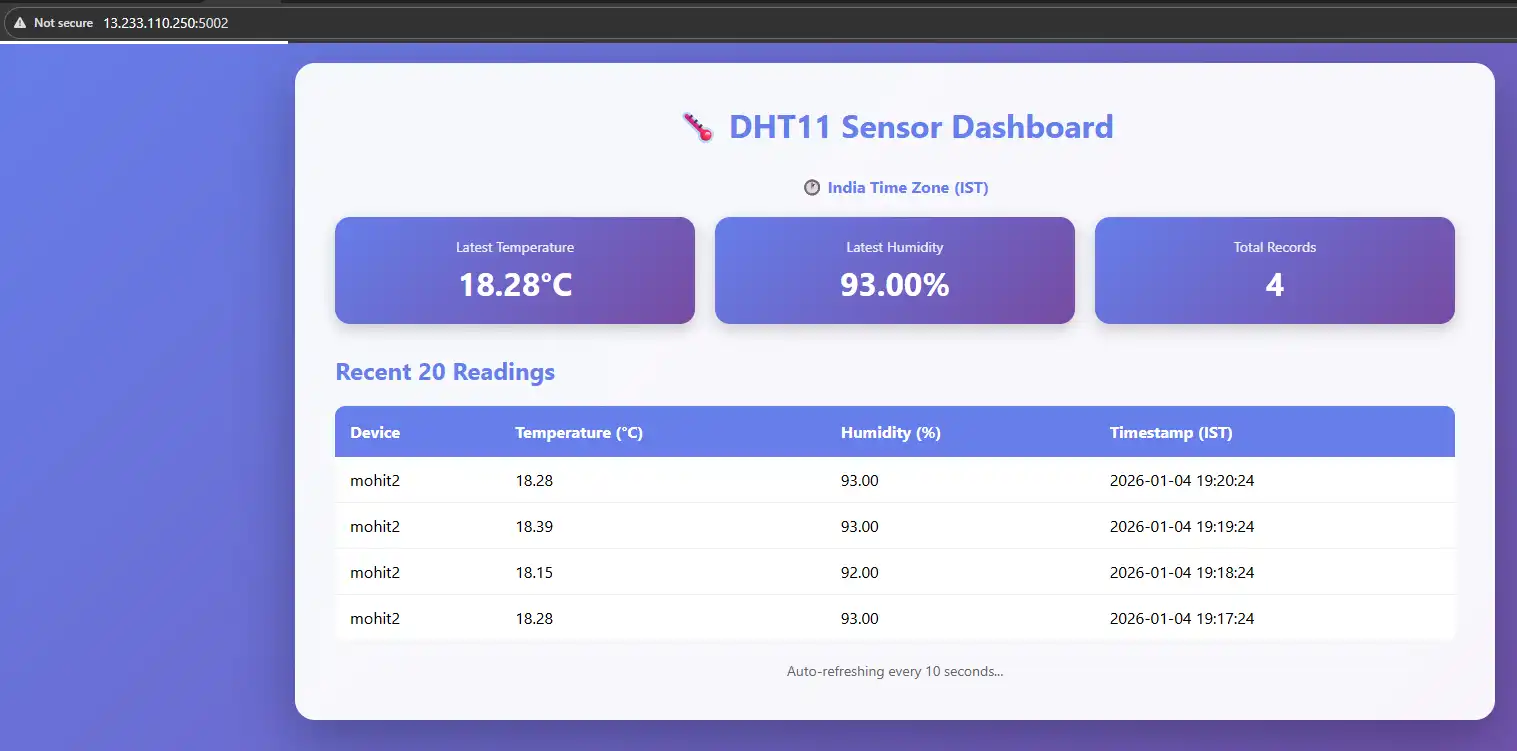
This design is server-agnostic, meaning the ESP8266 does not care whether the server is public or private.
→ Sensor initialisation and timing strategy is:
const int DHTPin = 14;
DHT dht(DHTPin, DHTTYPE);
const unsigned long uploadInterval = 60000;
- The DHT11 sensor is connected to GPIO14.
- Data is uploaded once every 60 seconds.
- Timing is controlled using millis() instead of delay() to keep the system responsive.
This approach follows non-blocking embedded design best practices.
→ Wi-Fi connection and device boot sequence is as follows:
WiFi.hostname(deviceName);
WiFi.begin(ssid, password);
WiFi.mode(WIFI_STA);
During setup():
ESP8266 connects to Wi-Fi. It assigns a hostname for easy identification and starts a local web server on port 80.
Once connected, the device prints its local IP address, which can be accessed from any browser on the same network.
To send sensor data to the remote server (core logic), use the following code:
void sendDataToServer(float temp, float humidity)
Key operations inside this function are:
-
URL construction
String url = “http://” + serverHost + “:” + serverPort + serverPath;
Creates a complete endpoint dynamically, allowing easy server changes.
-
JSON payload creation
{

“device”: “mohit2”,

“temp”: 27.45,

“humidity”: 61.20

}
JSON is lightweight, human-readable, and widely supported, perfect for REST APIs and cloud ingestion pipelines.
-
HTTP POST transmission
http.POST(jsonPayload);
Sends sensor data securely over HTTP. The server can store data in a database, trigger alerts, or feed dashboards.
This pattern is widely used in IoT cloud platforms and private telemetry systems.
→ Periodic sensor reading loop is:
if (currentTime - lastUploadTime >= uploadInterval)
Inside loop(): reads temperature and humidity from DHT11. It validates sensor data (!isnan) and sends data to the remote server at fixed intervals.
This ensures controlled network usage, predictable data sampling, and reliable long-term operation.
→ Local web server for real-time monitoring is:
WiFiServer server(80);
The ESP8266 also acts as a mini HTTP server.
When a client connects:
- Sensor data is read instantly.
- Response is returned in JSON format:
{

“temp”: 28.10,

“humidity”: 60.50

}
This matters because it:
- Enables offline or LAN-only monitoring.
- Is useful for diagnostics, maintenance, or edge applications.
- Reduces dependency on cloud connectivity.
This IoT system can work in both online and offline conditions, making it reliable and flexible. The use of fixed time intervals and simple JSON data makes it easy to manage and understand. This approach is useful for smart homes, small industries, and basic monitoring systems.


