


 Read about how Inmantec Institutions switched to Zentyal (formerly e-box Platform), which is a program for a Linux server and is meant for SMBs. Zentyal has a multi-faceted platform, as we will discover through this series.
Over the past many years, Inmantec Institutions had faced issues in managing its IT infrastructure. Problems included handling static IP pools for students and staff, managing Internet bandwidth such that it was not misused, etc. Heres a first hand account of how open source helped the institute manage its IT infrastructure efficiently and in a cost-effective manner.
For years, Inmantec used commercial software to manage its IT infrastructure. And like all proprietary software, this, too, did not provide the institution with a customised solution to manage the IP addresses of its students and staff, efficiently. In the case of static IP addresses, the institution was provided with four VLANs for all the staff and students of different courses. Most of the time, the organisation used IP addresses. These large static IP address pools had performance issues on commercial software. Inmantec required features like a captive portal, a DHCP server, real-time monitoring of users downloads and uploads with statistics, etc. With all these issues to be addressed, different open source software were tested till Zentyal server was discovered. It resolved most of the problems.
Zentyal is a Linux-based business server, which is a replacement for Microsoft Small Business Server and Microsoft Exchange Server. The beauty of the software lies in its simplicity, short installation period and minimal maintenance. The features that attracted Inmantec to Zentyal were:
1. Communication Server, which has a mail server, groupware and instant messaging system.
2. Office Server, which contains an LDAP directory server, file sharing and domain services, printer sharing and backup facilities.
3. Systems Management, which is a software management utility and monitors hardware performance.
4. The infrastructure, which comprises a DHCP server, a DNS server, an NTP server, a certification authority, Apache Webserver, an FTP server and UPS management.
5. Gateway and UTM, which has configurable network interfaces, high availability, advanced routing, an advanced firewall, traffic shaping and QOS, an advanced HTTP proxy server, a captive portal, a RADIUS server, VPN, an intrusion prevention system and mail filter.
Zentyal modules are customisable and can be handpicked at the time of installation. These features allow users to control most infrastructure management needs efficiently.
In this article, I will cover the setting up of Zentyal Server 3.4. We will explore two different scenariosfirst a live scenario and then a test one. Those who do not have a spare server to use, can test run it on VirtualBox, which will be explained later.
Scenario 1: Setting up Zentyal on a
production server
Hardware requirements:
- 32/64-bit hardware
- Two network interface cards
- 20 GB of hard disk space
Software requirements:
- Zentyal 3.4 32/64-bit server.
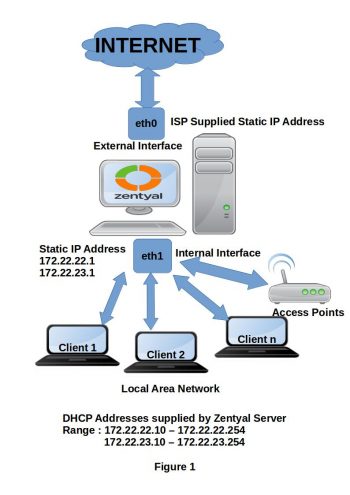
A server has two interface cards: eth0 and eth1. The interface eth0 is connected to the ISP, with a static address, and eth1 is connected to the LAN. The LAN interface is used to supply IP addresses to clients using a DHCP server. Interface eth1 is assigned two local IPs72.22.22.1 and 172.22.23.1 in order to serve two VLANs (virtual LANs). Each IP address range has some IPs reserved for internal use, which can be assigned for internal servers, copiers, printers, etc, and the rest of the range can be assigned to clients. This range of IP addresses can serve up to 490 clients.
To provide IP addresses automatically to the clients in the network, we use a DHCP server. We also use a local domain so as to provide names to our devices. Names are easier to remember than IP addresses. So, if you want to access any device from the network, just use device name rather than IP address. We have set IAMT as our local domain name. We also use a captive portal, which will authenticate a user on the domain. This portal is also used to provide a download quota for each individual user. This quota is used as a limit for Internet bandwidth usage.
Scenario 2: Setting up Zentyal for testing purposes
Hardware requirements:
A 32/64-bit laptop/desktop, two virtual network interface cards, and 20 GB of hard disk space.
Software requirements:
Zentyal 3.4 32/64-bit server
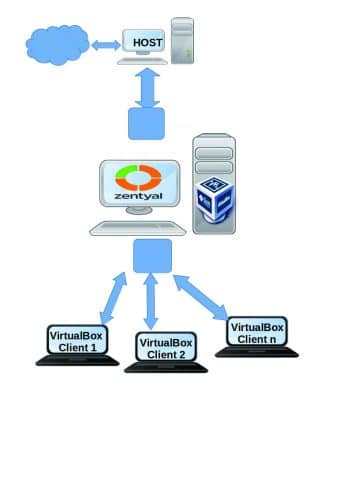
Those who want to test this server on their local machines can use VirtualBox1 for testing purposes.
For VirtualBox, the Internet is shared with the host operating system; therefore, the primary virtual interface (eth0) of the guest Zentyal server operating system has to be set as DHCP and not static.
Installation of Zentyal Server
To set up Zentyal Server, follow the steps listed below:
1. Download Zentyal 3.4 from http://zentyal.org.
2. After downloading, burn the image on a CD. For VirtualBox, you can use the image directly.
3. Select the languageEnglish.
4. You can install Zentyal with default settings by selecting Install Zentyal 3.4. This step will install Zentyal via GUI and will delete all existing partitions on the hard disk. By selecting Expert mode Zentyal can be installed in text mode.
5. Again, select the language required for the setup. In our case, its English.
6. Choose your time zone settings. In our case, it’s India.
7. Choose the keyboard layout. In our case, it’s No.
8. Under Configure the keyboard choose English US.
9. Choose English US for the Keyboard layout too.
10. It will now detect hardware and start loading the additional components.
11. Choose eth0 as the primary network interface.
12. It will then configure the network interface. To set up the network interface manually, select Cancel after IPv6 configuration. For VirtualBox, do not press anything.
13. Now choose Continue to manually configure the network.
14. Now type in the IP address given by your ISP. This step is not required for VirtualBox users.
15. Type the netmask, as supplied by your ISP.
16. Provide the gateway, as supplied by your ISP.
17. Type the nameservers. In our case, we have used Google Open DNS. Do not use commas for more than one name server; use a space instead.
18. You will then be asked for the hostname. Type the Server Name you want. The default is Zentyal.
19. Next, you will be asked for the domain name. You can type any domain name like test.com or in my case, iamt.
20. During installation, you will be asked for the username of the administrator of the system. Type any name.
21. Type the password for the administrator account and confirm the password.
22. The installation process will then begin. After the installation ends, the system will reboot.
23. After the system reboots, you will be asked to provide the username and password. After that, install modules for your server, click on the different modules available. We have selected all the modules. Click the Install button to install the modules.
24. After installation process dashboard will appear.
Setting up DHCP, DNS and the captive portal will be discussed in the next article.
References
[1] VirtualBox Download: https://www.virtualbox.org/wiki/Downloads
[2] VirtualBox setup: https://www.virtualbox.org/manual/ch01.html
[3] Zentyal website: http://www.zentyal.org
[4] Google public DNS: https://developers.google.com/speed/public-dns/
[5] Zentyal installation: http://doc.zentyal.org/en/installation.htm


Zentyal 3.4 is not the current version and version 4.0+ does not include many of the core services you listed here, DHCP and Radius being 2