

This tutorial will help you create a simple application using Maven, install Docker on the Ubuntu operating system, create a JAR file using Jenkins, and finally, deploy a Java-based app.
Docker, , an open platform, streamlines the building, testing, and deployment of applications, enhancing development efficiency by isolating applications from infrastructure or runtime environments. It provides UIs, CLIs, APIs and security features to package and run an application in lightweight containers. These containers have all the resources to run an application such as libraries, system tools, code, and runtime. In this article we will explore deploying a simple Java based application in Docker.
Creating a Java application using Maven
To build a package file for a sample application that we are going to run in a Docker container, Java and Maven need to be installed on the Ubuntu OS. Once that’s done successfully, verify the versions using the ‘java -version’ and ‘mvn -version’ commands, respectively:
test@ubuntu:~/Desktop$ java -version
openjdk version “17.0.8.1” 2023-08-24
OpenJDK Runtime Environment (build 17.0.8.1+1-Ubuntu-0ubuntu122.04)
OpenJDK 64-Bit Server VM (build 17.0.8.1+1-Ubuntu-0ubuntu122.04, mixed mode, sharing)

test@ubuntu:~/Desktop$ mvn -version
Apache Maven 3.6.3
Maven home: /usr/share/maven
Java version: 17.0.8.1, vendor: Private Build, runtime: /usr/lib/jvm/java-17-openjdk-amd64
Default locale: en_IN, platform encoding: UTF-8
OS name: “linux”, version: “6.2.0-37-generic”, arch: “amd64”, family: “unix”
Let’s create a simple Java application using mvn archetype:generate:
test@ubuntu:~/Desktop$ mvn archetype:generate -DgroupId=com.osfy.app -DartifactId=my-app -DarchetypeArtifactId=maven-archetype-quickstart -DarchetypeVersion=1.4 -DinteractiveMode=false
Upon successful completion, you will see a success message like this:
[INFO] Project created from Archetype in dir: /home/test/Desktop/my-app
[INFO] ------------------------------------------------------
[INFO] BUILD SUCCESS
[INFO] ------------------------------------------------------
[INFO] Total time:  51.828 s
[INFO] Finished at: 2023-12-05T23:16:46+05:30
[INFO] ------------------------------------------------------
Let’s now see the structure of the project, but before that install the tree command in Ubuntu.
test@ubuntu:~/Desktop$ sudo apt-get install tree
Next, use the tree command with the directory name:
test@ubuntu:~/Desktop$ tree my-app

my-app
├── pom.xml
└── src
    ├── main
    │   └── java
    │       └── com
    │           └── osfy
    │               └── app
    │                   └── App.java
    └── test
        └── java
            └── com
                └── osfy
                    └── app
                        └── AppTest.java

11 directories, 3 files
In the next section, we will execute unit tests and create packages.
Executing unit tests and creating a package using Jenkins
Go to the application directory created earlier and execute the ‘mvn test’ command:
test@ubuntu:~/Desktop$ cd my-app/
test@ubuntu:~/Desktop/my-app$ mvn test

[INFO] Scanning for projects...
[INFO]
[INFO] ------------------------< com.osfy.app:my-app >-------
[INFO] Building my-app 1.0-SNAPSHOT
[INFO] --------------------------------[ jar ]---------------

Downloading from central: https://repo.maven.apache.org/maven2/org/apache/maven/plugins/maven-resources-plugin/3.0.2/maven-resources-plugin-3.0.2.pom

.
.
.
[INFO]  T E S T S
[INFO] -------------------------------------------------------
[INFO] Running com.osfy.app.AppTest
[INFO] Tests run: 1, Failures: 0, Errors: 0, Skipped: 0, Time elapsed: 0.01 s - in com.osfy.app.AppTest
[INFO]
[INFO] Results:
[INFO]
[INFO] Tests run: 1, Failures: 0, Errors: 0, Skipped: 0
[INFO]
[INFO] ------------------------------------------------------
[INFO] BUILD SUCCESS
[INFO] ------------------------------------------------------
[INFO] Total time:  11.542 s
[INFO] Finished at: 2023-12-05T23:19:34+05:30
[INFO] ------------------------------------------------------
Now, let’s create a JAR file using the ‘mvn package’ command:
test@ubuntu:~/Desktop/my-app$ mvn package
Verify the target folder inside the application directory and you will find a newly created JAR file.
Let’s execute the JAR file:
test@ubuntu:~/Desktop/my-app$ java -cp target/my-app-1.0-SNAPSHOT.jar com.osfy.app.App

Hello World!
So now we have a simple Java application with unit tests. Let’s try to achieve the same steps using Jenkins. How is this useful in DevOps implementation?
Jenkins is an open source tool that provides integration with the existing tools used in application life cycle management to automate all activities — build, test, and deploy. It is almost a synonym for DevOps and is easy to learn. It has a huge community for support. Jenkins provides a simple way to create a pipeline that includes continuous integration and continuous delivery. It can be used creatively for managing entire life cycle management activities easily. Plugin-based architecture helps to use the existing tools in the pipeline and, hence, too many changes in culture in one go can be avoided.
Download Jenkins from https://www.jenkins.io/download/ and install it in your preferred way. I downloaded a generic war file and executed the java -jar jenkins.war command to run the application.
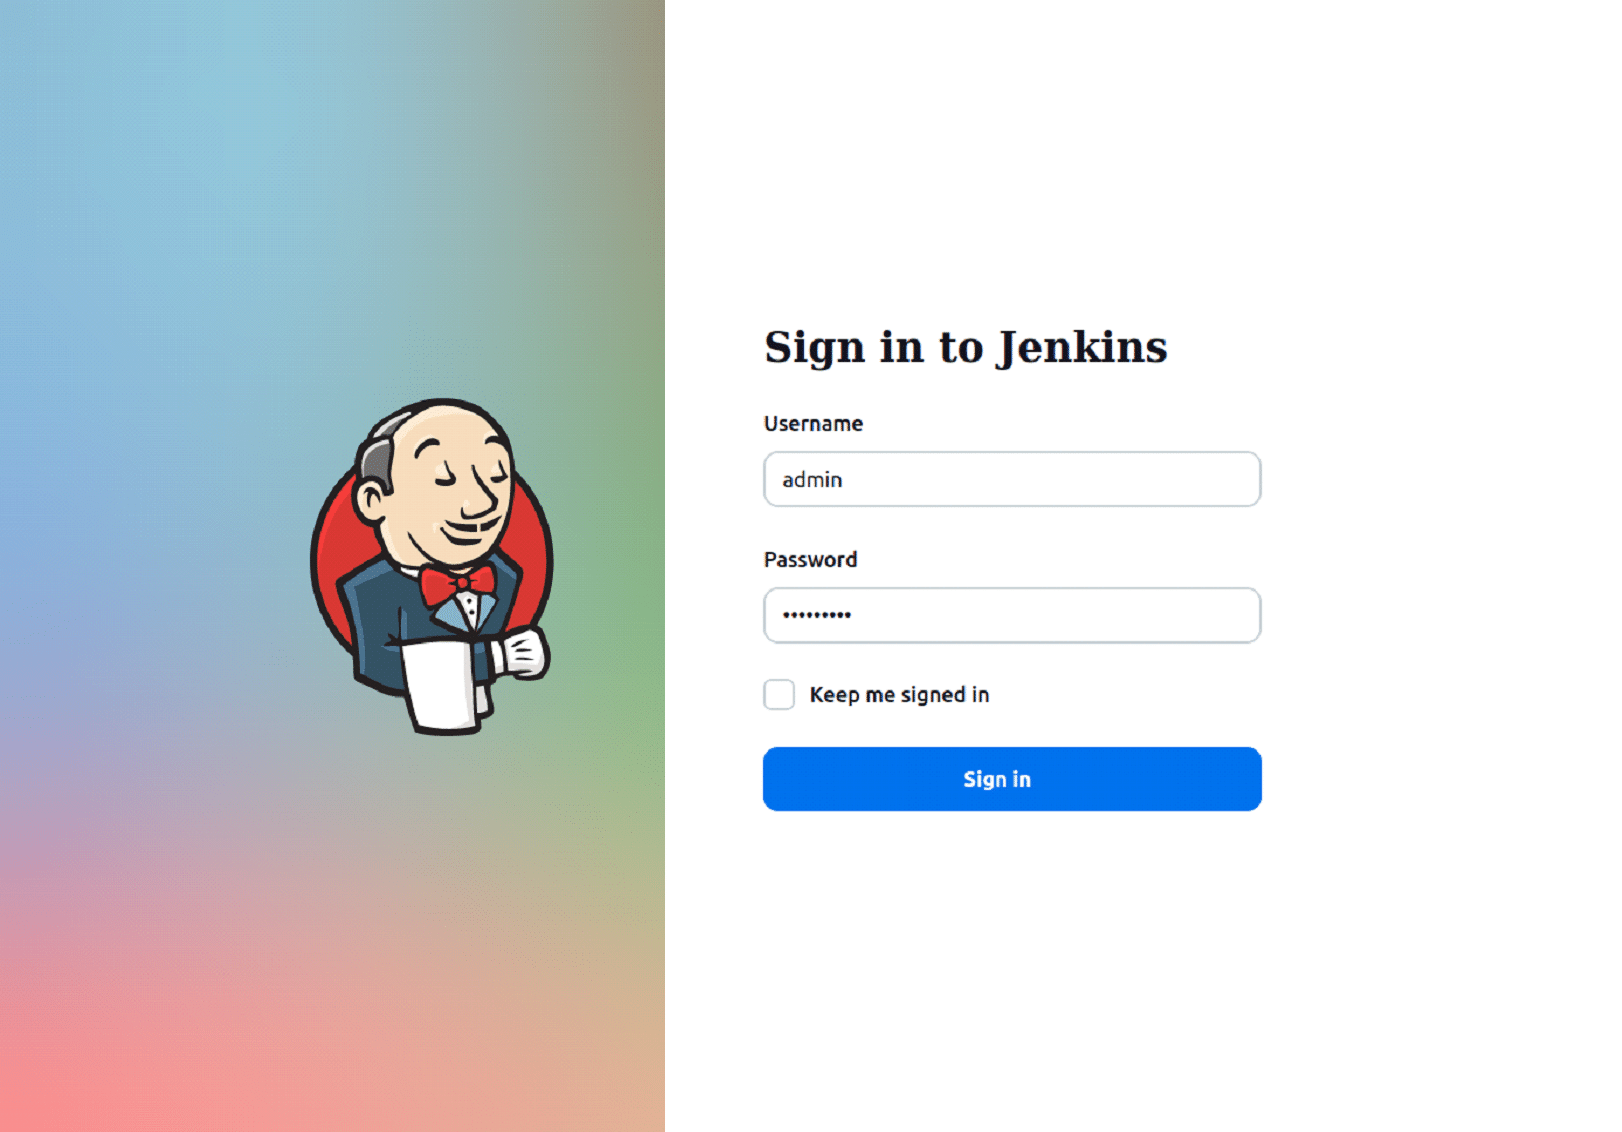
Once Jenkins is ready in your local system, visit it at http://localhost:8080/.
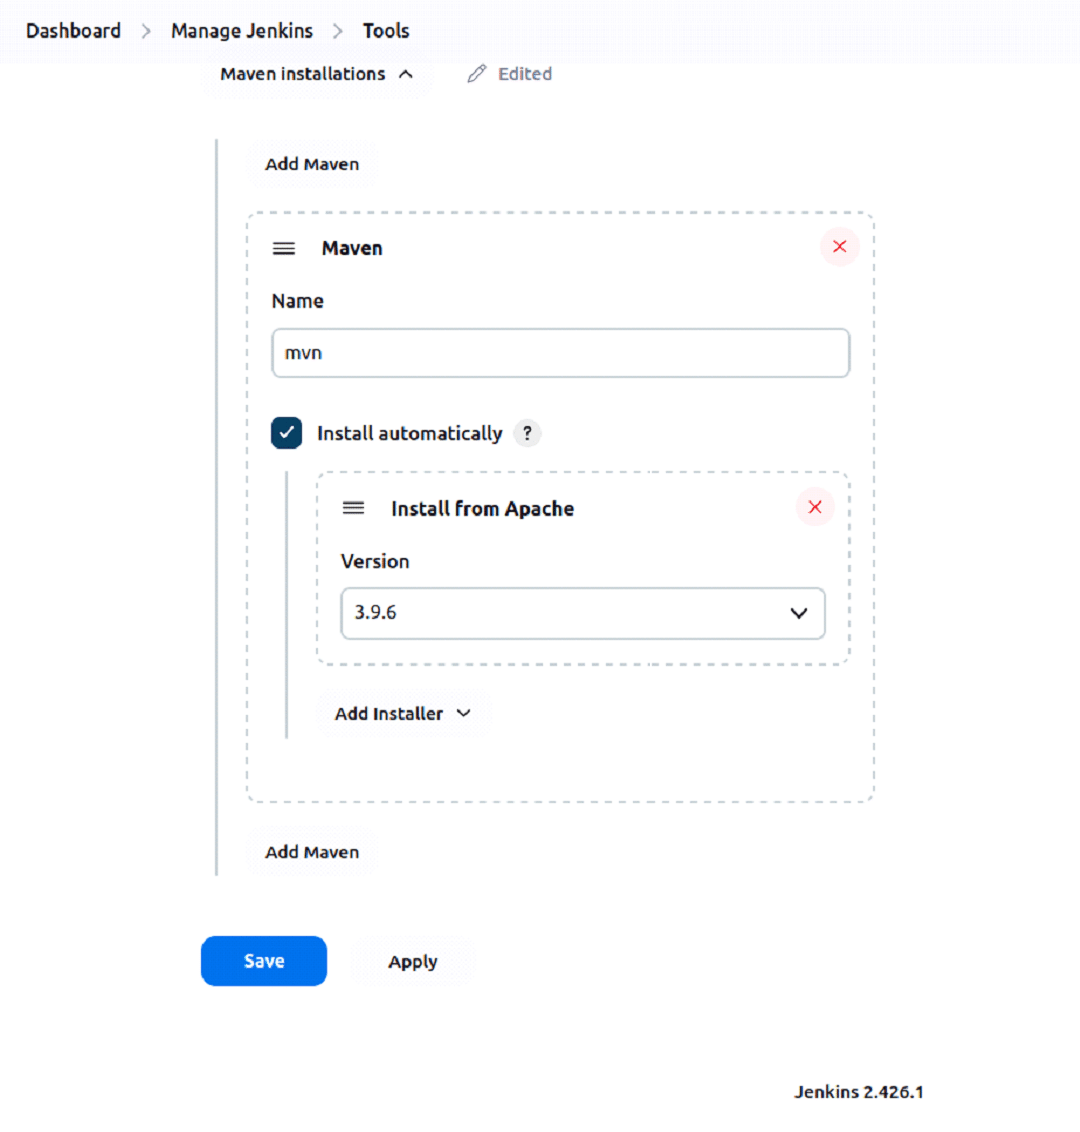
Go to Manage Jenkins -> Tools -> Maven installations and configure the Maven setup as shown in Figure 1.
Go to Manage Jenkins -> Plugins at http://localhost:8080/manage/pluginManager/available and install the Maven integration and file system SCM plugin.
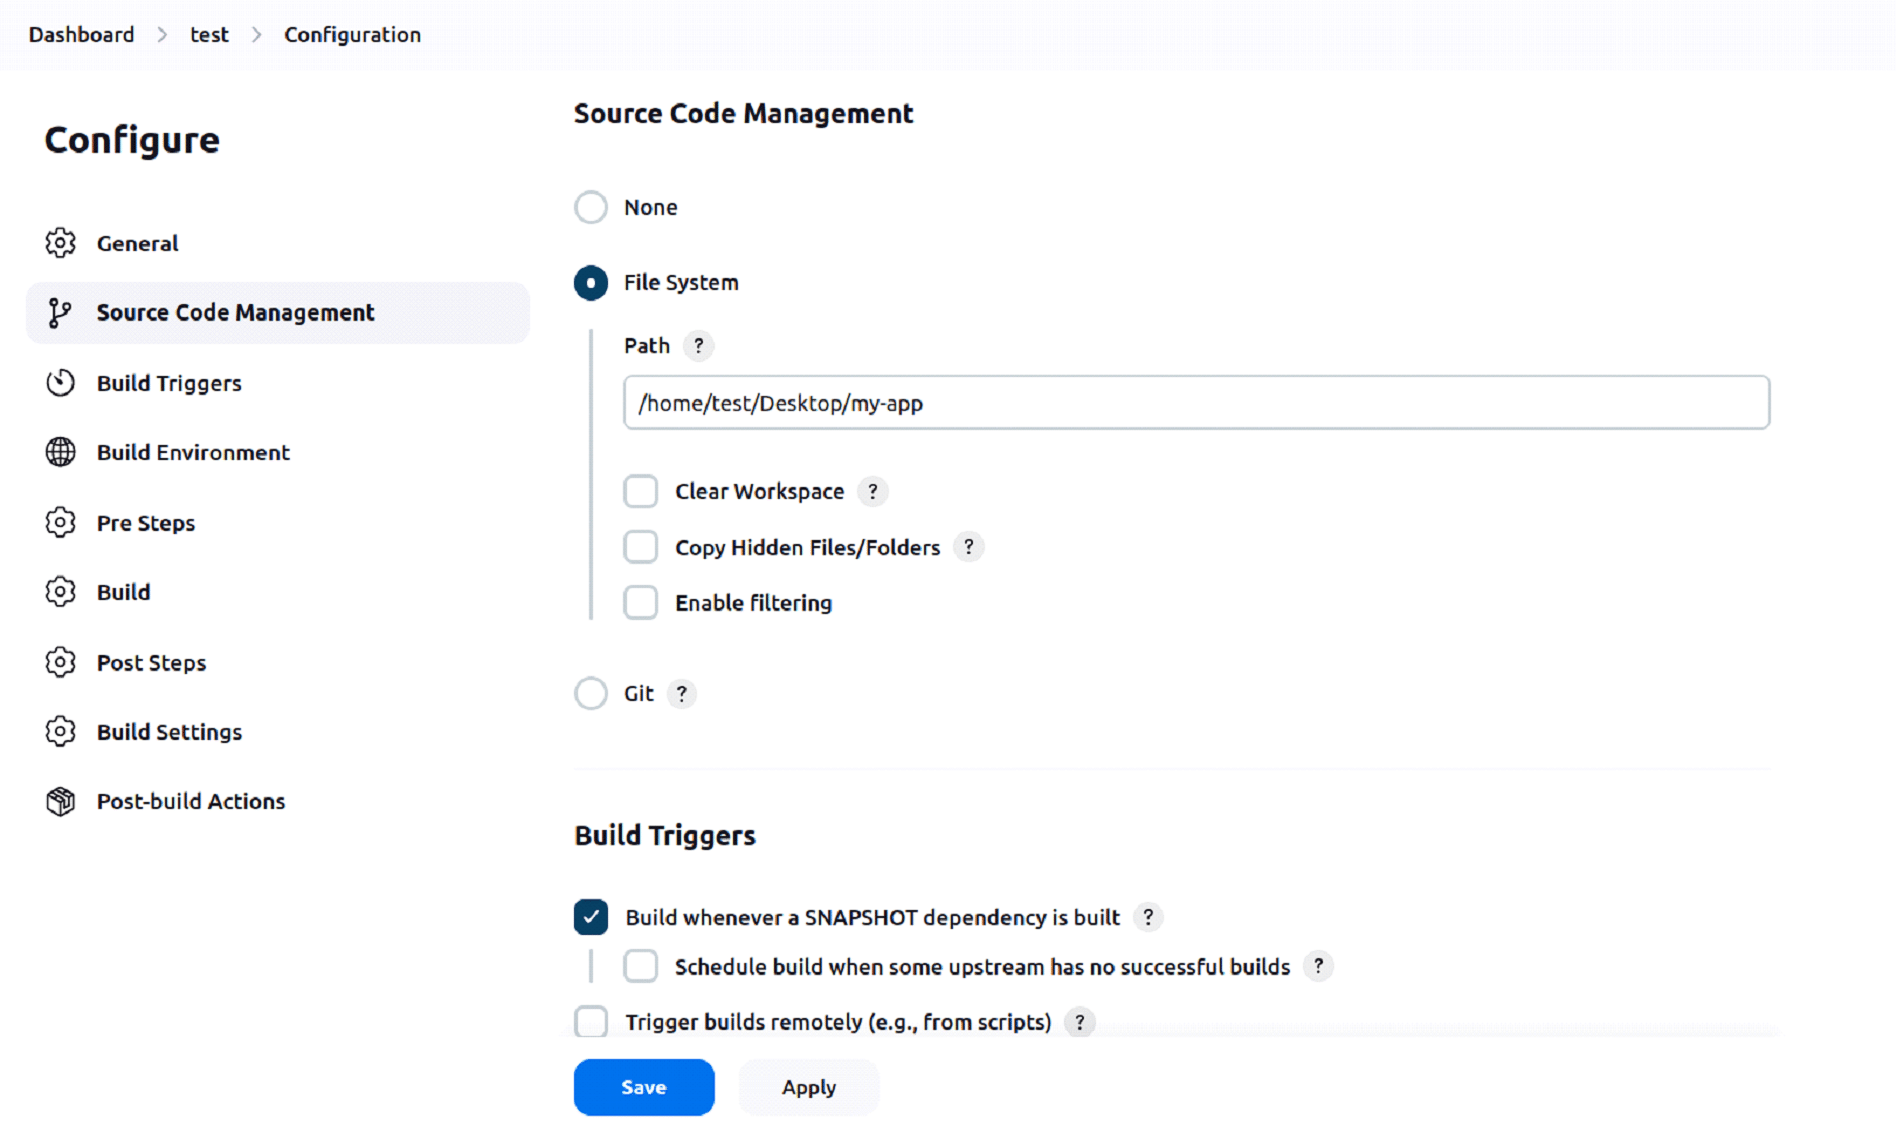
Once the plugins are installed, we can create a Maven project where we can provide a local directory in the source code management section as given in Figure 3.
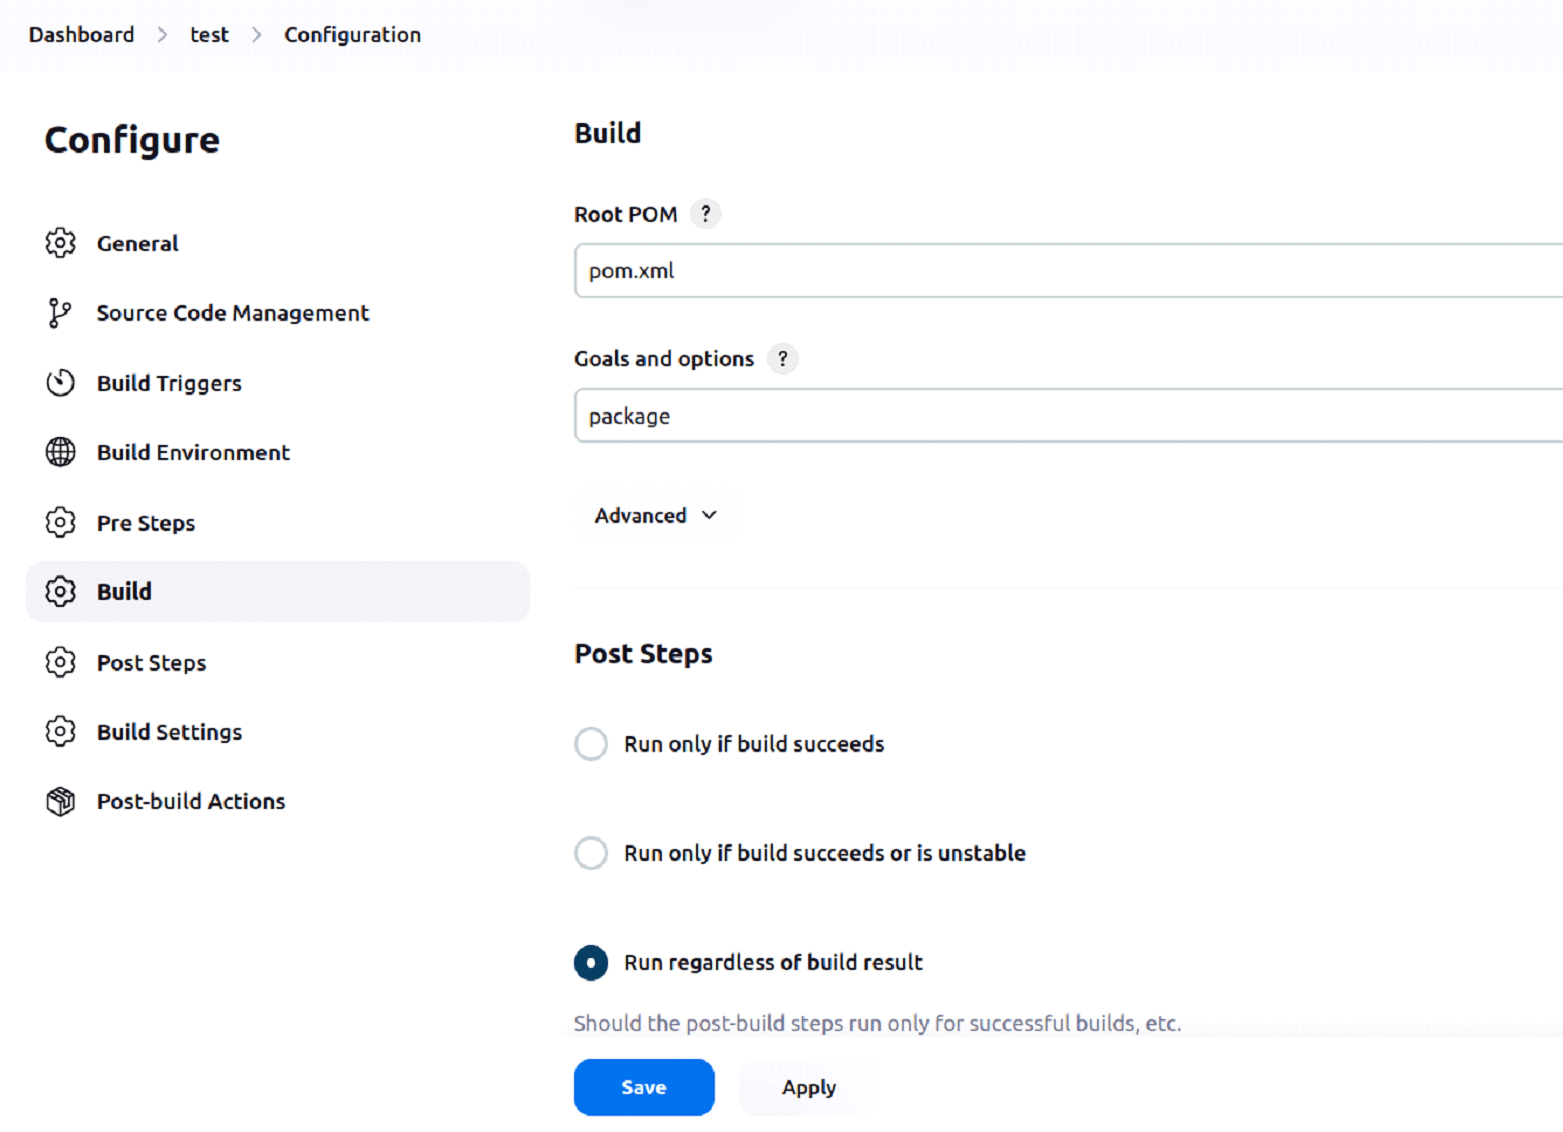
Go to the Build section in the Maven project and provide a package goal.
Go to the Post Build section and select Archive Artifact for the JAR file as given in Figure 5.
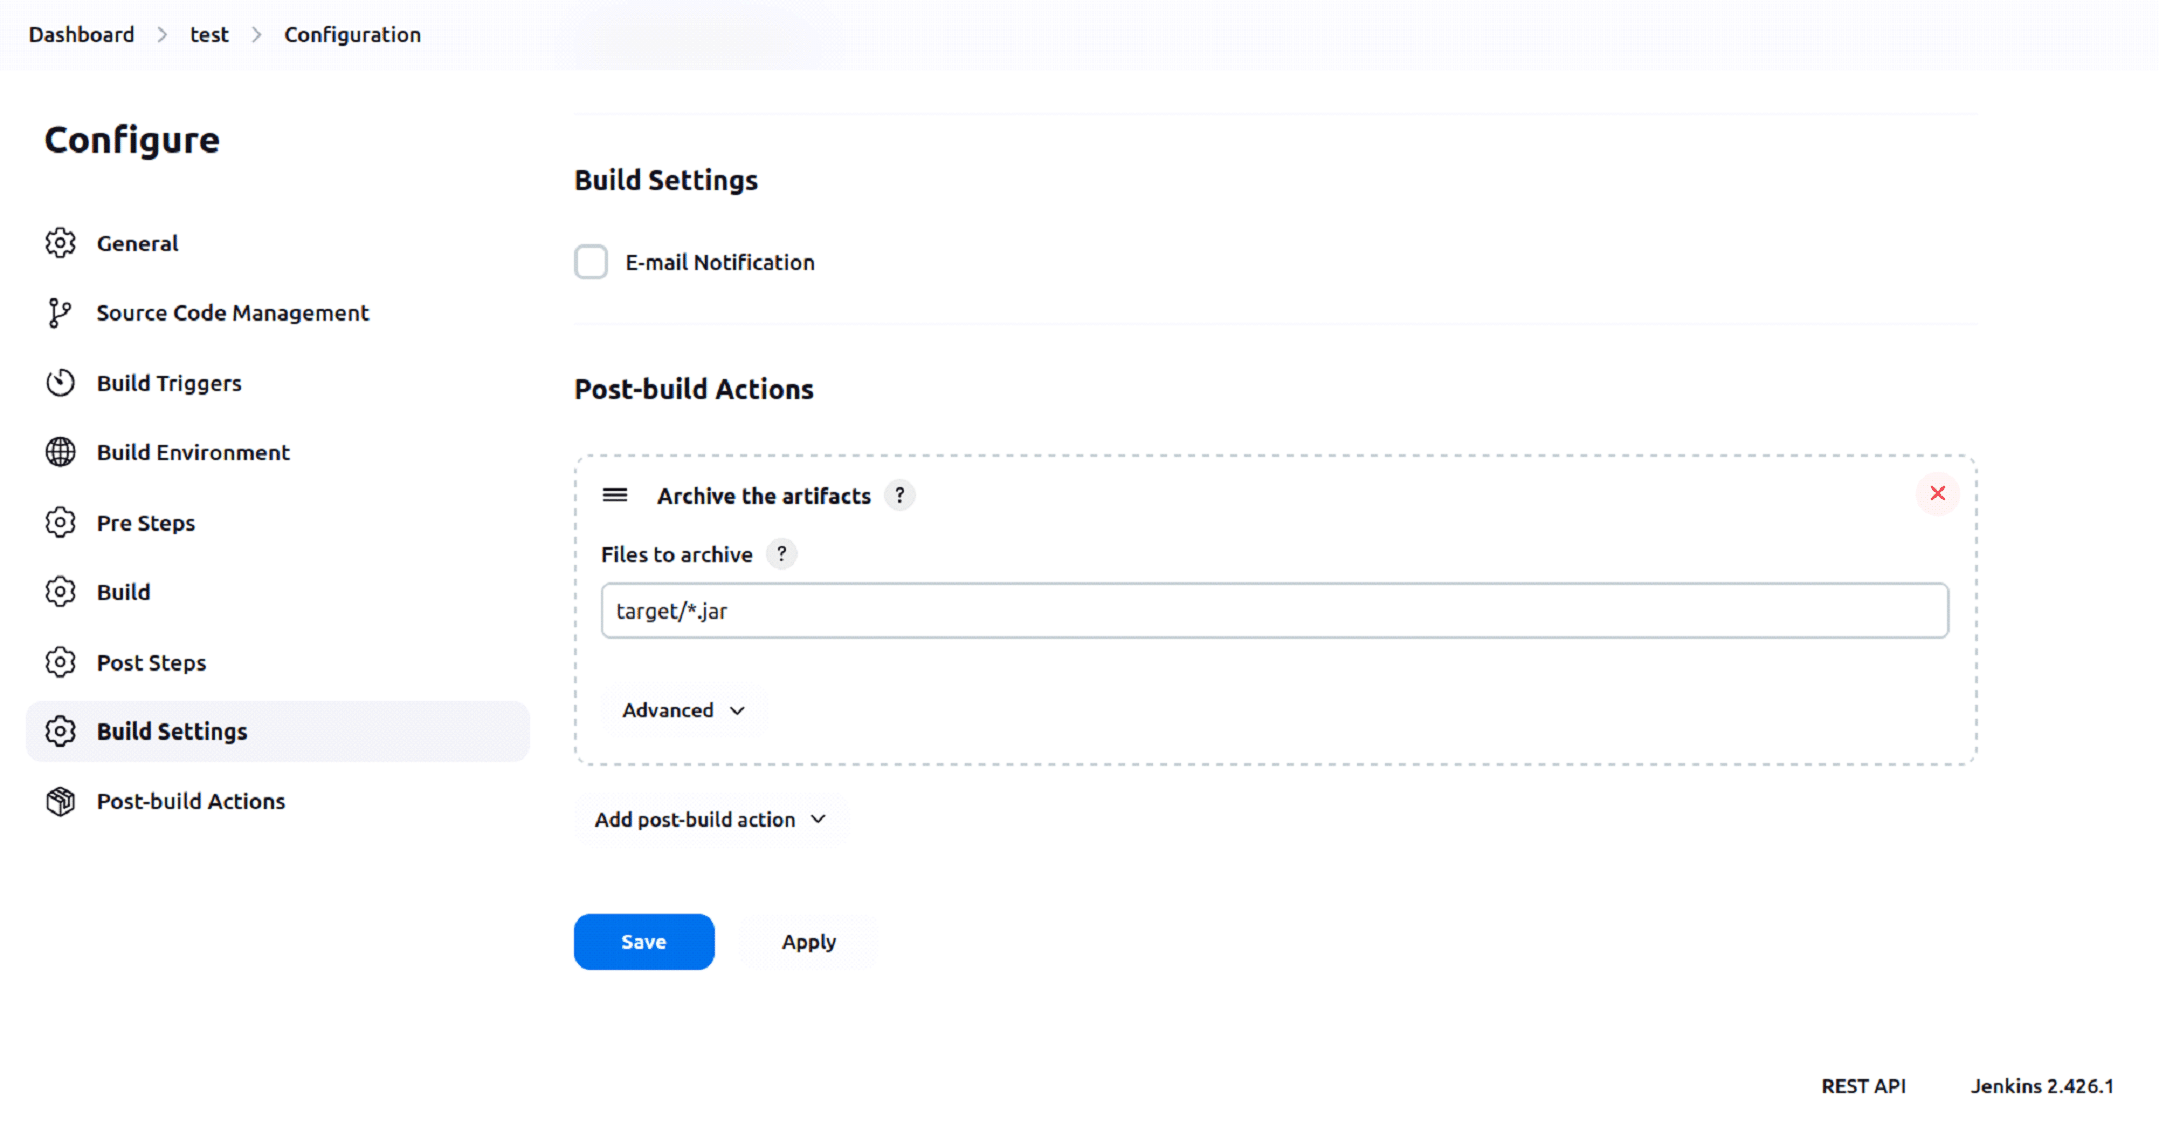
Click on Save and then on Build Now.
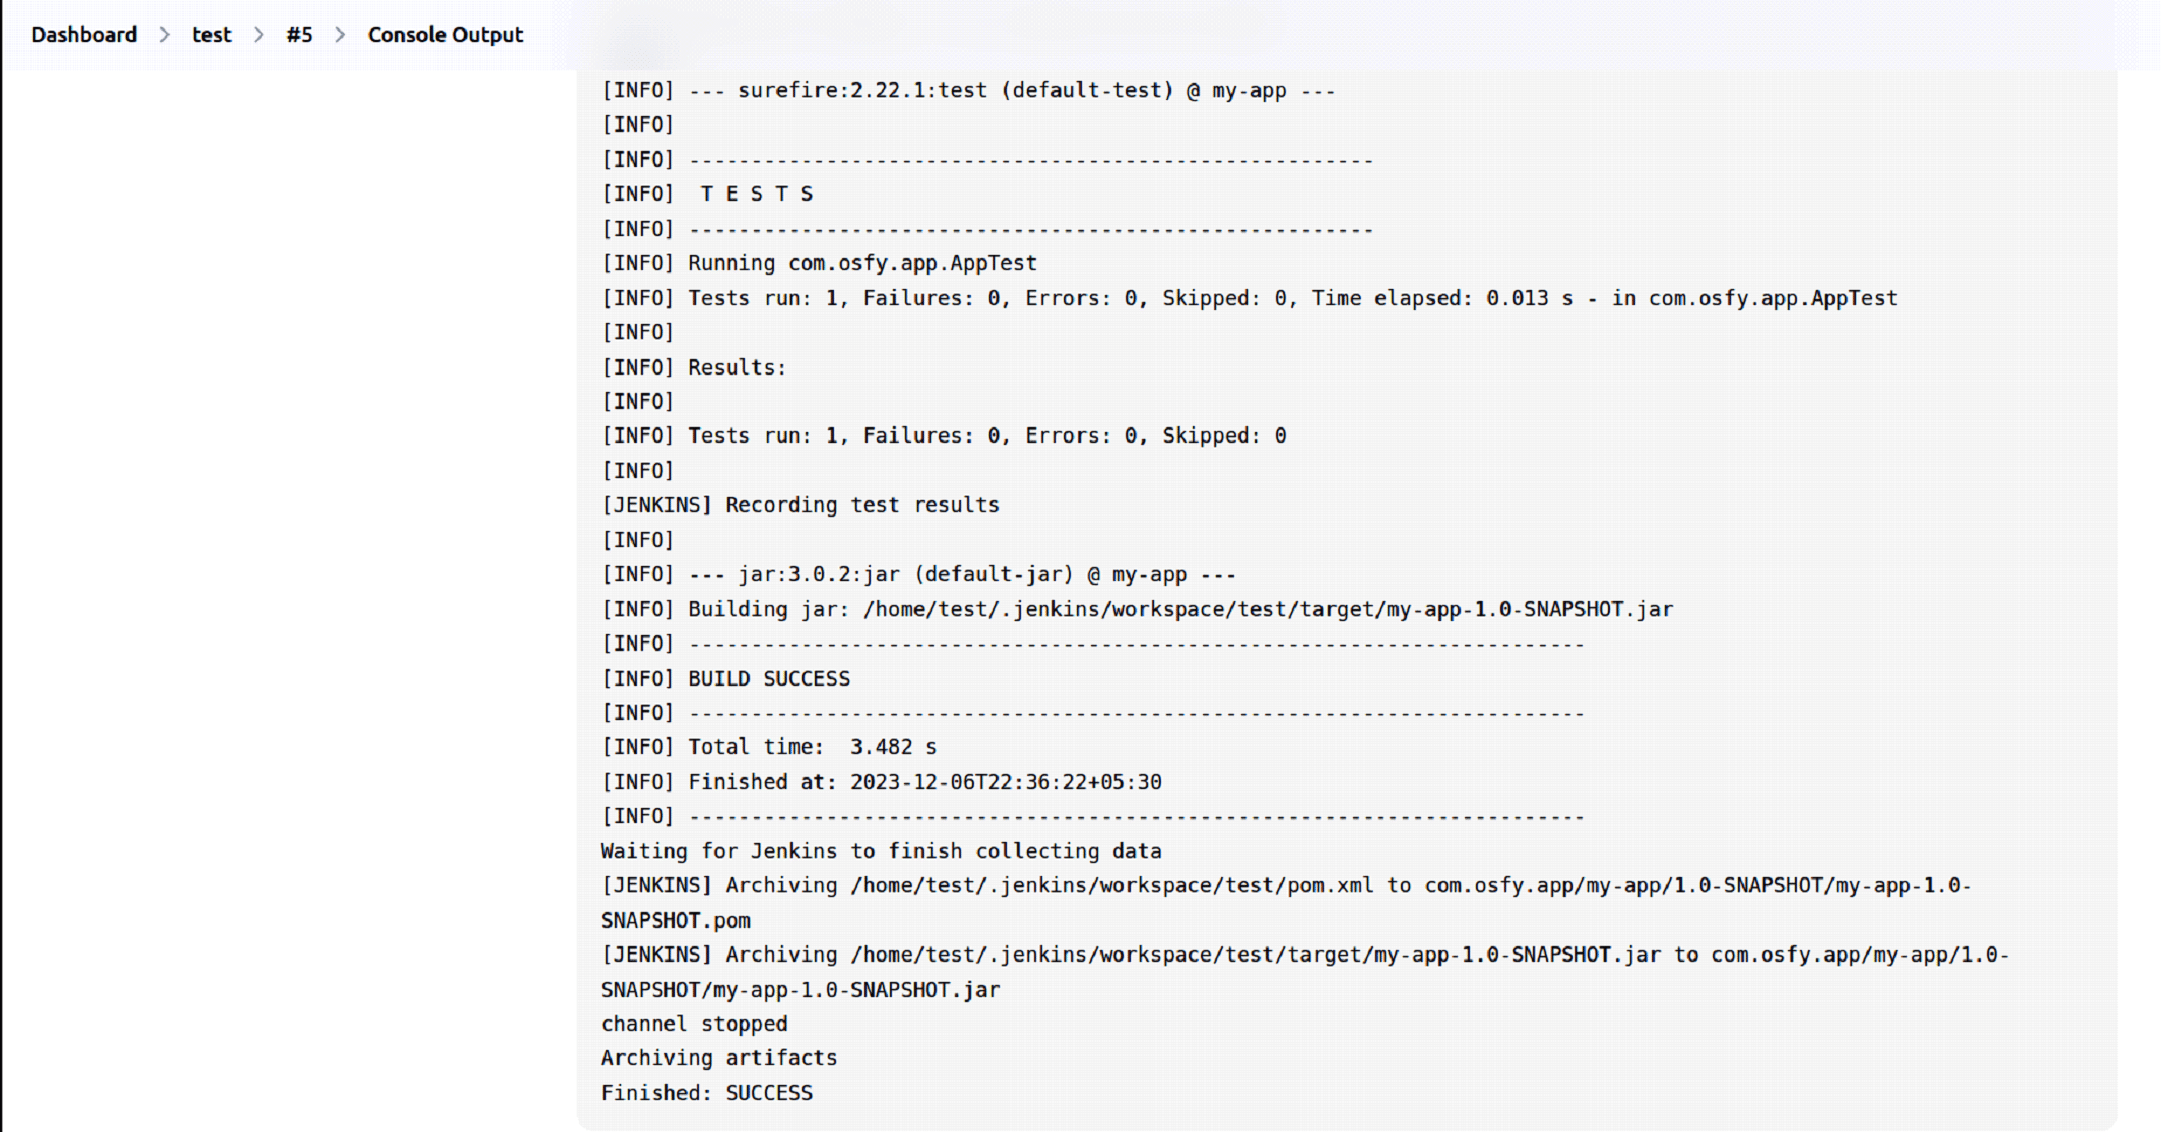
Verify the end section of the console output.
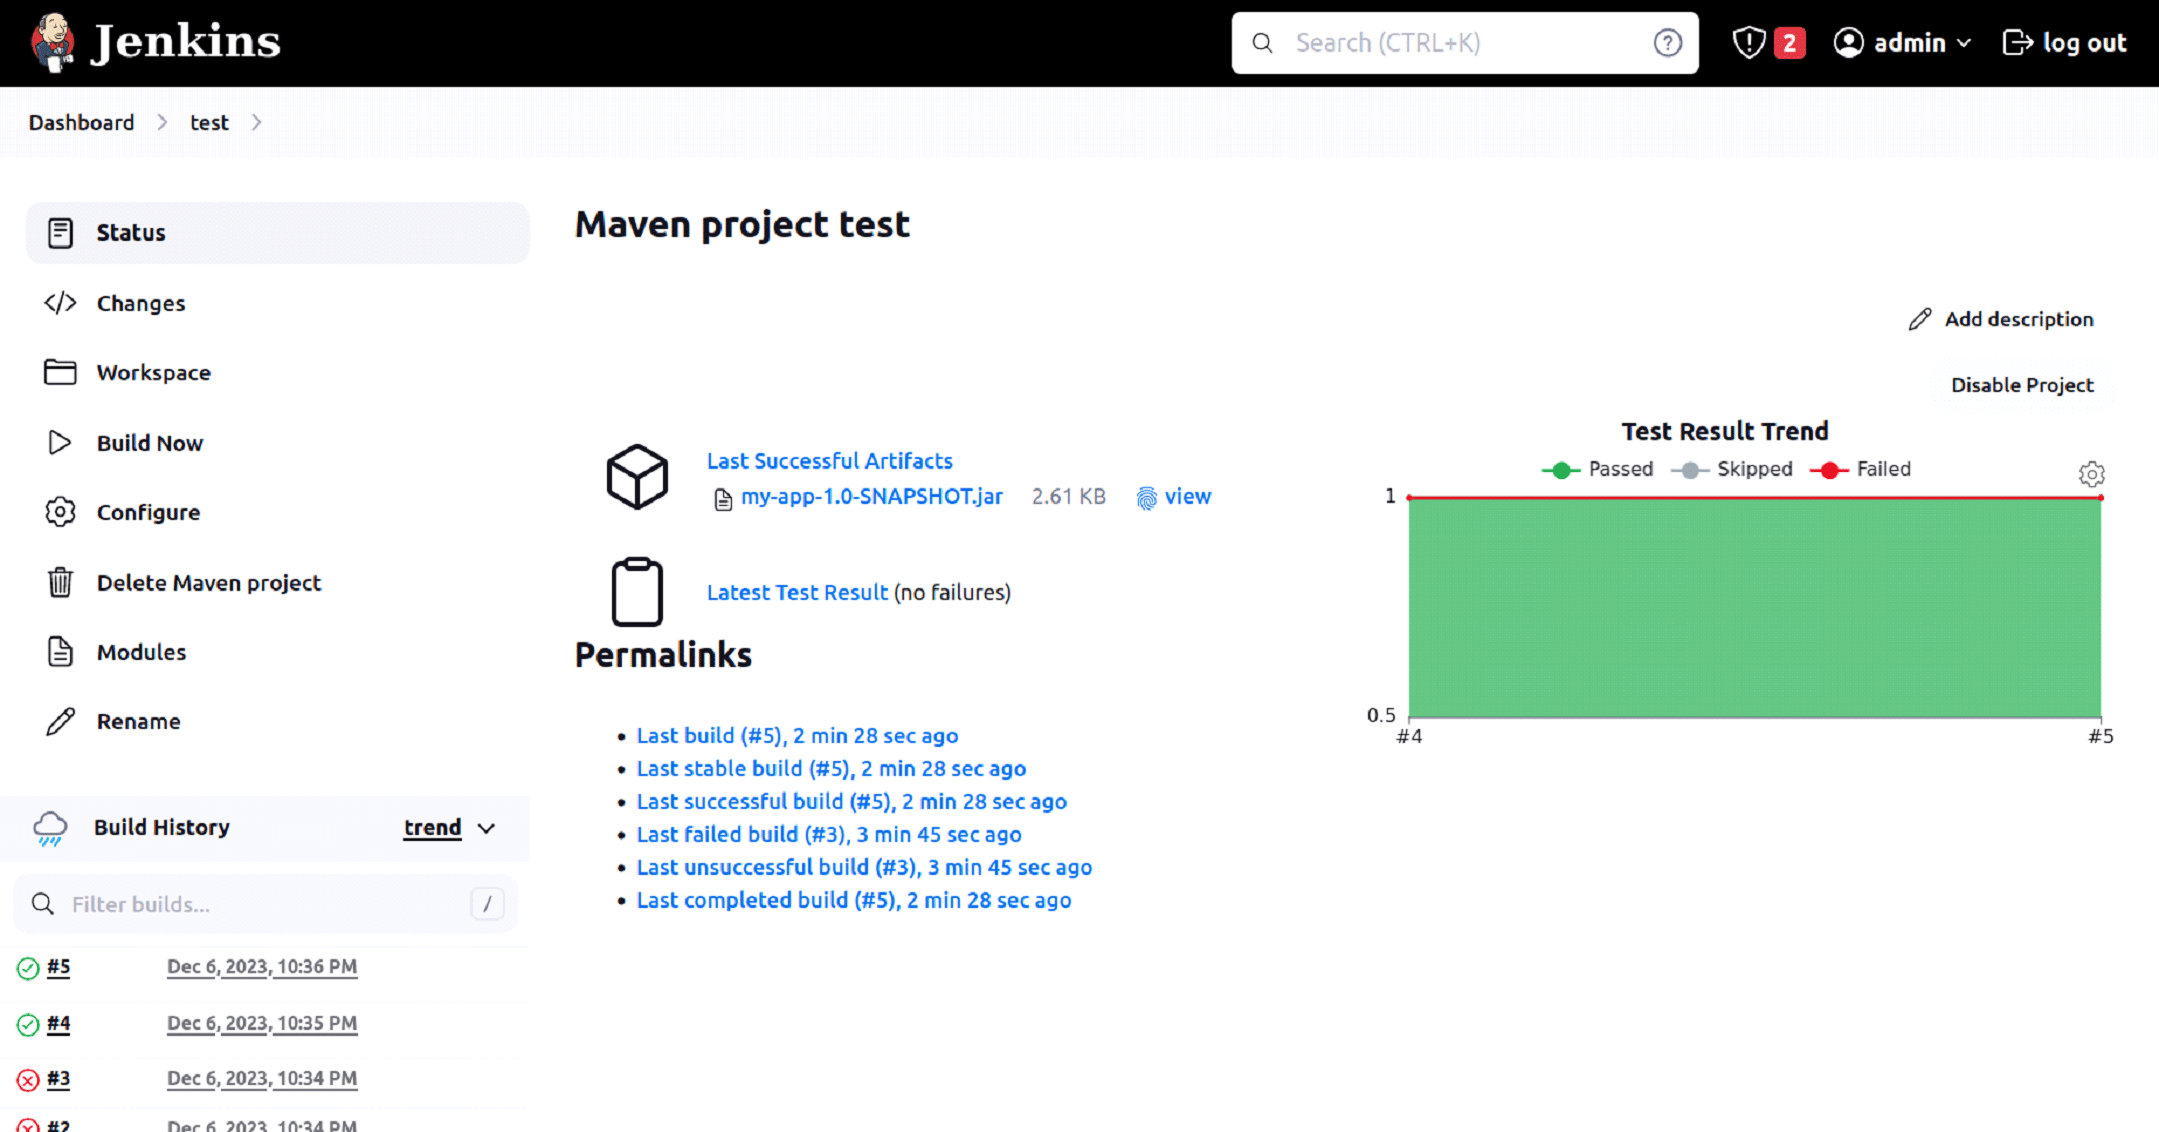
Verify the project dashboard with the test result chart and the downloadable JAR file.
Now, we have a JAR file ready. The next step is to create a Docker image that contains the JAR file and runtime environment.
Docker installation on Ubuntu
Update the APT package index and install packages using the following command:
test@ubuntu:~/Desktop$ sudo apt-get update

Hit:1 https://download.docker.com/linux/ubuntu jammy InRelease
Get:2 https://dl.yarnpkg.com/debian stable InRelease [17.1 kB]
Get:3 https://deb.nodesource.com/node_18.x jammy InRelease [4,563 B]
Ign:4 https://pkg.jenkins.io/debian-stable binary/ InRelease
Get:5 https://pkg.jenkins.io/debian-stable binary/ Release [2,044 B]
Get:6 https://pkg.jenkins.io/debian-stable binary/ Release.gpg [833 B]
Get:7 http://security.ubuntu.com/ubuntu jammy-security InRelease [110 kB]
Get:8 https://dl.google.com/linux/chrome/deb stable InRelease [1,825 B]
Hit:10 http://in.archive.ubuntu.com/ubuntu jammy InRelease
Install the required packages:
test@ubuntu:~/Desktop$ sudo apt-get install ca-certificates curl gnupg
Now add Docker’s official GPG key:
test@ubuntu:~/Desktop$ sudo mkdir -p /etc/apt/keyrings
test@ubuntu:~/Desktop$ sudo install -m 0755 -d /etc/apt/keyrings

test@ubuntu:~/Desktop$ curl -fsSL https://download.docker.com/linux/ubuntu/gpg | sudo gpg --dearmor -o /etc/apt/keyrings/docker.gpg

File ‘/etc/apt/keyrings/docker.gpg’ exists. Overwrite? (y/N) y

test@ubuntu:~/Desktop$ sudo chmod a+r /etc/apt/keyrings/docker.gpg
Set up the repository:
test@ubuntu:~/Desktop$ echo \
  “deb [arch=$(dpkg --print-architecture) signed-by=/etc/apt/keyrings/docker.gpg] https://download.docker.com/linux/ubuntu \
  $(. /etc/os-release && echo “$VERSION_CODENAME”) stable” | \
It is now time to install the latest version of Docker.
test@ubuntu:~/Desktop$ sudo apt-get install docker-ce docker-ce-cli containerd.io docker-buildx-plugin docker-compose-plugin
Verify the Docker version:
test@ubuntu:~/Desktop$ sudo docker version
We have an application package ready along with Docker. In the next section, we will create a Docker image using Dockerfile.
Creating a Dockerfile
Let’s check Docker status:
test@ubuntu:~/Desktop$ sudo service docker status
Now verify the existing Docker images:
test@ubuntu:~/Desktop$ sudo docker images
REPOSITORY TAG IMAGE ID CREATED SIZE
Next, verify existing Docker containers:
test@ubuntu:~/Desktop$ sudo docker ps -a
CONTAINER ID IMAGE COMMAND CREATED STATUS PORTS NAMES
No images or containers are available as it is a fresh installation of Docker.
Let’s run an nginx container to verify Docker:
test@ubuntu:~/Desktop$ sudo docker run -d -p 9999:80 nginx
Unable to find image ‘nginx:latest’ locally
latest: Pulling from library/nginx
1f7ce2fa46ab: Pull complete
9b16c94bb686: Pull complete
9a59d19f9c5b: Pull complete
9ea27b074f71: Pull complete
c6edf33e2524: Pull complete
84b1ff10387b: Pull complete
517357831967: Pull complete
Digest: sha256:10d1f5b58f74683ad34eb29287e07dab1e90 f10af243f151bb50aa5dbb4d62ee
Status: Downloaded newer image for nginx:latest
9089d27e1a2059d22fbd41e3694244c01d29546df350ee 1d732c1887caaf3742
Verify existing Docker images:
test@ubuntu:~/Desktop$ sudo docker images
REPOSITORY   TAG       IMAGE ID       CREATED       SIZE
nginx        latest    a6bd71f48f68   2 weeks ago   187MB
Now verify existing Docker containers:
test@ubuntu:~/Desktop$ sudo docker ps -a
CONTAINER ID   IMAGE     COMMAND                  CREATED          STATUS          PORTS                                   NAMES
9089d27e1a20   nginx     “/docker-entrypoint.…”   34 seconds ago   Up 33 seconds   0.0.0.0:9999->80/tcp, :::9999->80/tcp   peaceful_torvalds
So, what is a Dockerfile?
Dockerfile is the text document that provides build instructions to build the image with your application package.
FROM openjdk:11.0-jdk-slim
MAINTAINER osfy
COPY target/my-app-1.0-SNAPSHOT.jar app.jar
ENTRYPOINT [“java”,”-cp”,”/app.jar”, “com.osfy.app.App”]
Let’s understand the commands given above.
- FROM command: Uses the base image (openjdk:11) for subsequent instructions in Dockerfile.
- COPY command: Copies a file to the container.
- ENTRYPOINT command: Specifies entry point and manipulates the environment.
Place the Dockerfile in the project root directory. Now it is time to build a Docker image.
Building a Docker image for Java app
Execute the docker image command to create an image as shown below:
test@ubuntu:~/Desktop/my-app$ sudo docker image build -t my-app:latest

[+] Building 122.6s (7/7) FINISHED                                                                                                                                                          docker:default
 => [internal] load build definition from Dockerfile                                                                                                                                                  0.0s
 => => transferring dockerfile: 183B                                                                                                                                                                  0.0s
 => [internal] load .dockerignore                                                                                                                                       0.0s
 => => transferring context: 2B                                                                                                                                          0.0s
 => [internal] load metadata for docker.io/library/openjdk:11.0-jdk-slim                                                                                         3.2s
 => [internal] load build context                                                                                                                                       0.0s
 => => transferring context: 78B                                                                                                                                                                      0.0s
 => [1/2] FROM docker.io/library/openjdk:11.0-jdk-slim@sha256:868a4f2151d38ba6a09870cec584346a5edc8e9b71fde275eb2e0625273e2fd8                         119.2s
 => => resolve docker.io/library/openjdk:11.0-jdk-slim@sha256:868a4f2151d38ba6a09870cec584346a5edc8e9b71fde275eb2e0625273e2fd8                               0.0s
 => => sha256:868a4f2151d38ba6a09870cec584346a5edc8e9b71fde275eb2e0625273e2fd8 549B / 549B                                                               0.0s
 => => sha256:d2b6af2093e823ba0cdee4bcd45a905afe3fa054d08bde55b1d850515da69a08 1.16kB / 1.16kB                                                                      0.0s

 => => sha256:8e687a82603fe2a40c7c83684fc5b97b75dd4d51ce6b0e6250ef3fd64b7b9f66 5.59kB / 5.59kB                                                                               0.0s

 => => sha256:1efc276f4ff952c055dea726cfc96ec6a4fdb8b62d9eed816bd2b788f2860ad7 31.37MB / 31.37MB                                                                       53.1s

 => => sha256:a2f2f93da48276873890ac821b3c991d53a7e864791aaf82c39b7863c908b93b 1.58MB / 1.58MB                                                                         4.7s
 => => sha256:12cca292b13cb58fadde25af113ddc4ac3b0c5e39ab3f1290a6ba62ec8237afd 212B / 212B                      0.2s

 => => sha256:69e15dccd787ba2cfe67f6abf5970ed88a5e019efbb499e499da3ab20b85fcc7 202.34MB / 202.34MB 117.6s

 => => extracting sha256:1efc276f4ff952c055dea726cfc96ec6a4fdb8b62d9eed816bd2b788f2860ad7        2.0s
 => => extracting sha256:a2f2f93da48276873890ac821b3c991d53a7e864791aaf82c39b7863c908b93b   0.2s

 => => extracting sha256:12cca292b13cb58fadde25af113ddc4ac3b0c5e39ab3f1290a6ba62ec8237afd       0.0s

 => => extracting sha256:69e15dccd787ba2cfe67f6abf5970ed88a5e019efbb499e499da3ab20b85fcc7            1.6s
 => [2/2] COPY target/my-app-1.0-SNAPSHOT.jar app.jar                                                                                  0.2s
 => exporting to image                                                                                                                                           0.0s
 => => exporting layers
                                                                                                                                     0.0s
 => => writing image sha256:40ac0922ea5a75a65b048826 2b66f10e702130633c60bab17d5b798aeeff37ab     0.0s
 => => naming to docker.io/library/my-app:latest
Verify existing Docker images:
test@ubuntu:~/Desktop/my-app$ sudo docker images
REPOSITORY   TAG       IMAGE ID       CREATED          SIZE
my-app       latest    937b0c334197   11 seconds ago   654MB
nginx        latest    a6bd71f48f68   2 weeks ago      187MB
Let’s start a container from the image that we created.
test@ubuntu:~/Desktop/my-app$ sudo docker run my-app:latest
Hello World!
Verify existing Docker containers:
test@ubuntu:~/Desktop/my-app$ sudo docker ps -a
In the next section, we will push the Docker image to DockerHub.
Pushing Docker image to DockerHub
Use the docker login command from the terminal to login to the DockerHub account of testUser.
Tag the image:
test@ubuntu:~/Downloads$ sudo docker tag 40ac0922ea5a testUser/my-app
Now use the docker push command using the same tag:
test@ubuntu:~/Downloads$ sudo docker push testUser/my-app
Using default tag: latest
The push refers to repository [docker.io/testUser/my-app]
7c25c686d66b: Pushed
eb6ee5b9581f: Mounted from library/openjdk
e3abdc2e9252: Mounted from library/openjdk
eafe6e032dbd: Mounted from library/openjdk
92a4e8a3140f: Mounted from library/openjdk
latest: digest: sha256:b77631855b956abe6011f9468cd8947708638cee63f2474fbbb95d7056ac0859 size: 1368
The job is done!
You have now learnt how to deploy a Java-based app on Docker. I do hope you found this tutorial informative and easy to follow.


