


Hyperledger Fabric is a blockchain framework used in production by companies like Walmart and Maersk. This tutorial will help you set up a complete Fabric network on a Windows 11 laptop using Docker and WSL 2.
Public blockchains like Bitcoin let anyone join them, and every transaction is visible to all. In a private blockchain, however, the identities of the people joining the network are known. Think of a public blockchain as an open park where anyone can walk in and see what’s happening. A private blockchain is more like a members-only club where only approved people can gain access. Unlike public chains, there is no mining, no cryptocurrency, and no anonymous participation in a private blockchain.
Most business use cases today require participants to identify and verify themselves. This is where Hyperledger Fabric proves useful. Maintained by the Linux Foundation, it uses smart contracts which are self-executing programs stored on the blockchain. These run automatically when certain conditions are met. They ensure quick and verified outcomes without a central authority.
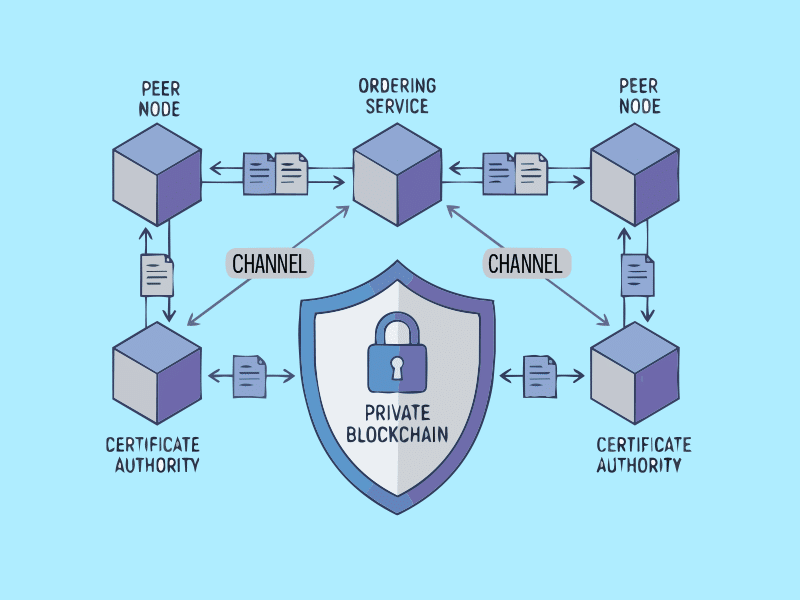
Every participant in this blockchain holds a cryptographic identity issued by a CA (Certificate Authority). Business logic runs inside containers called chaincode, which is Fabric’s version of smart contracts. Transactions go through an ordering service before being committed to the ledger, which is a record of all transaction logs.

Now let us build a private blockchain network using the official test network from the Fabric samples repository (https://github.com/hyperledger/fabric-samples). It runs eight Docker containers that simulate two peer organisations, an ordering service, and three Certificate Authorities all on one desktop.
Table 1 lists every container the test network brings up, its role, and the port it listens on.
Table 1: Hyperledger Fabric test-network components
| Container | Role | Image | Port |
| peer0.org1 | Endorses and commits transactions for Org1 |
hyperledger/ fabric-peer:2.5 |
7051 |
| peer0.org2 | Endorses and commits transactions for Org2 |
hyperledger/ fabric-peer:2.5 |
9051 |
| orderer | Orders transactions into blocks |
hyperledger/ fabric-orderer: 2.5 |
7050 |
| ca_org1 | Issues X.509 identities for Org1 |
hyperledger/ fabric-ca:1.5 |
7054 |
| ca_org2 | Issues X.509 identities for Org2 |
hyperledger/ fabric-ca:1.5 |
9054 |
| ca_orderer | Issues identity for the ordering service |
hyperledger/ fabric-ca:1.5 |
11054 |
| couchdb0 | State database for peer0.org1 |
couchdb:3.3.3 | 5984 |
| couchdb1 | State database for peer0.org2 |
couchdb:3.3.3 | 7984 |
When a transaction is initiated, it goes to both peer nodes for authorisation. Each peer runs the chaincode and signs the result. These signed approvals are then passed to the orderer, which lines transactions in sequence and bundles them together into blocks. The block is then sent back to all peers, and each one independently checks and commits it to its own ledger. This clean split between who authorises a transaction and who orders it is exactly what allows Fabric to scale smoothly without ever depending on a single point of failure.
The prerequisites for setting up this private blockchain network are:
- Windows 11 with WSL 2 enabled
- Docker Desktop 4.x or later — WSL 2 backend enabled
- A Linux distribution inside WSL 2 (Ubuntu or Debian recommended)
- curl and git (available by default in most Linux distros)
- ~2GB free for Docker image downloads
Setting up the environment
Step 1 — Enable WSL 2 and configure Docker Desktop:
Fabric’s shell scripts require a Linux environment. WSL 2 provides this on Windows. Open PowerShell as ‘Administrator’ and run the command below. Reboot when prompted.
wsl --install
Once rebooted, install Docker Desktop and open Settings. Under General, confirm that ‘Use the WSL 2-based engine’ is turned on. Then go to Resources > WSL Integration, toggle on your Linux distribution, and click Apply & Restart. Once done, open your Linux terminal and run docker ps — an empty container table with no errors confirms everything is working.
Step 2 — Download Hyperledger Fabric:
Fabric’s install script fetches the peer/orderer binaries, the sample chaincode, and all Docker images in one go:
cd ~
curl -sSLO https://raw.githubusercontent.com/hyperledger/
fabric/main/scripts/install-fabric.sh
chmod +x install-fabric.sh
./install-fabric.sh docker samples binary
This takes 10–20 minutes depending on connection speed. When done, a fabric-samples directory appears in the home folder with the binaries inside it.
All the scripts and commands used in this article are available at https://github.com/berlinflix/hyperledger-fabricexperiment.
Spinning up the network
All commands from here run inside the test-network directory:
cd ~/fabric-samples/test-network
./network.sh down # clear any leftover state
./network.sh up createChannel -c mychannel -ca
This generates cryptographic material for all identities, starts the eight containers, creates a channel named my channel, and joins both peers to it. When finished, the terminal prints:
Channel ‘mychannel’ joined.
Deploying the smart contract
The chaincode used here is asset-transfer-basic. It stores assets on the ledger with five fields — ID, colour, size, owner, and appraised value, and supports create, read, update, delete, transfer, and list operations.
Deploy the JavaScript version (no local Node.js needed — Fabric builds it inside a container):
./network.sh deployCC \
-ccn basic \
-ccp ../asset-transfer-basic/chaincode-javascript \
-ccl javascript
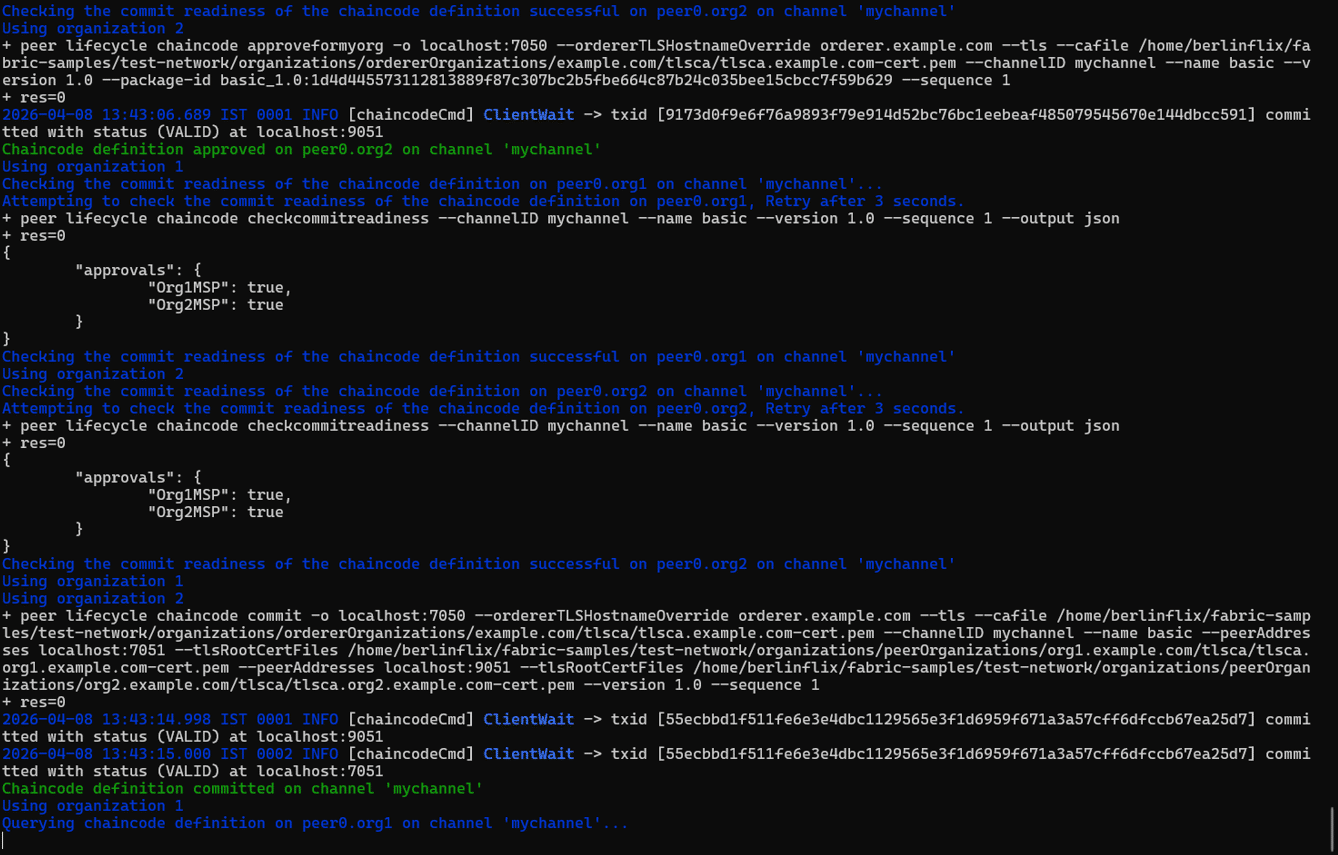
The process installs the package on both peers, collects approval from each organisation’s admin, and commits the definition to my channel. Successful output ends with:
Chaincode definition committed on channel ‘mychannel’
Accessing the environment
Before using the peer CLI directly, export the variables that tell it which node to talk to and which identity to use. Run these inside the WSL terminal from the test-network directory:
export PATH=”$HOME/bin:$HOME/fabric-samples/bin:$PATH”
export FABRIC_CFG_PATH=”$HOME/fabric-samples/config/”
export CORE_PEER_TLS_ENABLED=true
export CORE_PEER_LOCALMSPID=”Org1MSP”
export CORE_PEER_ADDRESS=localhost:7051
export CORE_PEER_TLS_ROOTCERT_FILE=$HOME/fabric-samples/testnetwork/
organizations/
peerOrganizations/org1.example.com/peers/peer0.org1.
example.com/tls/ca.crt
export CORE_PEER_MSPCONFIGPATH=$HOME/fabric-samples/testnetwork/
organizations/
peerOrganizations/org1.example.com/users/Admin@org1.
example.com/msp
ORDERER_CA=$HOME/fabric-samples/test-network/organizations/
ordererOrganizations/
example.com/orderers/orderer.example.com/msp/tlscacerts/
tlsca.example.com-cert.pem
ORG1_CA=$HOME/fabric-samples/test-network/organizations/
peerOrganizations/
org1.example.com/peers/peer0.org1.example.com/tls/ca.crt
ORG2_CA=$HOME/fabric-samples/test-network/organizations/
peerOrganizations/
org2.example.com/peers/peer0.org2.example.com/tls/ca.crt
| Note: hese variables configure the CLI as the Org1 Admin identity on peer0.org1 (port 7051). Every invoke passes both –peerAddresses flags so that Org1 and Org2 both endorse the transaction; this is required by the default endorsement policy. |
Running the experiments
Experiment 1 — Create an asset and verify it:
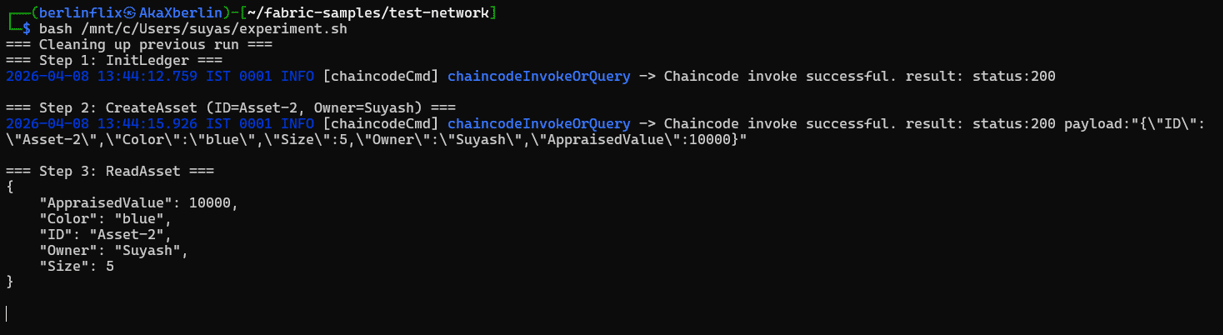
Initialise the ledger with six sample assets, and then create a custom one assigned to Suyash:
peer chaincode invoke -o localhost:7050 \
--ordererTLSHostnameOverride orderer.example.com --tls
--cafile $ORDERER_CA \
-C mychannel -n basic \
--peerAddresses localhost:7051 --tlsRootCertFiles $ORG1_CA
\
--peerAddresses localhost:9051 --tlsRootCertFiles $ORG2_CA
\
-c ‘{“function”:”InitLedger”,”Args”:[]}’
peer chaincode invoke -o localhost:7050 \
--ordererTLSHostnameOverride orderer.example.com --tls
--cafile $ORDERER_CA \
-C mychannel -n basic \
--peerAddresses localhost:7051 --tlsRootCertFiles $ORG1_CA
\
--peerAddresses localhost:9051 --tlsRootCertFiles $ORG2_CA
\
-c ‘{“function”:”CreateAsset”,”Args”:[“Asset-2”,”blue”,”5”,
”Suyash”,”10000”]}’
Wait a few seconds for the block to commit, and then query
the ledger:
peer chaincode query -C mychannel -n basic -c
‘{“Args”:[“ReadAsset”,”Asset-2”]}’
The ledger returns:
{
“AppraisedValue”: 10000,
“Color”: “blue”,
“ID”: “Asset-2”,
“Owner”: “Suyash”,
“Size”: 5
}
Experiment 2 — Transfer ownership and audit the ledger:
Transfer Asset-2 from Suyash to Arun:
peer chaincode invoke -o localhost:7050 \
--ordererTLSHostnameOverride orderer.example.com --tls
--cafile $ORDERER_CA \
-C mychannel -n basic \
--peerAddresses localhost:7051 --tlsRootCertFiles $ORG1_CA
\
--peerAddresses localhost:9051 --tlsRootCertFiles $ORG2_CA
\
-c ‘{“function”:”TransferAsset”,”Args”:[“Asset-2”,”Arun”]}’
Query the asset again to confirm:
peer chaincode query -C mychannel -n basic -c
‘{“Args”:[“ReadAsset”,”Asset-2”]}’
{
“AppraisedValue”: 10000,
“Color”: “blue”,
“ID”: “Asset-2”,
“Owner”: “Arun”,
“Size”: 5
}
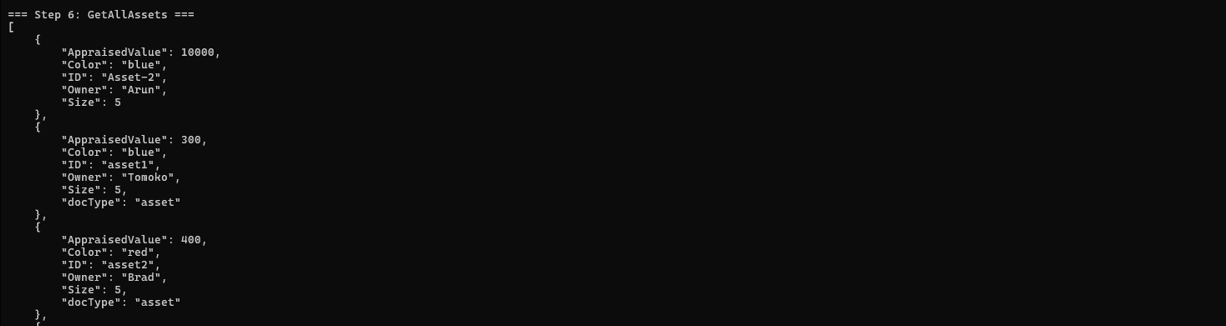
Finally, pull the entire ledger state to confirm Asset-2 appears alongside the six defaults:
peer chaincode query -C mychannel -n basic -c
‘{“Args”:[“GetAllAssets”]}’
The original state where Suyash owned the asset is not visible in the current state, but it is permanently recorded in the blockchain’s transaction history. No record can be altered without breaking every hash that follows it.
Now that we have gone through the main experiment, here are a few more things you can try with the same network and chain code still running.
Experiment 3 — Querying asset history:
The assettransfer- basic chaincode has a GetAssetHistory function. Unlike ReadAsset, which only shows you the current state, this one pulls up every recorded state of an asset from the beginning. For Asset-2, it will show two entries —when Suyash first created it and when it was transferred to Arun, each with a timestamp and transaction ID. Nothing can be removed or reordered. This is exactly what makes blockchain useful for audits and proving a chain of custody.

Experiment 4 — Updating an asset:
Update Asset lets you change any field of an existing asset — its colour, size, or appraised value — without touching the ID or owner. You could try changing the appraised value of Asset-2 from 10000 to 15000 and then querying it back to confirm. The old value does not disappear; it stays in the history. What this shows is that even a simple edit goes through the full endorsement-ordering-commit cycle, same as a transfer. Nothing skips the queue.
Experiment 5 — Rich query using CouchDB:
Because the test network runs CouchDB as the state database, you can query assets by their field values instead of just by ID. This is something you cannot do with the default LevelDB. For example, you could search for all assets where Owner equals Arun, or all assets with an appraised value above a certain number. In a real deployment, where the ledger has thousands of assets, this kind of query becomes very useful when a participant wants to see everything they own without needing to know each ID upfront.
To shut the network down, use the command:
./network.sh down
This stops all containers and removes the generated crypto material. Running network.sh up again regenerates everything from scratch.
This experiment covered the full lifecycle of a digital asset on a private blockchain network— setup, chaincode deployment, asset creation, ownership transfer, and ledger audit running entirely on a PC with Docker and WSL 2. The same Hyperledger Fabric framework, with the same endorsement-ordering-commit architecture, runs in production supply chains, trade finance systems, and healthcare data networks.
The test network makes it possible to understand exactly how those systems work without needing any enterprise infrastructure. The next step is to write custom chaincode and define your own data model and business rules, or connect a web application to the ledger using the Fabric Gateway SDK.


