
Digital forensics is now used extensively to recover and analyse the deleted and undeleted contents of digital media, including digital artefacts such as browser history, browser cache, images, email, document metadata, etc. These artefacts are generally created when using the digital media for various purposes like Internet browsing, instant messaging, etc.
After the successful recovery and analysis of contents belonging to a digital media, one can obtain evidence regarding incidents of cyber crime, cyber espionage and unethical/illegal activities of miscreants or disgruntled employees. The evidence can then be used to take legal action against the accused, and to adopt preventive measures.
Continuous developments in the field of digital forensics have already resulted in a number of toolkits released by many vendors, targeting various aspects of digital forensics. However, such toolkits are usually expensive, and are mostly procured by law-enforcement agencies and large private companies. Therefore, these are out of the reach of individuals and organisations with limited resources.
However, with the open source community catching up in this relatively new branch of forensics, there are quite a few open source tools available now, targeting various aspects of digital forensics. Also available are open source Live Linux distributions, such as Helix and BackTrack, which are specifically tailored for digital forensics.
Since BackTrack is already very popular for its comprehensive toolkit for security auditing, this article is an attempt to explore the forensics capabilities built into it. BackTrack, being a Live Linux distribution, is easy to use. One doesn’t need permanent installation; any machine can be booted using either a Live DVD or Live USB version of BackTrack. An introductory article, including installation options and general usage, was published in October 2010.
The latest version, BackTrack 4, includes a new boot menu titled “Start BackTrack Forensics”. This boot menu will start BackTrack in a forensically clean mode, which will not alter the digital data in any manner. This means that the special mode will not automatically mount available drives (thereby avoiding altering the last-mount times of drives).
Also, this mode will not use any of the available swap partitions on the hard drive, to avoid altering the data stored in the swap partitions. This can be verified by taking an MD5 snapshot of the drive both before and after using BackTrack in a forensically clean mode, and then comparing both MD5 sums for equality. However, various forensic tools are available in both, the default mode, which is not forensically clean, and the special forensically clean mode just described.
BackTrack Desktop provides easy navigation to various forensics tools by clicking BackTrack –> Digital Forensics on the system menu (Figure 1).

A digital forensic investigation generally consists of four major steps (Figure 2):
- Data acquisition/data preservation;
- Data recovery;
- Analysis of data for evidence;
- Reporting of the digital evidence found.

The various forensic tools available under BackTrack are also categorised on the basis of these steps. Listed below are these categories, along with details of some useful tools.
Image-acquiring tools
These tools are aimed at taking an exact replica/image (bit-by-bit) of the digital media identified for forensic investigation, without altering the content of the media at all. All methods of forensic analysis aimed at finding digital evidence are then performed on this replica.
Acquiring an image of the suspected media helps analyse the media on a high-end workstation, which can fulfil the resource requirements of extensive forensic analysis tools. Also, working with an image keeps the original media undisturbed and unaltered by any of the analysis activity. Here is a list of some of the important image-acquiring tools available in BackTrack.
dd
dd is the popular Linux command-line utility for taking images of digital media, such as a hard drive, CD-ROM drive, USB drive, etc., or a particular partition of the media. Images created using dd-like utilities are called raw images, as these are bit-by-bit copies of the source media, without any additions or deletions. The basic usage for dd is:
dd if=<media/partition on a media> of=<image_file>
Examples include:
dd   if=/dev/sdc    of=image.dd
dd   if=/dev/sdc1  of=image1.dd
The first example takes the image of the whole disk (sdc), including the boot record and partition table. The second takes the image of a particular partition (sdc1) of the disk (sdc). A partition image can be mounted via the loop device.
Also, instead of storing the image contents in a file, you can pipe the data to a host on the network by using tools such as nc; this is useful when you have space constraints for the image file. For example:
dd if=/dev/sdc | nc 192.168.0.2 6000
In this example, the contents of the image file are sent via TCP port 6000 to the host 192.168.0.2, where you can run nc in listening mode as nc -l 6000 > image.dd to store the received image contents in the file image.dd.
However, dd has limitations in cases where the media to be imaged has errors in the form of bad sectors. Thus, a more advanced version of dd, named dd_rescue, is available in BackTrack to image a drive that’s suspected to have one or more bad sectors.
dd_rescue
dd_rescue is intended specifically for imaging potentially failing media. It switches to a smaller block size (essentially the hardware sector size, most often 512 bytes) when it encounters errors on a drive, and then skips the error-prone sectors, so that it gets as much of the drive as is possible.
dd_rescue will not abort on errors unless one specifies a number of errors (using the -e option) after which to abort. Also, dd_rescue can start from the end of the disk/partition and move backwards. Finally, with dd_rescue, you can optionally write a log file, which can provide useful information about the location of bad sectors. The basic usage of dd_rescue is shown below:
dd_rescue <input file> <out file>
For example:
dd_rescue /dev/sdc image.ddrescue
dcfldd
dcfldd is an enhanced version of dd with the following useful additional features for forensics:
- On-the-fly hashing of the transmitted data
- Progress updation for the user
- Splitting of output in multiple files
- Simultaneous output to multiple files at the same time
- Wiping the disk with a known pattern
- Image verification for verifying an image against the original source/pattern
Basic usage for dcfldd is dcfldd <options> if=<input media> of=<image_file>, where <input media> specifies the input media and <image_file> specifies the image file, or the prefix for multiple image files.
Some of the useful options are:
split=<bytes>— Specifies the size of each of the output image files.vf=<file>— Specifies the image file that needs to be verified against the input.splitformat=<text>— Specifies the format for multiple image files when using splitting.hash=<names>— Specifies one or more (a comma-separated list) of hash algorithms, such as md5, sha1, etc.hashwindow=<bytes>— Specifies the number of bytes of input media for calculation of hash.<hash algorithm>log=<file>— Specifies output files for hash calculations of a particular hash algorithm.conv=<keywords>— Specifies conversions of input media according to a comma-separated list of keywords, such asnoerror(continue after read errors),ucase(change lower to upper case), etc.hashconv=before|after— Specifies the hash calculation before or after the specified conversion options.bs=<block size>— Specifies the input and output block size.
For example:
dcfldd if=/dev/hdc hash=md5 hashwindow=10G md5log=md5.txt hashconv=after bs=512 conv=noerror,sync split=10G splitformat=aa of=image.dd
In this example, 10 gigabytes will be read from the input drive and written to the file image.dd.aa. Then it will read the next 10 gigabytes and write it to file image.dd.ab. Also, an MD5 hash of every 10-gigabyte chunk on the input drive will be stored in the file called md5.txt. The block size is set to 512 bytes, and in the event of read errors, dcfldd will write zeros to the output and continue reading.
Aimage
Aimage is an advanced forensics format (AFF) imaging tool with intelligent error recovery, compression and verification. AFF is an extensible open format for the storage of disk images and related forensic meta-data. The ability to store relevant metadata, such as the serial number of the drive, date of imaging, etc., inside the image itself, is a huge advantage, and is not possible with raw imaging tools such as dd.
Many popular forensics tools such as Sleuthkit and Autopsy have support for analysing images stored in AFF format.
AFF is a segmented archive file specification (Figure 3) where each file consists of an AFF file header followed by one or more file segments, and ends with a special directory segment that lists all the segments of the file, and their offset from the file’s start.
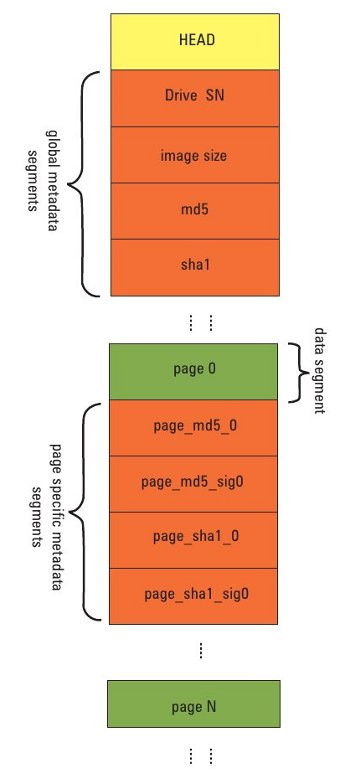
These segments are used to store all information, including the image itself, and image metadata, inside the AFF file. Further, each AFF segment consists of a header, variable-length segment name, a 32-bit flag, variable-length data payload and segment footer (Figure 4).
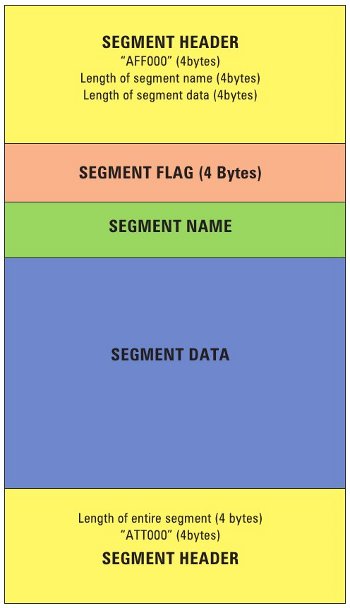
The length of the entire segment is stored in the header and footer, for rapid bidirectional seeking through an AFF image file. Segments can be between 32 bytes and 2^32-1 bytes long. There can be metadata segments, which are used to hold information about the disk image, and data segments called “pages”, which are used to hold the image disk information itself.
Some of the default metadata segments that are created by the Aimage utility and are included in the AFF image file are:
acquisition_date— Holds the date and time of imaging.pagesize— Holds the size of an uncompressed data segment, viz., a page (default 16 MB, same for all pages).imagesize— size (in bytes) of the complete image (64-bit value).image_gid— globally unique identifier that is different for every run of Aimageacquisition_device— The device used as the source for imaging.badsectors— Total number of 512-byte bad sectors in the image (32-bit value).badflag— Pattern for bad sectors in the data segment(s).dir— AFF directory segment.
AFF file data segments (pages) can be compressed with the open source utility zlib, or can be left uncompressed. The segment flag of a data segment carries information about whether the data is compressed or not. Compressed AFF files consume less space, but are slower to create and access.
The basic usage of Aimage is aimage <options> <input> <outfile>, where <input> is the input media (a drive/partition on a drive/data coming in on a TCP port) to be imaged; <outfile> is the output file; <options> is a list of options.
Some of the important options are:
--quiet,-q— No interactive statistics.--no_dmesg,-D— Do not put thedmesgoutput into the AFF output file.--no_compress,-x— Do not compress (useful for slow machines).-skip=<nn>[s],-k <nn>[s]— Skipnnbytes from start of input media. Use the suffixsto specify sectors instead of bytes.-X<n>— Level of compression (<n>can range from 1 to 9).--error=0,-e0— Standard error recovery.--error=1,-e1— Stop reading at first error.-z— Overwrite an already existing.affoutput file.-s <name>=<value>— Create segment<name>with value. (The option can be repeated.)-L— Use LZMA compression.-S <nn>,--image_pagesize=<nn>— Specify the AFF file page size as<nn>, with optional suffix ofb,k,morgto reflect bytes, kilobytes, megabytes or gigabytes.
Example: To create the AFF image file image.aff of the drive /dev/sd0 with an additional metadata segment with the name case_number and value abcd, invoke Aimage as follows:
aimage /dev/sd0 image.aff -s case_number=abcd
Aimage also offers a real-time display to show the current status of imaging, as shown in Figure 5.

Afconvert
Afconvert allows converting of raw (bit-by-bit copy) forensic disk images (made using dd-like tools or ISO images) into AFF format images, and vice-versa. By default, Afconvert uses gzip/bzip compression. However, LZMA is an alternative compression algorithm available, using the -L option, for better compression rates.
Basic usage for Afconvert is afconvert <options> <input raw image>, where <input raw image> is the raw image to be converted into AFF image file and <options> is a list of options. Some of the useful options are:
--no_compress,-x— Do not compress (useful for slow machines).-X<n>— Level of compression (<n>can range from 1 to 9).-z— Overwrite an already existing.affoutput file.-s <name>=<value>— Create segment<name>with value. (The option can be repeated.)-o <outfile>— To specify the output file.-S <nn>,--image_pagesize=<nn>— Specify the AFF file page size as<nn>, which can be suffixed withb,k,morgto reflect bytes, kilobytes, etc.-r— To produce a raw image file from an AFF image file.-e <ext>— To specify the extension of the output file. If the output file is not specified, the name of the output file is<input raw image name>.aff
Example: To create an AFF image file from the raw image usb.dd, using the LZMA compression algorithm, run the following command:
afconvert -z -L usb.dd
The output AFF file after completion of conversion will be named usb.aff.
To create a raw ISO image from the AFF image file usb.aff, run:
afconvert -e iso -r usb.aff
After completion of conversion, the output file will be usb.iso.
Afinfo
Afinfo is a command-line utility that prints information about AFF image files. Basic usage is afinfo <options> <AFF file name>. Some of the useful options are:
-a— Print all segments; by default, data segments are skipped.-s <segment>— Print information about<segment>; can be repeated.-m— Validate MD5 sum of entire image.-S— Validate SHA1 sum of entire image.-p— Validate the hash of each page (if present).
Example: Invoking the Afinfo utility for the AFF file /tmp/image.aff prints the output shown in Figure 6. Information about data segments is skipped by default.

Afcat
Afcat is a command-line utility that prints the various contents of an AFF image file. Basic usage is afcat <options> <AFF file name>. Some of the useful options are:
-p <nnn>— Output data of page number<nnn>.-S <nnn>— Output data of sector<nnn>(sector size 512 bytes).-l— Output all segment names.-L— Output all segment names, arg and segment length.
Example: Invoking Afcat on the AFF file /tmp/image.aff with the -L option prints an output as shown in Figure 7.

AIR Imager
AIR (Automated Image and Restore) Imager is a GUI front-end for dd/dcfldd, as shown in Figure 8.
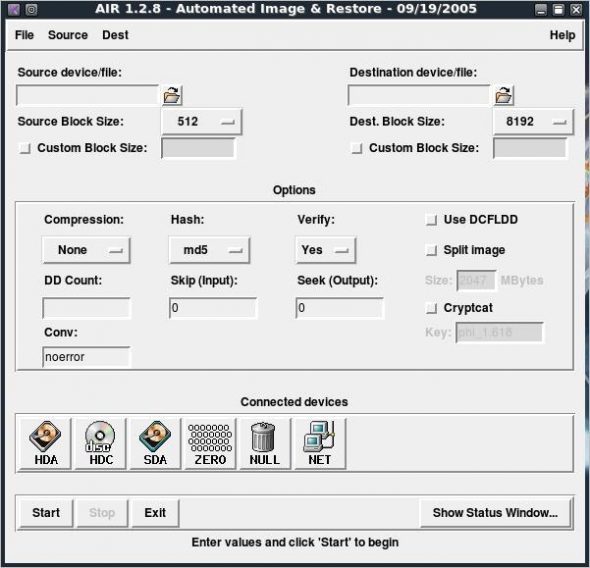
It has been designed to easily create forensic images or restore images on drives. It offers the following features:
- Use of either
ddordcfldd. - Auto-detection of IDE and SCSI drives, CD-ROMs and tape drives.
- Image compression via gzip/bzip2.
- Image verification via MD5 or SHA1.
- Imaging over a TCP/IP network.
- Splitting images into multiple files.
- Write zeros to a drive/partition.
- Creating a large image file filled with zeros.
- Customisation of source and destination devices/files.
- Skipping of certain bytes of source and destination devices/files.
Image acquisition is one of the most important and primary tasks for any forensic investigation. Thus, it should be done carefully, and with the right set of tools — otherwise one can end up damaging the original source media. We have seen many open source tools for imaging, each one having its own advantages and disadvantages. Trying any of these will give you experience with imaging various digital media.
After data acquisition and imaging comes the data recovery and forensic analysis of the forensic image files, to find digital evidence. We will learn about these two phases and the associated open source tools available in BackTrack, in the next article. I hope you have enjoyed your foray into digital forensic analysis.
References
- The Advanced Forensic Format 1.0
- Forensics Wiki
- A Paper on AFF [PDF]
- A Paper on “Open Source Digital Forensics Tools” [PDF]





















Nice article. Looking forward for the part -2.
This is one of the more complete article on backtrack, security and forensic i’ve saw around.
And this is just part 1.
Really nice !
Nice article. Waiting for more….
This is gonna be so cool!
[…] The open source world has many such utilities (and distros). Here, I must mention BackTrack Linux, which has gained international fame for its wide range of vulnerability assessment […]
[…] attempts. The open source world has many such utilities (and distros). Here, I must mention BackTrack Linux, which has gained international fame for its wide range of vulnerability assessment and digital […]
Really nice, congratulations!