


Glassfish is a free and open source application server rolled out by Sun Microsystems for the Java EE platform, and is now sponsored by the Oracle Corporation. Using Glassfish, one can create enterprise applications that are both portable and scalable. This article continues from where the earlier write-up An Introduction to Glassfish: The Enterprise Application Server left off.
Before proceeding with the installation, let us ensure that we are equipped with the following prerequisites:
1. Two servers are prepared with OS RHEL6.1. The hostname and IP address used are:
First node GF-Node01 192.168.10.10
Second node GF-Node02 192.168.10.11
2. Each servers /etc/hosts configuration file should contain the details of both the servers. It should look as shown below:
#cat /etc/hosts

127.0.0.1 localhost localhost.localdomain localhost4 localhost4.localdomain4
::1 localhost localhost.localdomain localhost6 localhost6.localdomain6
192.168.10.10 GF-Node01.rsys.org GF-Node01
192.168.10.11 GF-Node02.rsys.org GF-Node02
3. Set the IP address as follows:
[System -> Preferences -> Network Connection]
4. Turn off the firewall as follows:
[System -> Administration -> Firewall]
5. SElinux setting can stay in its default Enforcing mode [Command to verify getenforce; SElinux Configuration File /etc/sysconfig/selinux]
6. Installation of Java: [jdk-1_5_0_20-linux-i586.rpm]
7. Glassfish application: [glassfish-installer-v2.1.1-b31g-linux.jar]
Installations of Java and Glassfish have been covered in my previous article. So, without wasting any time lets proceed. Here, Glassfish is installed in /appinstall/glassfish.
Re-installing Glassfish Application Server
In case you want to re-install Glassfish, delete the glassfish directory from where it is installed [in our case /appinstall/glassfish]. The reference command is # rm rf /appinstall/glassfish
Browse to the directory in which you want to install Glassfish and then execute the following command:
# java -Xmx256m -jar /opt/Setup/glassfish-installer-v2.1.1-b31g-linux.jar
Note: The Glassfish setup is kept in /opt/Setup
Building a cluster over a standalone Glassfish application server
There may be a situation in which you already have Glassfish installed and built as a standalone application server. In such a scenario, DO NOT uninstall, but follow the procedure below which will help you to build Glassfish as a cluster over the standalone build.
Consider this to be the First Node:
GF-Node01 192.168.10.10
The added directories under /appinstall/glassfish, after building a standalone application server are:
- bin
- config
- domains
Delete the above mentioned directories. The reference command is # rm rf bin/ config/ domains/
Set Executable Permission to lib/ant/bin modules under the glassfish directory.
The reference command is # chmod -R +x lib/ant/bin/ . Ideally, it will be set since the server was previously built as a standalone application server.
Using the ant executable (located under /appinstall/glassfish/lib/ant/bin), run setup-cluster.xml (located under /appinstall/glassfish) to build a Glassfish cluster.
The reference command is # lib/ant/bin/ant -f setup-cluster.xml
As mentioned in my last article, under the Glassfish directory, there are two Glassfish setup xml files:
a. setup.xml: For building a standalone Glassfish environment.
b. setup-cluster.xml: For building a clustered Glassfish environment.
We know the build has been successful when we see the message BUILD SUCCESSFUL Total time: XX seconds followed by a return of the root prompt.
Note down the following port numbers which will be required later:
Admin Console 4848
HTTP Instance 8080
JMS 7676
IIOP 3700
HTTP_SSL 8181
IIOP_SSL 3820
IIOP_MUTUALAUTH 3920
JMX_ADMIN 8686
As observed, the deleted directories, bin/, config/ and domains/, are recreated after a successful build. Verify if the build Glassfish application server supports clusters.
The reference command is:
# cd /appinstall/glassfish/bin
# ./asadmin
The build Glassfish application server supports clusters if the default domain domain1 starts successfully with the following message:
asadmin> start-domain
..
Domain supports application server clusters and other standalone instances.
asadmin>
Note: The default credentials for Glassfish Administrative Console are:
Username: admin
Password: adminadmin
Cluster configuration on GF-NODE 01
Before proceeding, just ensure that the domain is running.
There are three major components in creating a cluster:
Creating a node agent for both nodes.
Creating a cluster that will be common for both nodes – GF-Node01 and GF-Node02.
Creating instances for both nodes.
Create the node agent GF-Agent01 for the first node GF-Node01 as follows:
asadmin> create-node-agent --host GF-Node01 --port 4848 GF-Agent01
Please enter the admin user name>admin
Please enter the admin password>adminadmin
Command create-node-agent executed successfully.
asadmin>
Create the cluster GF-Cluster thats common for both nodes GF-Node01 and GF-Node02 as follows:
asadmin> create-cluster --host GF-Node01 --port 4848 GF-Cluster
Please enter the admin user name>admin
Please enter the admin password>adminadmin
Command create-cluster executed successfully.
asadmin>

Now create the instance 'GF-Instance01' for the first node 'GF-Node01':
asadmin> create-instance --host GF-Node01 --port 4848 --nodeagent GF-Agent01 --cluster GF-Cluster GF-Instance01
Please enter the admin user name>admin
Please enter the admin password>adminadmin
Command create-instance executed successfully.
asadmin>
Start the node agent and instances for the first node GF-Node01:
asadmin> start-node-agent --syncinstances=true GF-Agent01

Please enter the admin user name>admin
Please enter the admin password>adminadmin
Please enter the master password [Enter to accept the default]:>
Redirecting output to /appinstall/glassfish/nodeagents/GF-Agent01/agent/logs/server.log
Redirecting application output to /appinstall/glassfish/nodeagents/GF-Agent01/agent/logs/server.log
Redirecting output to /appinstall/glassfish/nodeagents/GF-Agent01/GF-Instance01/logs/server.log
Command start-node-agent executed successfully.

asadmin>
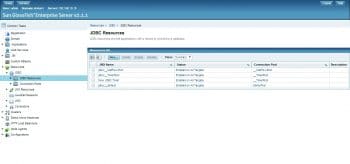
Making changes in JDBC resources
Now log in to the Glassfish administrative console
http://GF-Node01:4848 or http://192.168.10.10:4848
The hostname works if DNS is configured in your environment or the host file is configured on both the server and the client.
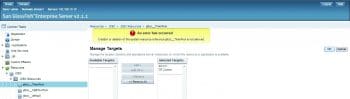
Browse to Resources > JDBC > JDBC Resources > jdbc/__TimerPool
On the right hand side, click on the Manage Target tab.
Add GF-Cluster (the cluster created above) from Available Targets to Selected Targets. On clicking OK, we encounter the error that is indicated in Figure 1.
In order to resolve the issue, create a new JDBC resource with the following details:
JNDI Name New JDBC timer [this name can be anything of your choice]
Pool Name _TimerPool [select from the drop-down menu]
Status Enabled Add GF-Cluster from Available Targets to Selected Targets.
The JDBC resource New JDBC Timer has been created successfully.
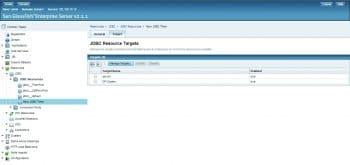
Browse to Resources > JDBC > JDBC Resources> New JDBC Timer and click on the Target tab. The GFCluster should be added and enabled. Refer to Figure 2 and Figure 3.
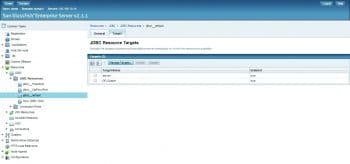
Next, browse to Resources > JDBC > JDBC Resources> jdbc/__CallFlowPool . GF-Cluster should already be added and enabled under the Target tab. Refer to Figure 4.

Now browse to Resources > JDBC > JDBC Resources > jdbc/__default.
Under the Target tab, add the cluster GF-Cluster from Available Targets to Selected Targets. As observed, the added cluster GF-Cluster was not enabled [False]; it is now enabled [True]. Refer to Figure 5.
Once all the changes have been made under JDBC resources, we need to restart Nodeagent, Instance and domain.
#cd /appinstall/glassfish/bin
#./asadmin
Stop the node agent and instance on the first node GFNode01 as follows:
asadmin> stop-node-agent --stopinstances=true GF-Agent01
Command stop-node-agent executed successfully.
asadmin>
Stop the domain on the first node GF-Node01 as follows:
asadmin> stop-domain
Domain domain1 stopped.
asadmin>
Start the domain on the first node GF-Node01as follows:
asadmin> start-domain .. .. Domain supports application server clusters and other standalone instances. asadmin>
Start the node agent and instance on the first node GF-Node01as follows:
asadmin> start-node-agent --syncinstances=true GF-Agent01

Please enter the admin user name>admin
Please enter the admin password>adminadmin
Please enter the master password [Enter to accept the default]:>
Redirecting output to /appinstall/glassfish/nodeagents/GF-Agent01/agent/logs/server.log
Redirecting application output to /appinstall/glassfish/nodeagents/GF-Agent01/agent/logs/server.log
Redirecting output to /appinstall/glassfish/nodeagents/GF-Agent01/GF-Instance01/logs/server.log
Command start-node-agent executed successfully.

asadmin>
The cluster configuration on GF-Node02 is as follows:
Hostname GF-Node02
GF-Node02 192.168.10.11
To summarise, you need to take the following steps:
1. Follow the pre-requisites section
2. Install Java: jdk-1_5_0_20-linux-i586.rpm
3. Install Glassfish: glassfish-installer-v2.1.1-b31g-linux.jar
4. Set the recursive executable permission to the lib/ant/bin directory under glassfish.
The reference command is: # chmod -R +x lib/ant/bin/
5. Build Glassfish to support the application cluster.
The reference command is: # lib/ant/bin/ant -f setup-cluster.xml
Once completed, DO NOT start the default domain domain1 on this Node GF-Node02; check with the reference command given below:
#cd /appinstall/glassfish/bin #./asadmin asadmin>stop-domain The domain (domain1) isnt running. asadmin>
Create the node agent GF-Agent02 on the second node GF-Node02 referring to the first node GF-Node01, as follows:
asadmin>create-node-agent --host GF-Node01 --port 4848 GF-Agent02

Please enter the admin user name>admin
Please enter the admin password>adminadmin
Command create-node-agent executed successfully.

asadmin>
Create the instance GF-Instance02 on the second node GF-Node02 referring to the first node GF-Node01, as follows:
asadmin>create-instance --host GF-Node01 --port 4848 --nodeagent GF-Agent02 --cluster GF-Cluster GF-Instance02

Please enter the admin user name>admin
Please enter the admin password>adminadmin
Command create-instance executed successfully.

asadmin>
Now start the node agent and instances for the second node GF-Node02:
asadmin> start-node-agent --syncinstances=true GF-Agent02

Please enter the admin user name>admin
Please enter the admin password>adminadmin
Please enter the master password [Enter to accept the default]:>
Redirecting output to /appinstall/glassfish/nodeagents/GF-Agent02/agent/logs/server.log
Redirecting application output to /appinstall/glassfish/nodeagents/GF-Agent02/agent/logs/server.log
Redirecting output to /appinstall/glassfish/nodeagents/GF-Agent02/GF-Instance02/logs/server.log
Command start-node-agent executed successfully.

asadmin>
Note:
a. While creating a node agent and an instance on the second node GF-Node02, the cluster mentioned is GF-Cluster which was earlier created in GF-Node01.
b. The admin user name and password used above are that of the first node GF-Node01.
Verifying the cluster configuration
Login to admin console – http://<IP Address or FQDN>:4848
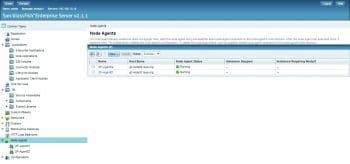
Note: Turn off the firewall of the Linux server or allow the required port numbers, without which the admin console will not be accessible. Both node agents and the cluster is up and running (see Figure 6 and Figure 7).

Deploying a sample Web application on a clustered environment
Download a sample WAR file to test. In our case, it is hello.war. Log in to the Glassfish admin console. Go to Application -> Web Applications. Click on Deploy. Keeping the default selection, choose the file hello.war. Add GF-Cluster from Available Targets to Selected Targets. Click OK.
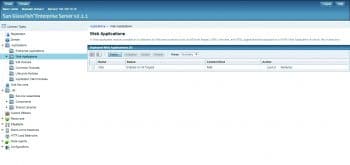
The Web application hello.war has now been deployed successfully (Figure 8).
Click on Launch under Action. The links given below will be displayed for the hello application:
- http://GF-Node01.rsys.org:8080/hello
- https://GF-Node01.rsys.org:8181/hello
- http://gf-node01.rsys.org:38080/hello
- https://gf-node01.rsys.org:38181/hello
- http://gf-node02.rsys.org:38080/hello
- https://gf-node02.rsys.org:38181/hello
As observed, the Web application deployed from the admin console of GF-Node01 can be accessible from both the nodes (GF-Node01 and GF-Node02).
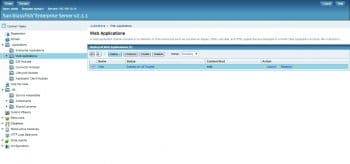
How to undeploy a Web application on a clustered environment
Under Application -> Web Application, check the WAR file. The Undeploy button will be enabled (Figure 9), so click on it. The Web Application undeploys successfully.


Hi
How to configure Load balance in glassfish Cluster via apache mod-jk. If any document available kindly share me.