


Firebase is a platform backed by Google for building, growing and deploying web apps, mobile apps and games. This article illustrates developing a complete single-page web application on Firebase using its services, namely, FireStore, authentication and hosting. The readers can follow the steps given here and develop a web application with ease.
This article will handhold you to develop a simple web application to maintain a journal of events.
Requirements
To start with, let us specify a clear requirement. Requirement specification is one of the most important aspects of the development process. Here is the list of requirements.
- The journal should be accessible only via login.
- The login credentials are predefined by the system administrator, and consist of email and password.
- A logged-in user should be able to add a new entry into the journal.
- A logged-in user should be able to view the entries in the journal.
- A logged-in user should be able to sort the entries chronologically.
- Each entry must auto-fill the details like date of entry and author.
Architecture
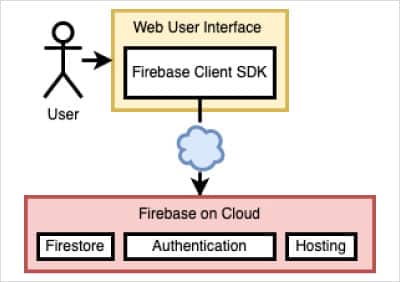
The application is designed around the Firebase cloud platform. The platform offers services, scale, SDKs, tools and well-maintained documentation. The following services are used for this application.
- FireStore: The real-time database service for storing the journal entries.
- Hosting: The service to host the web application.
- Authentication: The service to offer login-based access to the application.
- Firebase SDK: The NPM module that offers commands and communication API. The JS client uses this API to interact with the FireStore and authentication services at runtime.
The architecture is depicted in Figure 1.
So what do you need to get started with building the application? Here is the list of basic prerequisites.
- An account with Google (like a Gmail account)
- Node 10+ distribution on the development machine
- An IDE like Visual Studio Code
- A web browser
Procedure
The following sections give the step-by-step procedure to be followed to configure Firebase, and develop and deploy the application.
- Create the project
Visit https://firebase.google.com/ and sign in using your Gmail account. It opens the Firebase console to add or create a new project. We used glarimy-firebase as the name for the project. You may or may not select Google Analytics in the project creation wizard. The Project Review page opens up once the project is created successfully. This page lists various services and tools available in different categories. Expand the Build category on the left pane of the overview page to locate Authentication, Firestore Database and Hosting services that we intend to use. - Set up the database
We intend to use Firestore Database to store the journal entries. Note that Firestore is a NoSQL database. It organises the data into collections of documents. Once the database is enabled, you can start creating collections.
Click on the Firestore Database under the Build category. It opens the Cloud Firestore page. Create a new database by clicking on the Create Database button. Choose Start in Production Mode and also choose an appropriate Cloud Firestore location. We chose asia-south1. With this the database is ready.
Now, create a collection with the name journal-entries. Create a dummy document with an auto-generated ID along with the structure, as shown in Figure 2. The document consists of three fields, namely, author (string), date (number to store the time in UNIX epoch format) and description (string).
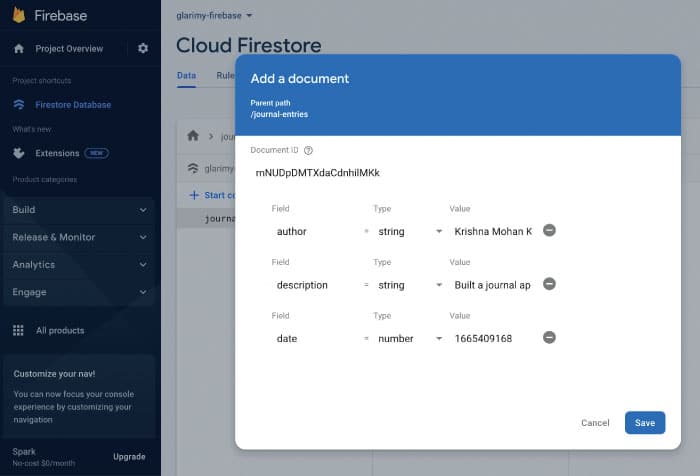
All the journal entries will be stored in this journal-entries collection at runtime.
3. Set up authentication
We intend to control access to the application via a login. For that, we need to configure authentication.
Click on Authentication under the Build category of the Project Review pane. It opens the Authentication page. Click on Get Started. Choose and enable email/password as the sign-in provider. In other words, users must provide an email-id and password to sign in to the web app.
We want to restrict the app to a few predefined users. So, add new users under the User tab, as shown in Figure 3. We want only the users in this list to be able to sign in to the application.
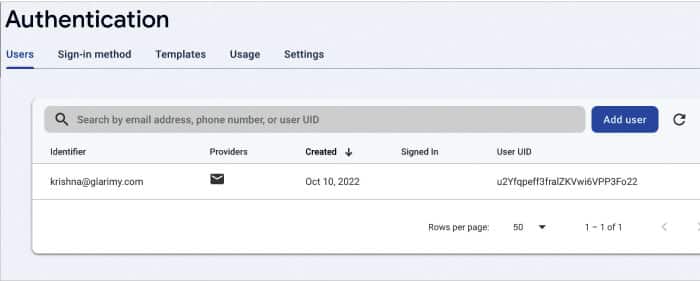
Do not worry about the privacy of the passwords. Once the admin enters the details, no one (including the admin) can view the password again in a readable format.
4. Develop the client
Click on Hosting under the Build category of the Project Review pane. It opens the Hosting page. Click on Get Started. The wizard looks as shown in Figure 4. Follow the instructions to install Firebase SDK on your machine and develop the client application.
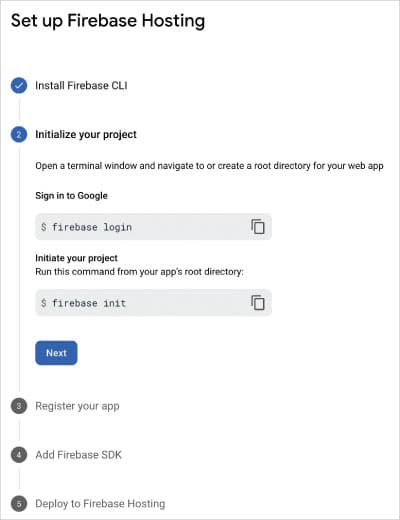
At Step 4 of the wizard, make a note of the generated firebaseConfig. In our case, it looks somewhat like the following:
const firebaseConfig = {
    apiKey: “AIzaSyXXXXXXXXXXXXXXwwvZgtbrnLiqKFPE”,
    authDomain: “glarimy-firebase.firebaseapp.com”,
    projectId: “glarimy-firebase”,
    storageBucket: “glarimy-firebase.appspot.com”,
    messagingSenderId: “7822123479139”,
    appId: “1:782281879139:web:aad87vdvcdeee3914d256”,
    measurementId: “G-F86URYCS0X”
};
By now, you will have a project folder created on your development machine with various folders and files generated. Locate the folder named public in the project folder. We can develop the client application in this folder. The application consists of four important kinds of files like in any other web client: 1) The HTML files, 2) The CSS files, 3) The JS script files, 4) Other assets like images, etc.
Here is the public/index.html file for the application:
<!DOCTYPE html>
<html>

<head>
  <meta charset=”utf-8”>
  <meta name=”viewport” content=”width=device-width, initial-scale=1”>
  <title>Glarimy Journal</title>
  <link rel=”stylesheet” href=’./styles.css’>
  <script defer src=”/__/firebase/8.4.1/firebase-app.js”></script>
  <script defer src=”/__/firebase/8.4.1/firebase-auth.js”></script>
  <script defer src=”/__/firebase/8.4.1/firebase-database.js”></script>
  <script defer src=”/__/firebase/8.4.1/firebase-firestore.js”></script>
  <script defer src=”/__/firebase/8.4.1/firebase-messaging.js”></script>
  <script defer src=”/__/firebase/8.4.1/firebase-storage.js”></script>
  <script src=’./index.js’></script>
</head>

<body>
  <div id=’top’>
    <h1>Our Story</h1>
    <div id=’current’></div>
    <div id=’nav’>
      <button id=’new’> New</button>
      <button id=’refresh’>Refresh</button>
      <button id=’latest’> Latest</button>
      <button id=’oldest’> Oldest</button>
    </div>
  </div>
  <div id=’auth’>
    <h2>Login Required</h2>
    <div><input type=’text’ placeholder=”email” id=’email’ /></div>
    <div><input type=’password’ placeholder=”password” id=’password’ /></div>
    <div>
      <input type=’submit’ value=’Login’ id=’login’ />
      <input type=’reset’ value=’Cancel’ id=’resent’ />
    </div>
  </div>

  <div id=’form’>
    <h2>Record Your Story</h2>
    <input type=’date’ id=’date’>
    <div>
      <textarea id=’description’></textarea>
    </div>
    <button id=’submit’>Record</button>
  </div>

  <div id=’journal’></div>
</body>

</html>
Observe that the above HTML file is referring to a file named index.js in the same folder. The index.js file consists of all the logic. It uses the Firebase SDK extensively. Note that this is the file that also consists of the firebaseConfig. Here is the code:
const firebaseConfig = {
    apiKey: “AIzaSyXXXXXXXXXXXXXXwwvZgtbrnLiqKFPE”,
    authDomain: “glarimy-firebase.firebaseapp.com”,
    projectId: “glarimy-firebase”,
    storageBucket: “glarimy-firebase.appspot.com”,
    messagingSenderId: “7822123479139”,
    appId: “1:782281879139:web:aad87vdvcdeee3914d256”,
    measurementId: “G-F86URYCS0X”
};
var db = undefined;
var user = undefined;

async function login(email, password) {
    await firebase.auth().signInWithEmailAndPassword(email, password);
    user = firebase.auth().currentUser;
}

function activate() {
    document.querySelector(‘#date’).valueAsDate = new Date();
    document.querySelector(‘#login’).addEventListener(‘click’, async function () {
        let email = document.querySelector(‘#email’).value;
        let password = document.querySelector(‘#password’).value;
        await login(email, password);
        await fetch(‘desc’);
        document.querySelector(‘#current’).innerHTML = user.email;
        document.querySelector(‘#email’).value = “”;
        document.querySelector(‘#password’).value = “”;
        document.querySelector(‘#auth’).style.display = ‘none’;
        document.querySelector(‘#nav’).style.display = ‘block’;
        document.querySelector(‘#journal’).style.display = ‘block’;
    });
    document.querySelector(‘#submit’).addEventListener(‘click’, async function () {
        let date = document.querySelector(‘#date’).value;
        let description = document.querySelector(‘#description’).value;
        if(description.trim().length == 0)
            return;
        if (new Date(date).getTime() > new Date().getTime())
            return;
        await db.collection(“journal-entries”).add({
            “description”: description,
            “author”: user.email,
            “date”: new Date(date).getTime()
        });
        document.querySelector(‘#date’).valueAsDate = new Date();
        document.querySelector(‘#description’).value = “”;
        await fetch(‘desc’);
        document.querySelector(‘#journal’).style.display = ‘block’;
        document.querySelector(‘#form’).style.display = ‘none’;

    });

    document.querySelector(‘#new’).addEventListener(‘click’, async function () {
        document.querySelector(‘#journal’).style.display = ‘none’;
        document.querySelector(‘#form’).style.display = ‘block’;
    });

    document.querySelector(‘#refresh’).addEventListener(‘click’, async function () {
        await fetch(‘desc’);
        document.querySelector(‘#journal’).style.display = ‘block’;
        document.querySelector(‘#form’).style.display = ‘none’;
    });

    document.querySelector(‘#latest’).addEventListener(‘click’, async function () {
        await fetch(‘desc’);
        document.querySelector(‘#journal’).style.display = ‘block’;
        document.querySelector(‘#form’).style.display = ‘none’;
    });

    document.querySelector(‘#oldest’).addEventListener(‘click’, async function () {
        await fetch(‘asc’);
        document.querySelector(‘#journal’).style.display = ‘block’;
        document.querySelector(‘#form’).style.display = ‘none’;
    });
}

async function fetch(order) {
    let entries = await db.collection(“journal-entries”).orderBy(‘date’, order).get();
    document.querySelector(‘#journal’).innerHTML = “”;
    entries.forEach((entry) => {
        let record = entry.data();

        let doe = document.createElement(“div”);
        let date = new Date(record.date);
        doe.innerHTML = `📅 ${date.getDate()} ${date.toLocaleString(‘default’, { month: ‘long’ })} ${date.getFullYear()} ${date.toLocaleDateString(‘default’, { weekday: ‘long’ })}`
        doe.classList = [‘date’];

        let description = document.createElement(“div”);
        description.innerHTML = record.description;
        description.classList = [‘description’]

        let author = document.createElement(“div”);
        author.innerHTML = `✍ ${record.author}`;
        author.classList = [‘author’]

        let div = document.createElement(“div”);
        div.id = entry.id;
        div.classList = [‘entry’];
        div.appendChild(doe);
        div.appendChild(description);
        div.appendChild(author);

        document.querySelector(‘#journal’).appendChild(div);
    });
}

window.addEventListener(‘load’, async function () {
    firebase.initializeApp(firebaseConfig);
    db = firebase.firestore();
    activate();
});
We also need to develop the stylesheet named public/styles.css which is being referenced in the HTML file. Refer to the repository specified towards the end of the article to find the stylesheet.
5. Deploy the web app
Once the application code is ready, deploy the application by running the following command from the root directory of the application on the development machine:
firebase deploy
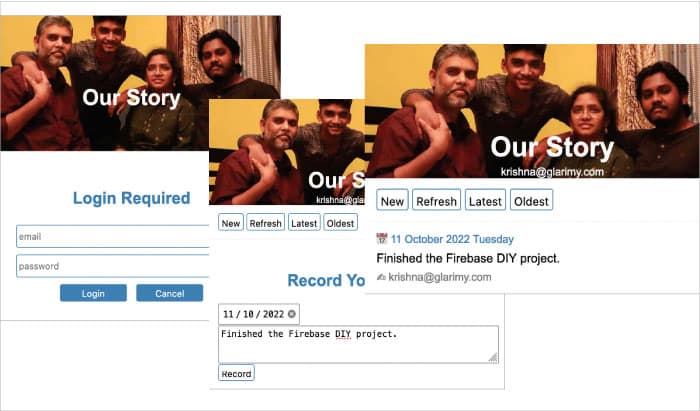
It provides the URL at which the application is ready. Access the URL from the browser, and login with one of the user credentials that are configured to use the application. Figure 5 depicts the user interface.
It provides the URL at which the application is ready. Access the URL from the browser, and login with one of the user credentials that are configured to use the application. Figure 5 depicts the user interface.
You can improve this application with the following additional features:
- Add authentication via sign-in providers like Google, GitHub, Yahoo, Facebook, Twitter, etc.
- Add a feature to edit the journal entries.
- Add a feature to upload images also along with the journal entries.
- Add a feature to add tags to the entries and search based on the tags.
- Add a feature to export the journal entries into XML, JSON and PDF formats.
- Redevelop the client using Typescript/React/Angular instead of basic JavaScript.
I do hope this article will help you understand the concepts and get started with the development of a single-page web application on Firebase.


